How to use Ownbit MultiSig?
This article describes how to use Ownbit to manage MultiSig assets. This article takes 2-3 MultiSig as an example to explain. The three asset signers are: user1, user2 and user3.
Important reminder: MultiSig is a way for multiple people to jointly manage assets. Taking 2-3 MultiSig as an example, assets can be spent when 2 signatures are reached. If this requirement cannot be met for any reason, the assets will be permanently unavailable. Often the parties involved are team members, company colleagues, family members or friends. If you manage assets with strangers, please be careful not to be deceived!
Content
2. TRC20 MultiSig (explained by USDT-TRC20 MultiSig)
3. ETH/ERC20 MultiSig, BSC/BEP20 MultiSig (explained by USDT-BEP20 MultiSig)
4. BTC MultiSig (LTC, DOGE, etc.)
6. Self-service recovery of MultiSig assets
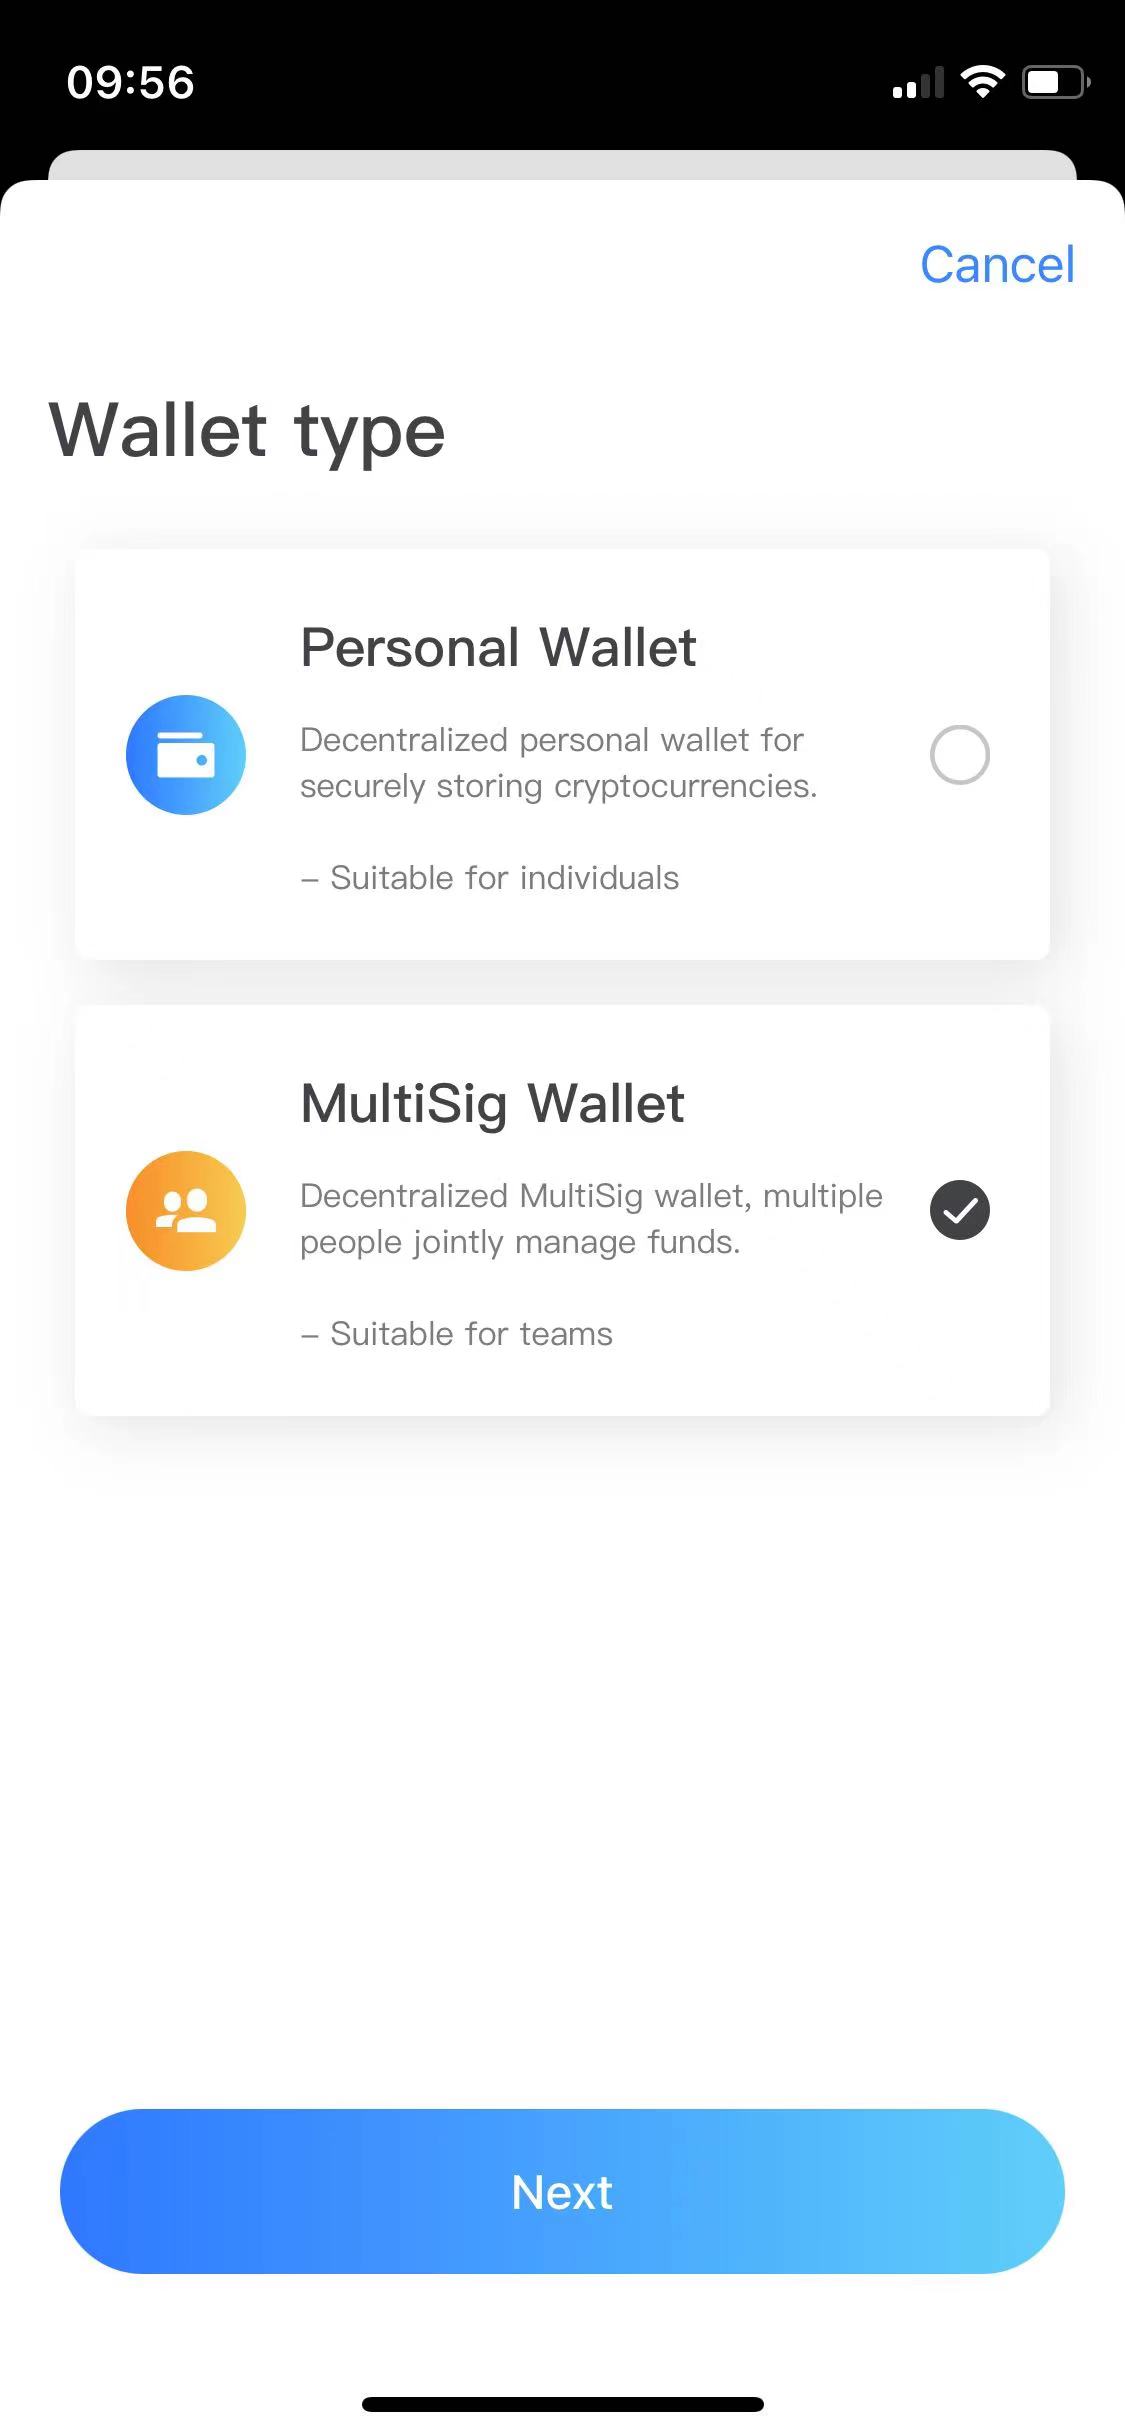
1. Create a MultiSig wallet
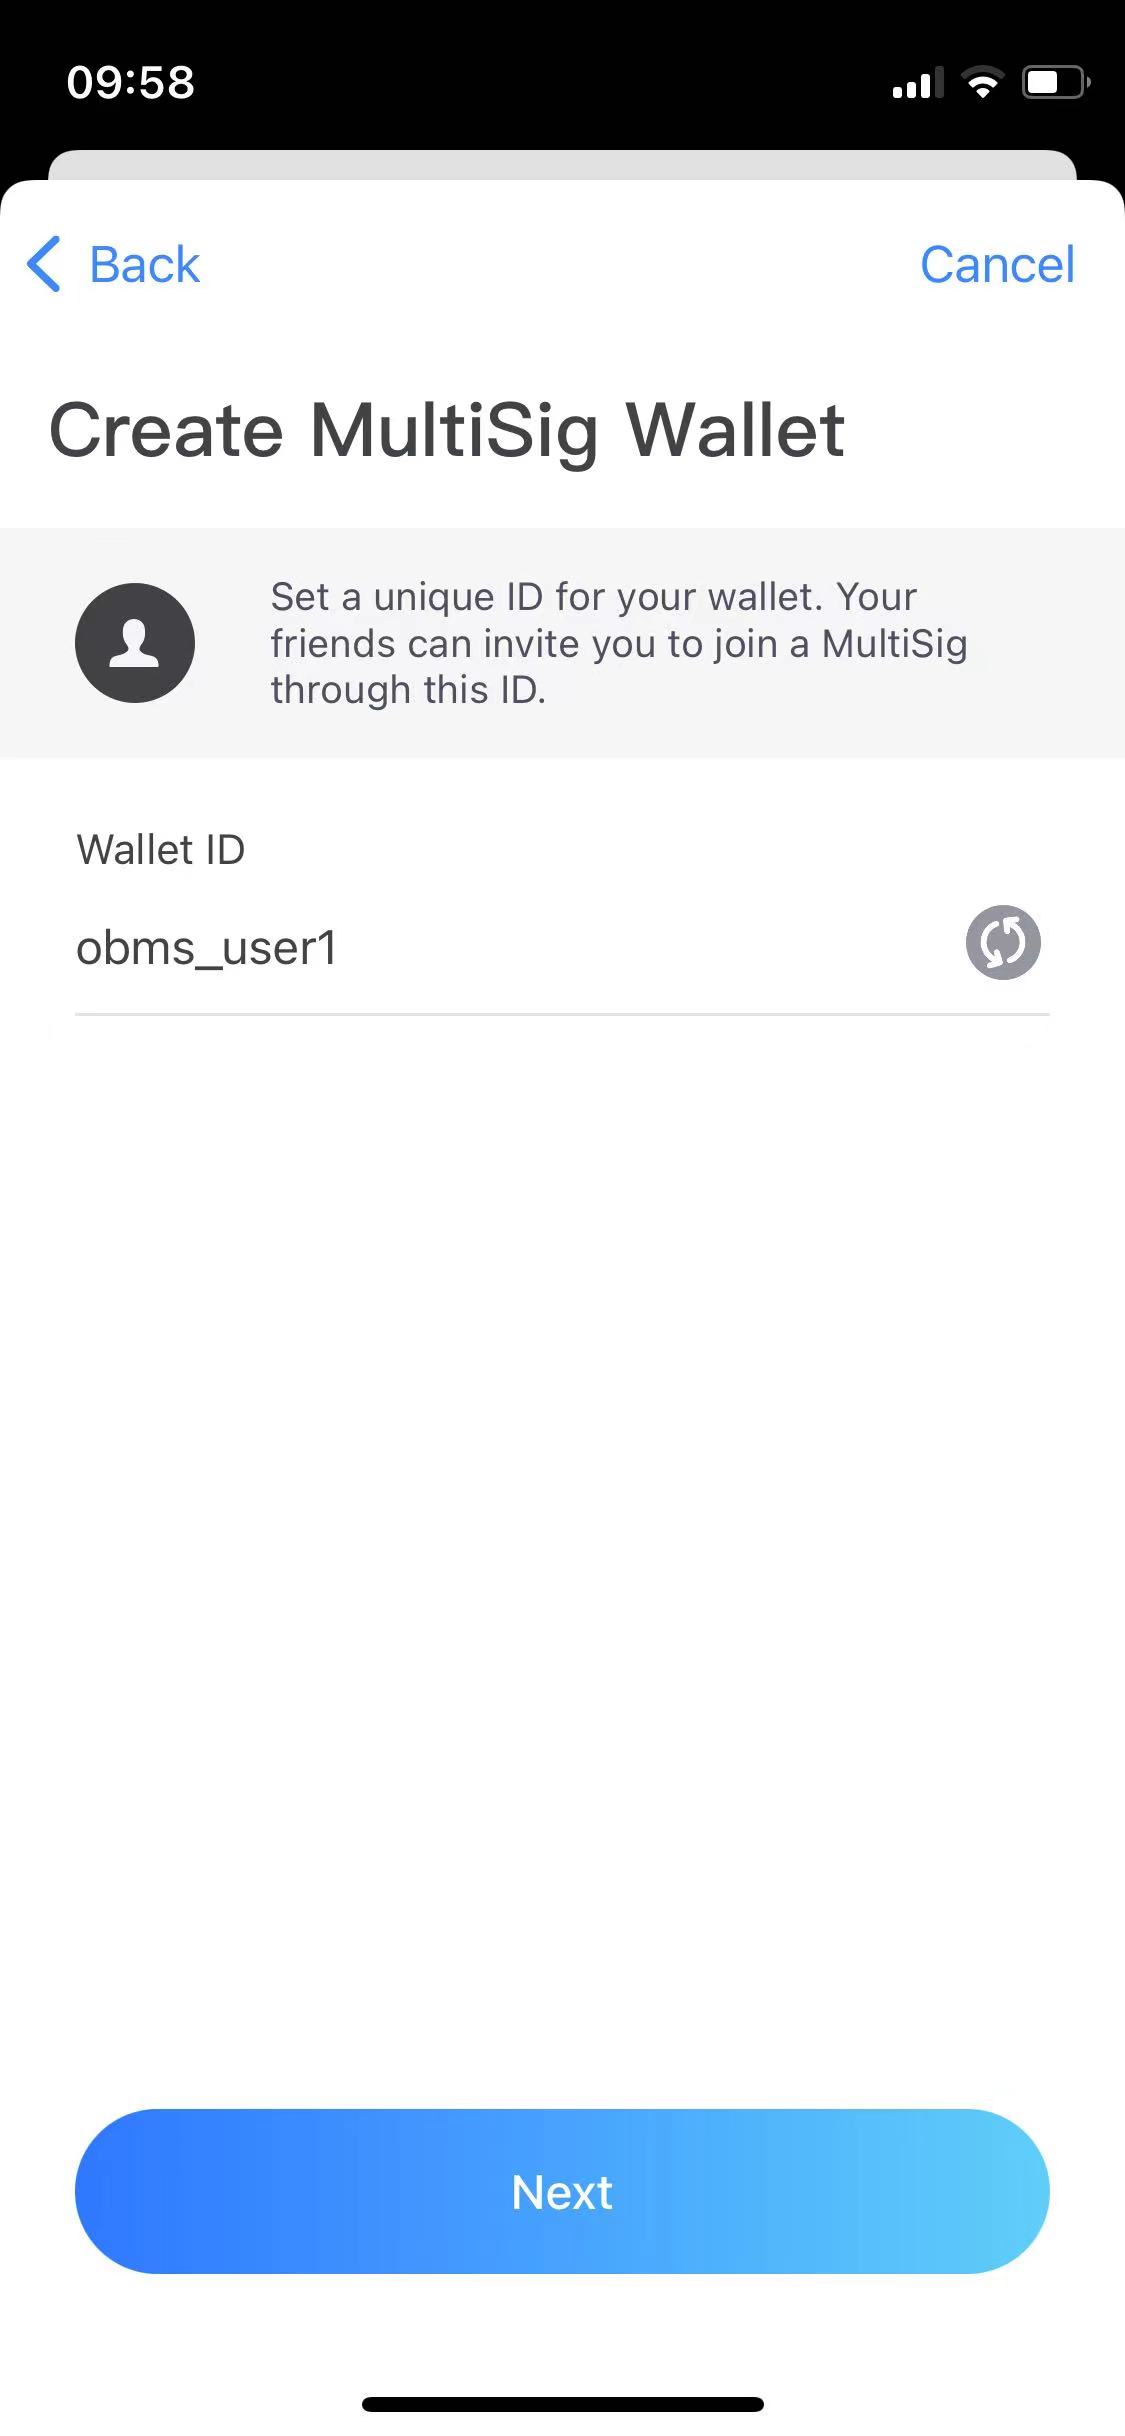
The three co-players download and install the Ownbit wallet respectively, and create their own MultiSig wallets. The following example shows the MultiSig wallet obms_user1 created by user1. Wallet home page: Create wallet -> Select MultiSig wallet:
Enter the wallet ID, eg enter: obms_user1.
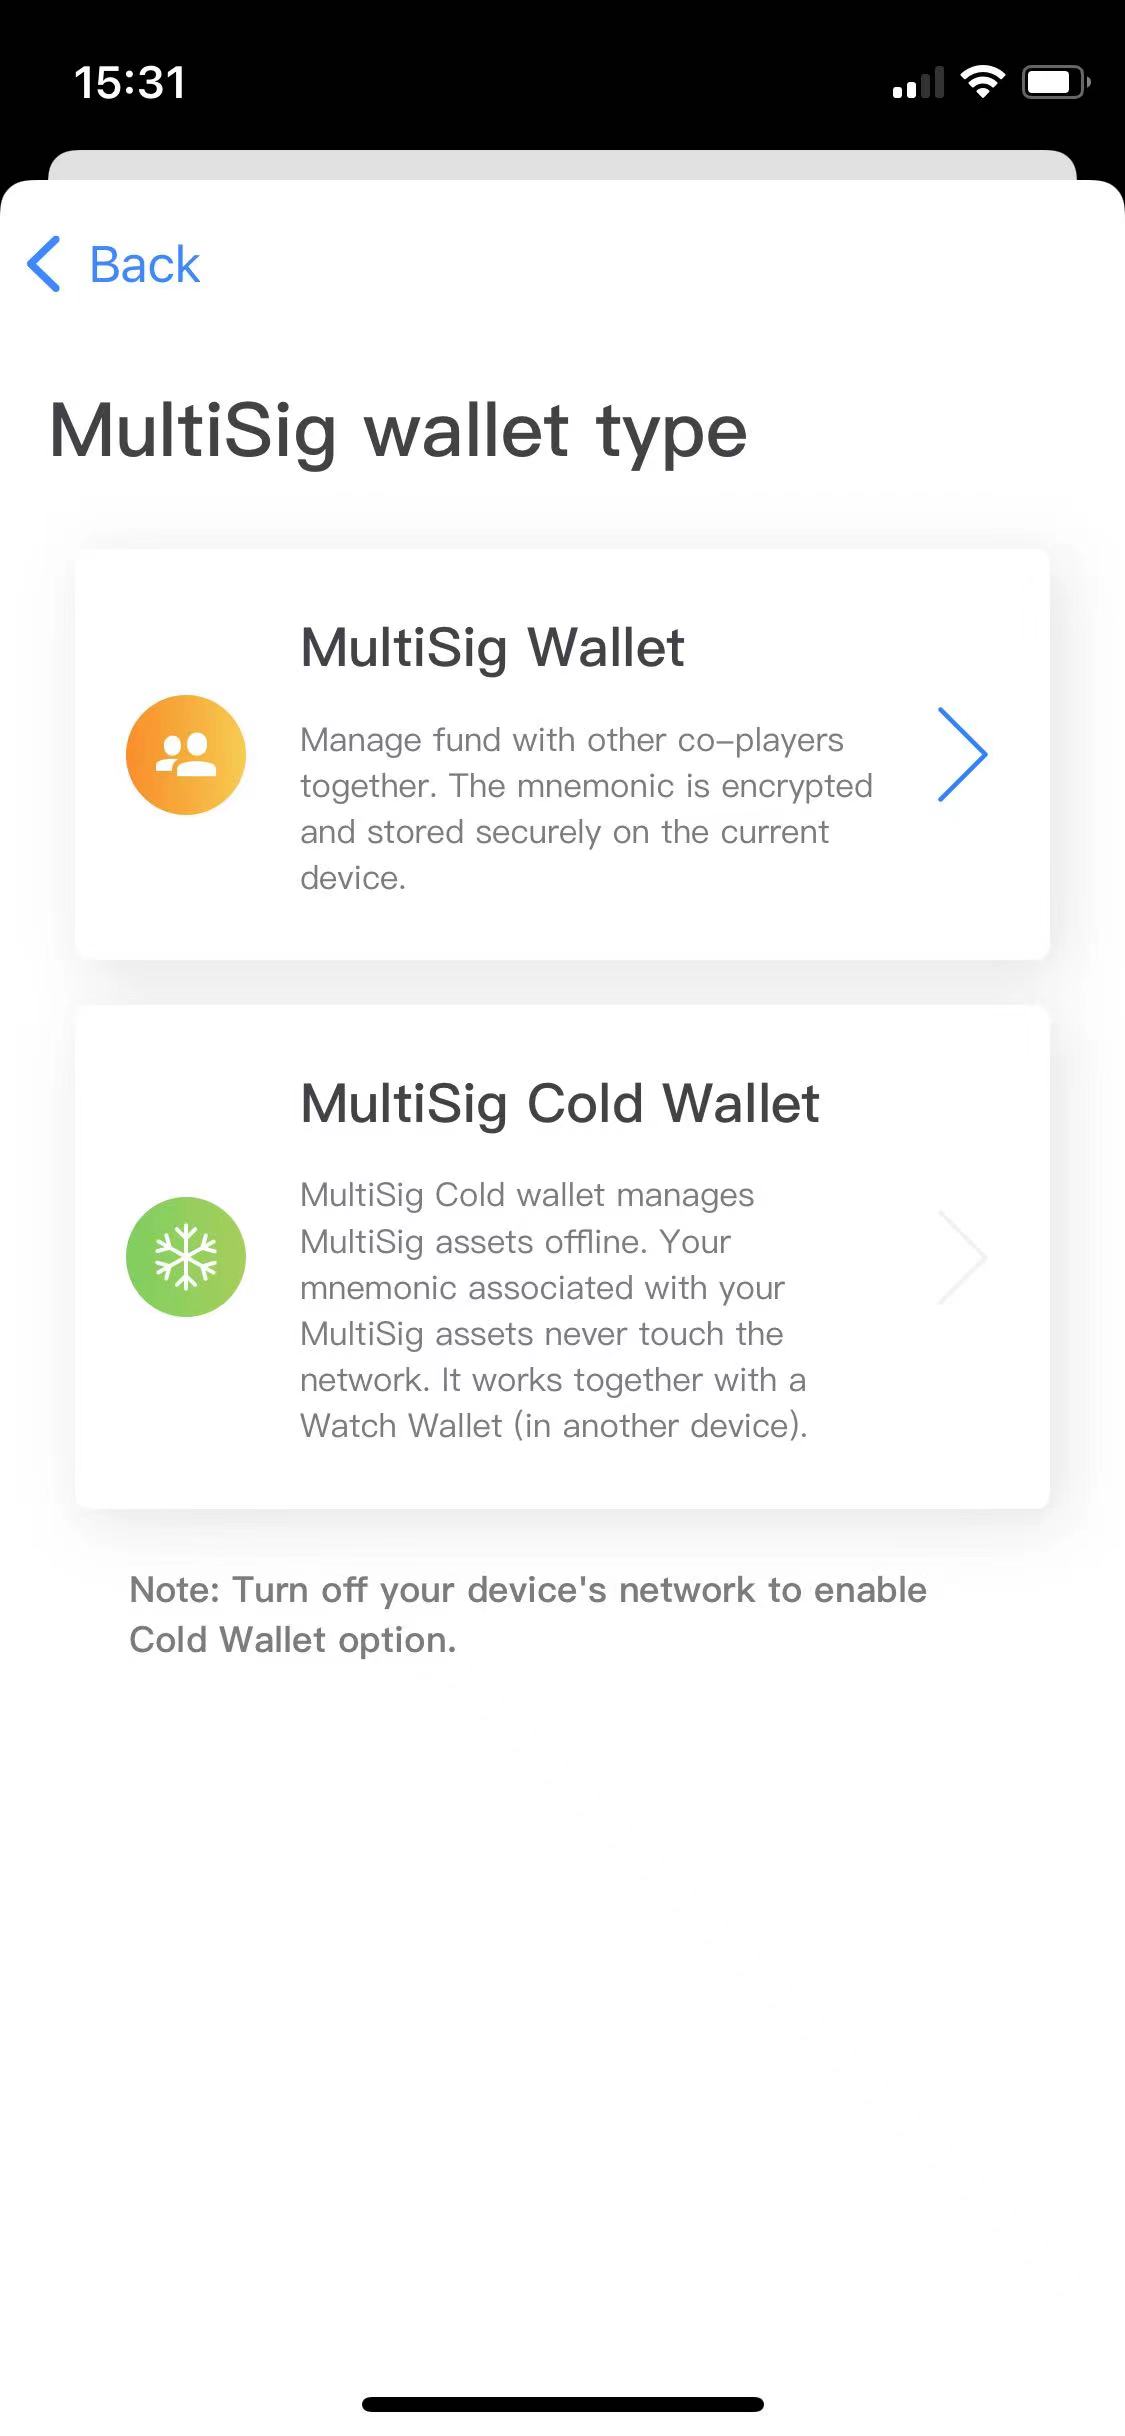
Then choose whether to create a MultiSig Cold Wallet. The mnemonic of the Cold Wallet is stored offline, so the assets are more secure. To use Ownbit Cold Wallet, you need two mobile phones, one of which is permanently offline (not connected to the Internet or in airplane mode) as a Cold Wallet. The other mobile phone is connected to the Internet normally, as a Watch Wallet. Watch Wallets work with Cold Wallets when sending transactions.
How to choose? In general, Ownbit online wallets are also quite safe. If you store a large amount of assets and conditions permit (there are two mobile phones), it is recommended to use the Cold Wallet/Watch Wallet mode to make the assets more (absolutely) safe.
After the creation is complete (please safely back up the mnemonic phrase), you can enter the MultiSig wallet homepage, as shown below.

2. TRC20 MultiSig (explained by USDT-TRC20 MultiSig)
Click the + sign on the MultiSig wallet page to enter the MultiSig creation process page, fill in the MultiSig name, as shown below:

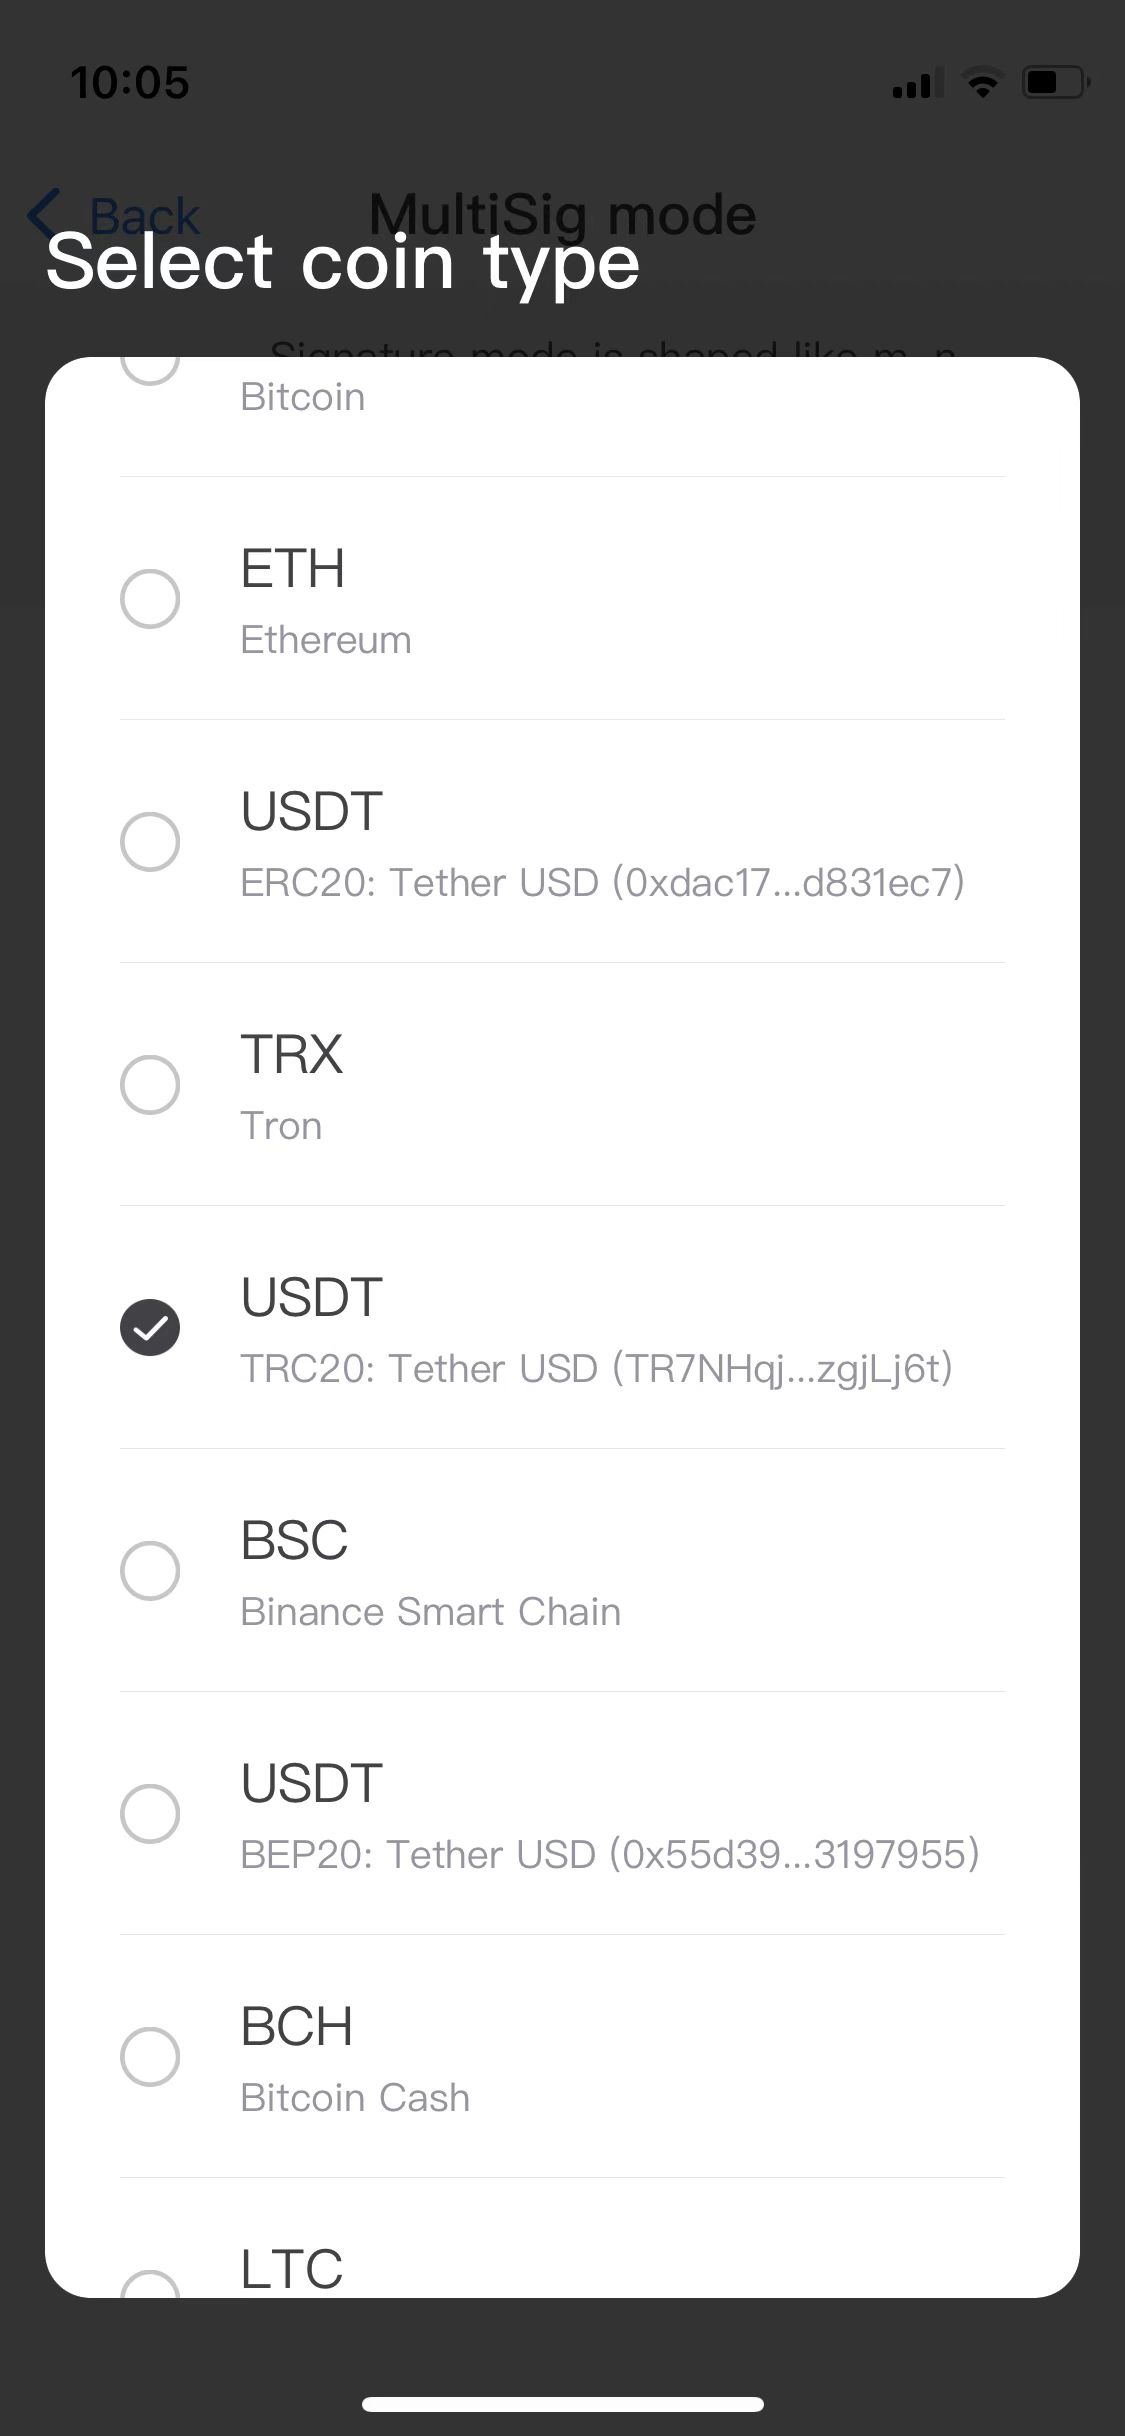
Select USDT-TRC20 (Note: The latest version no longer has a separate USDT-TRC20 option. TRC20 always selects the coin type: Tron.) as the coin type, and select the corresponding signature mode (this article uses the 2-3 mode as an example to explain, that is, there are 3 participants, and the assets can be spent with 2 signatures), as shown below:
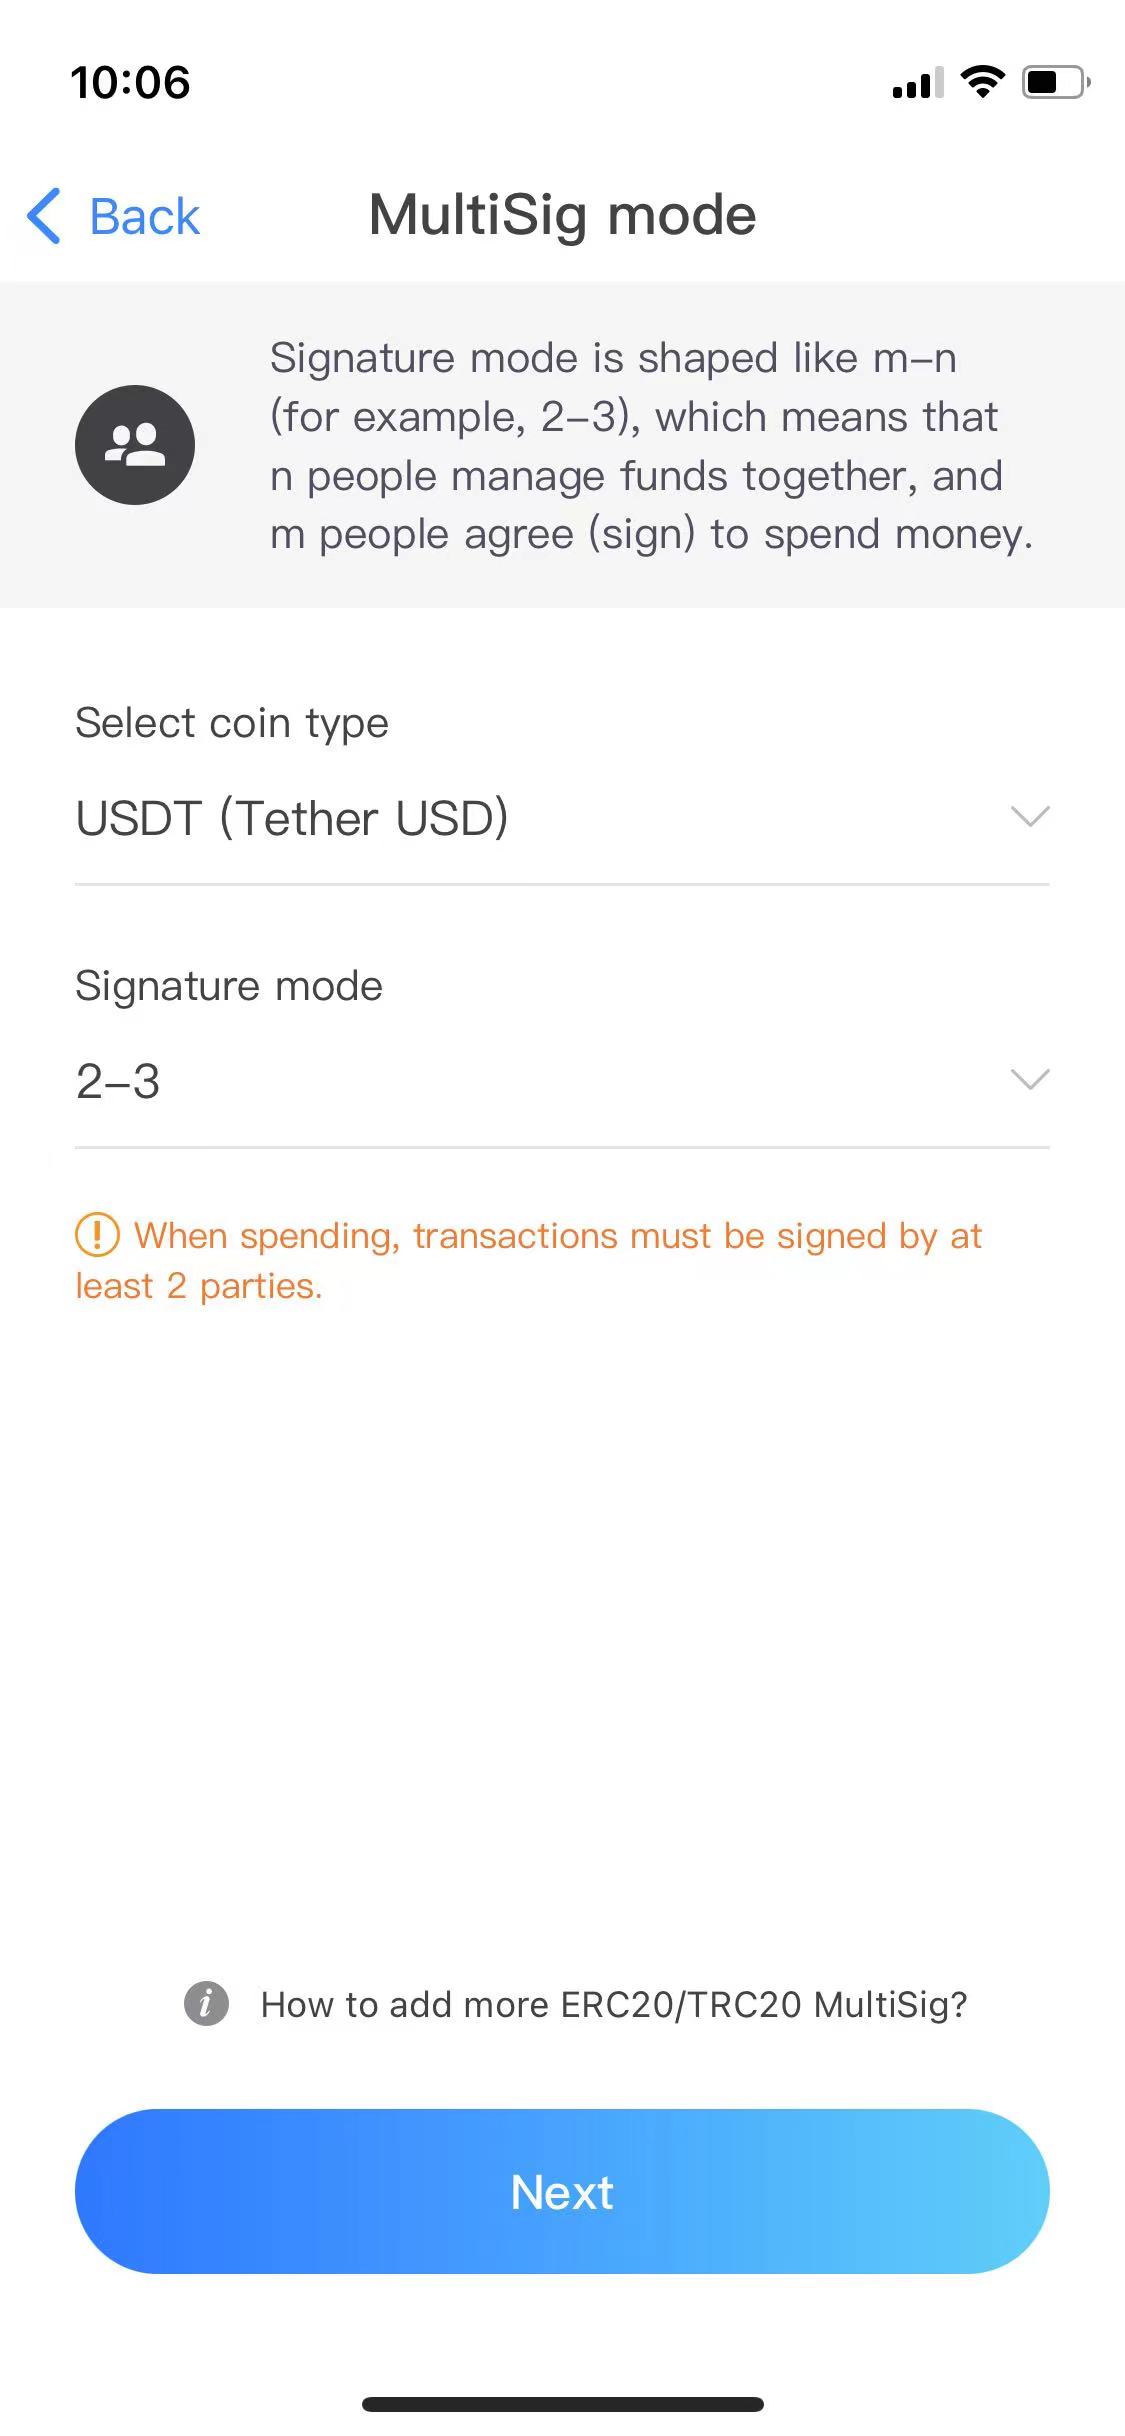
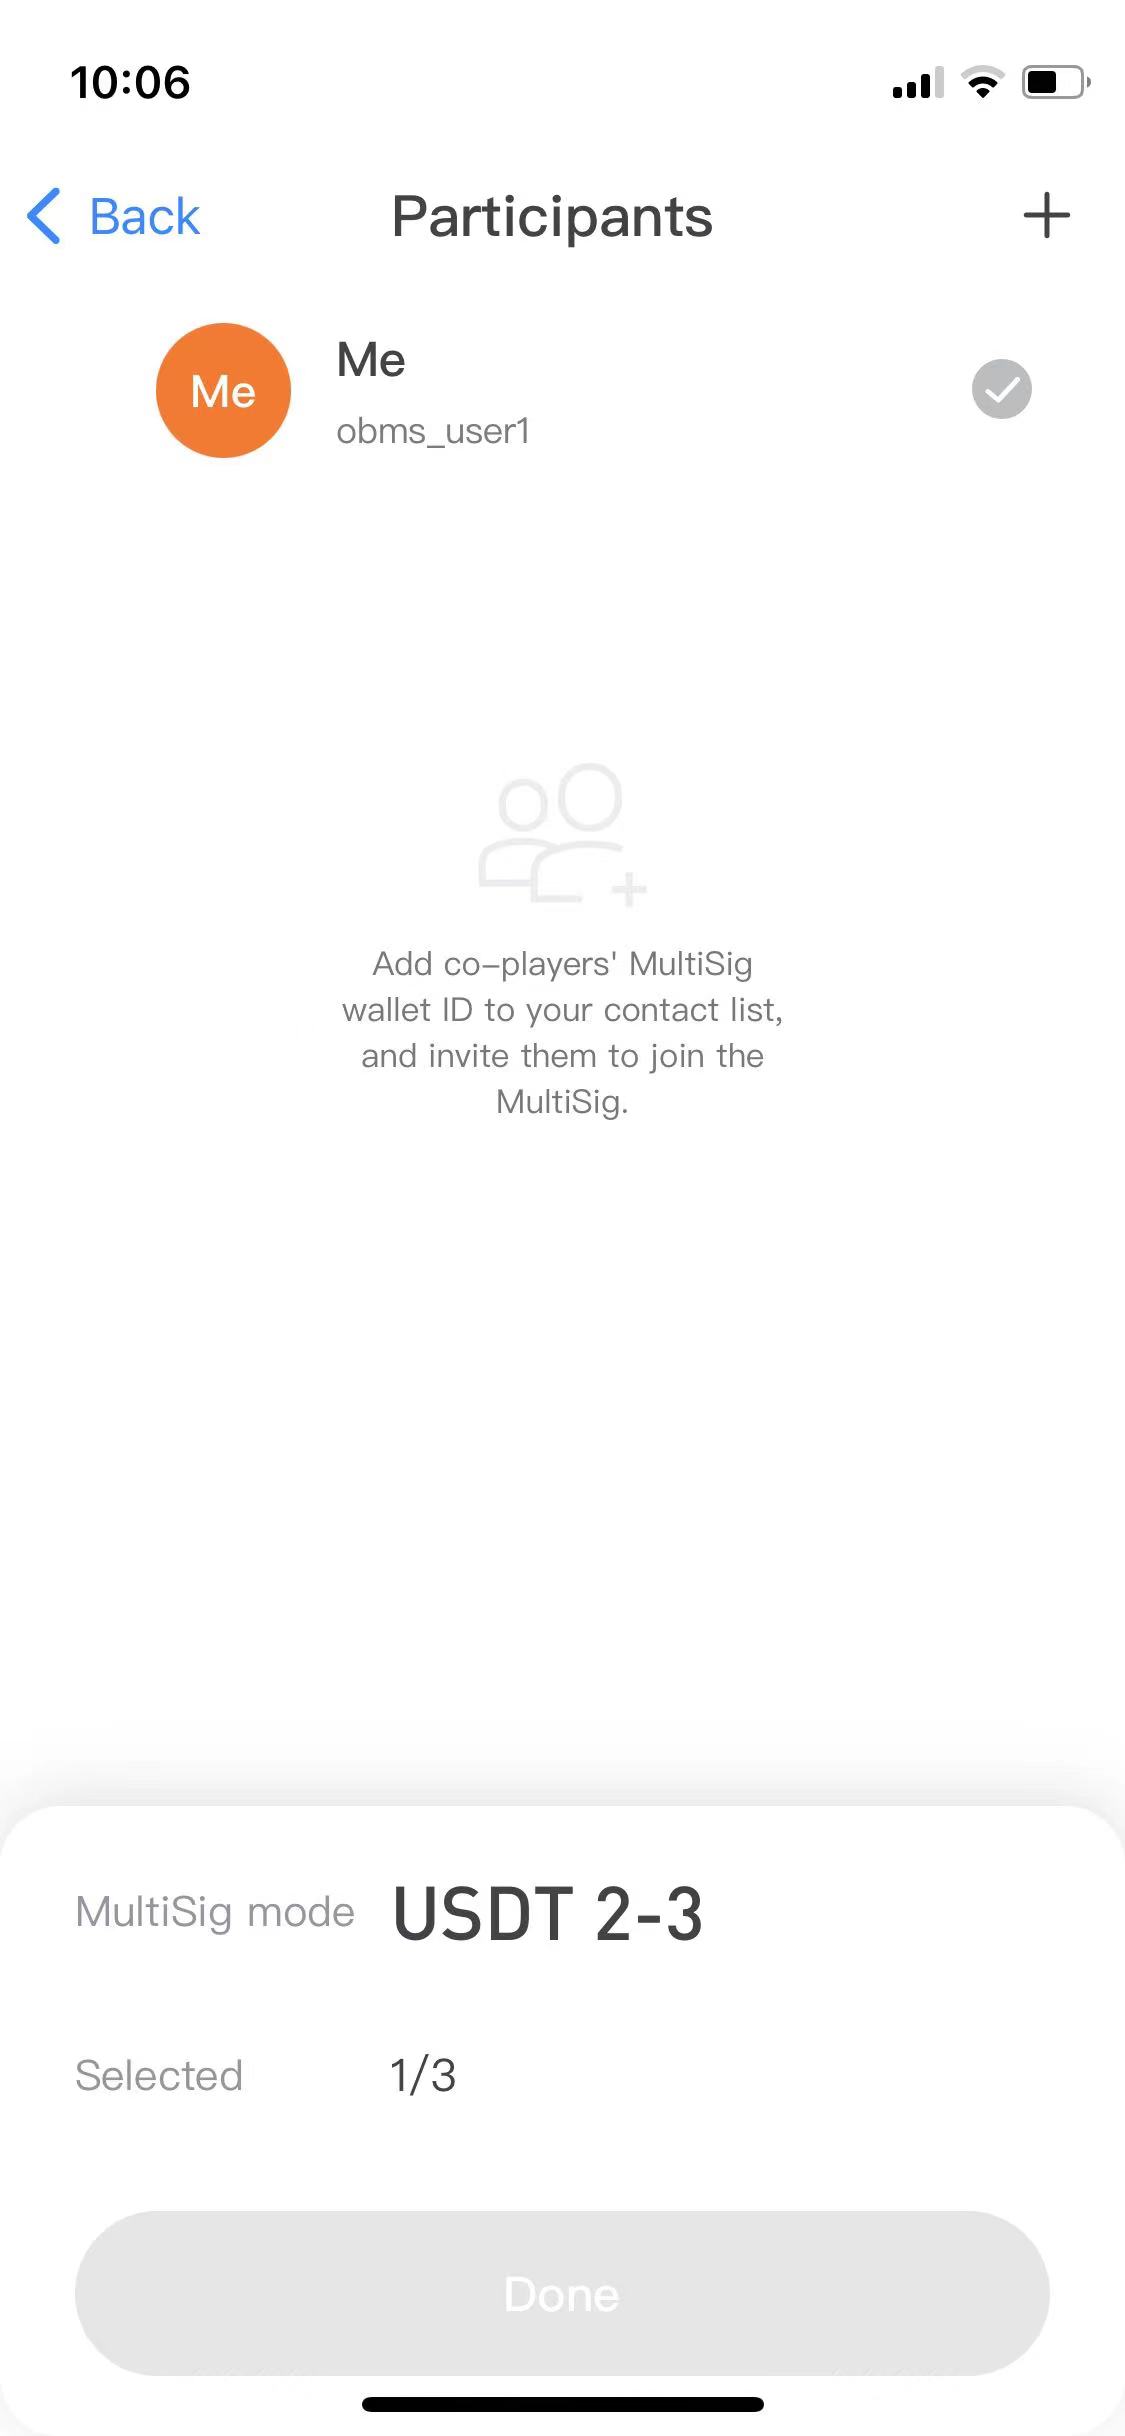
How to add participants?
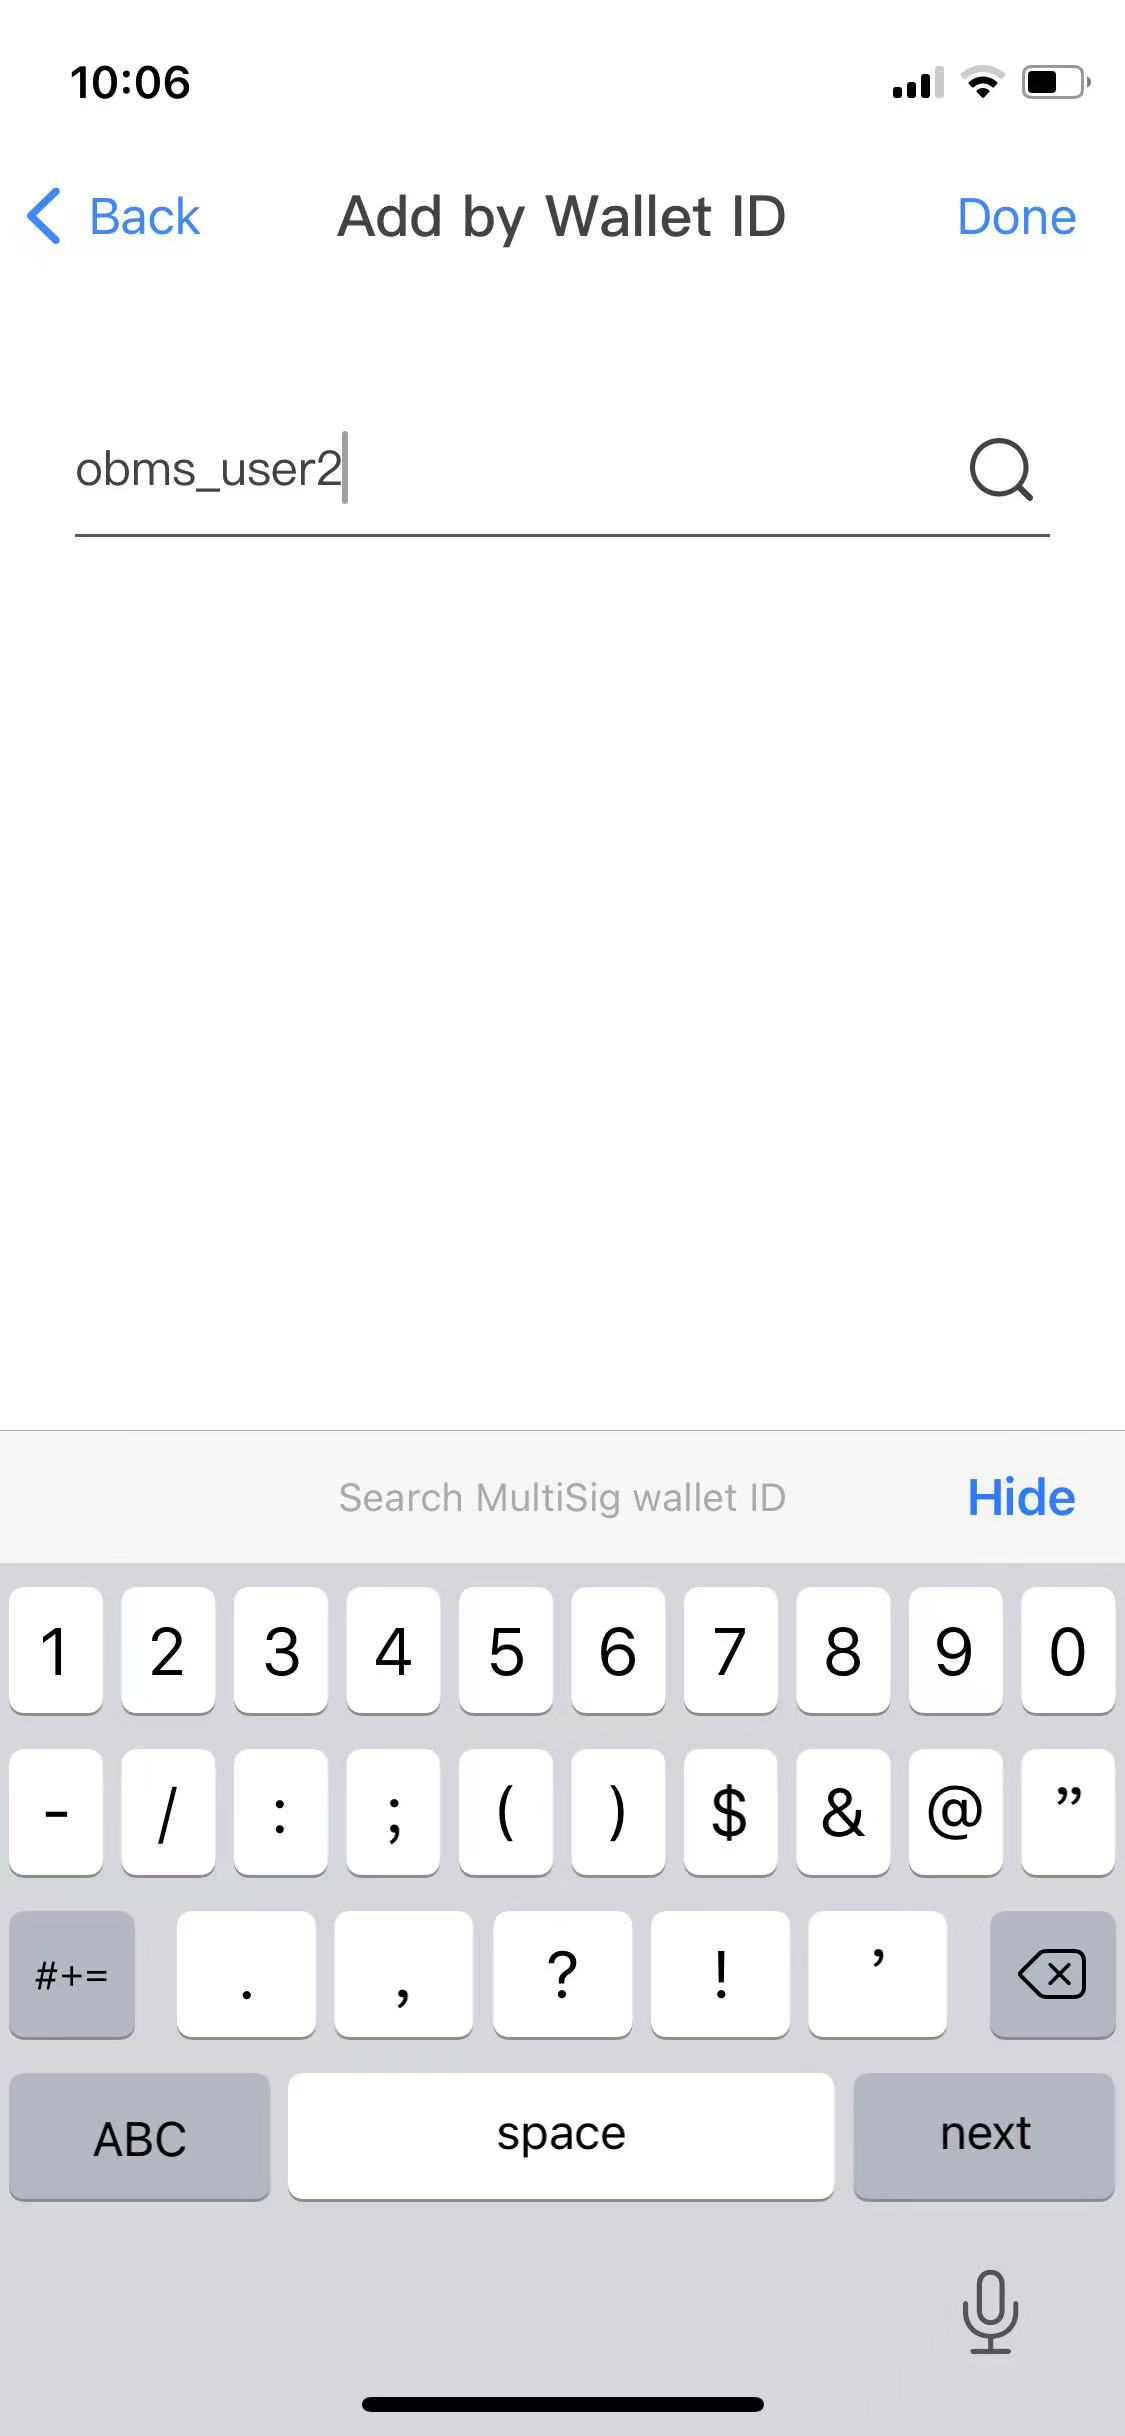
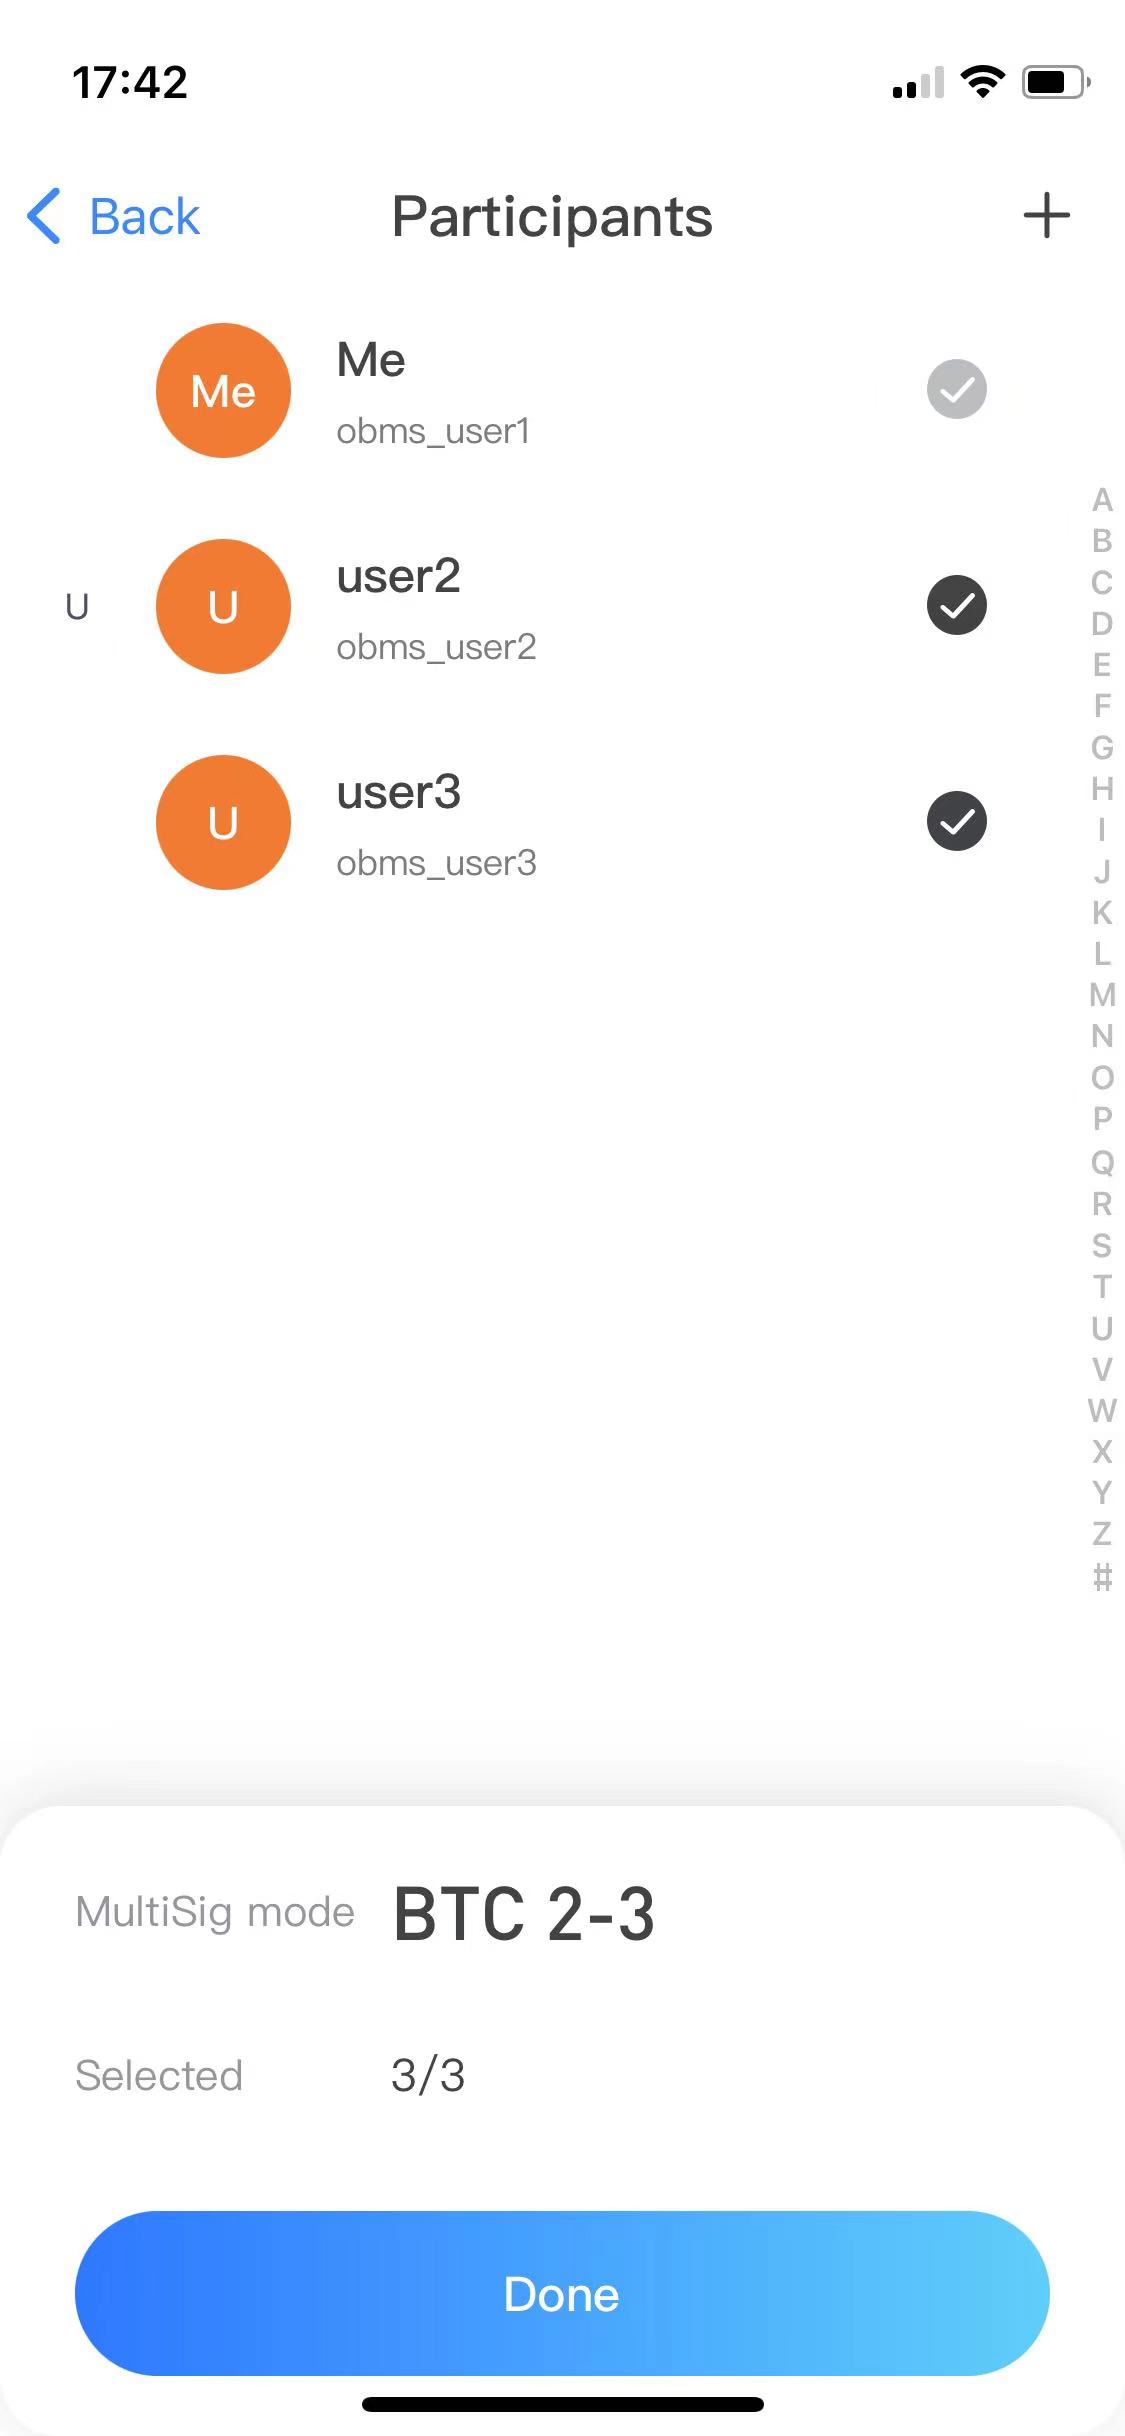
On the Select Participants page, click the + sign in the upper right corner, enter the MultiSig wallet IDs of other participants, and add them, as shown below:

After clicking OK, the MultiSig is created successfully, as shown below:
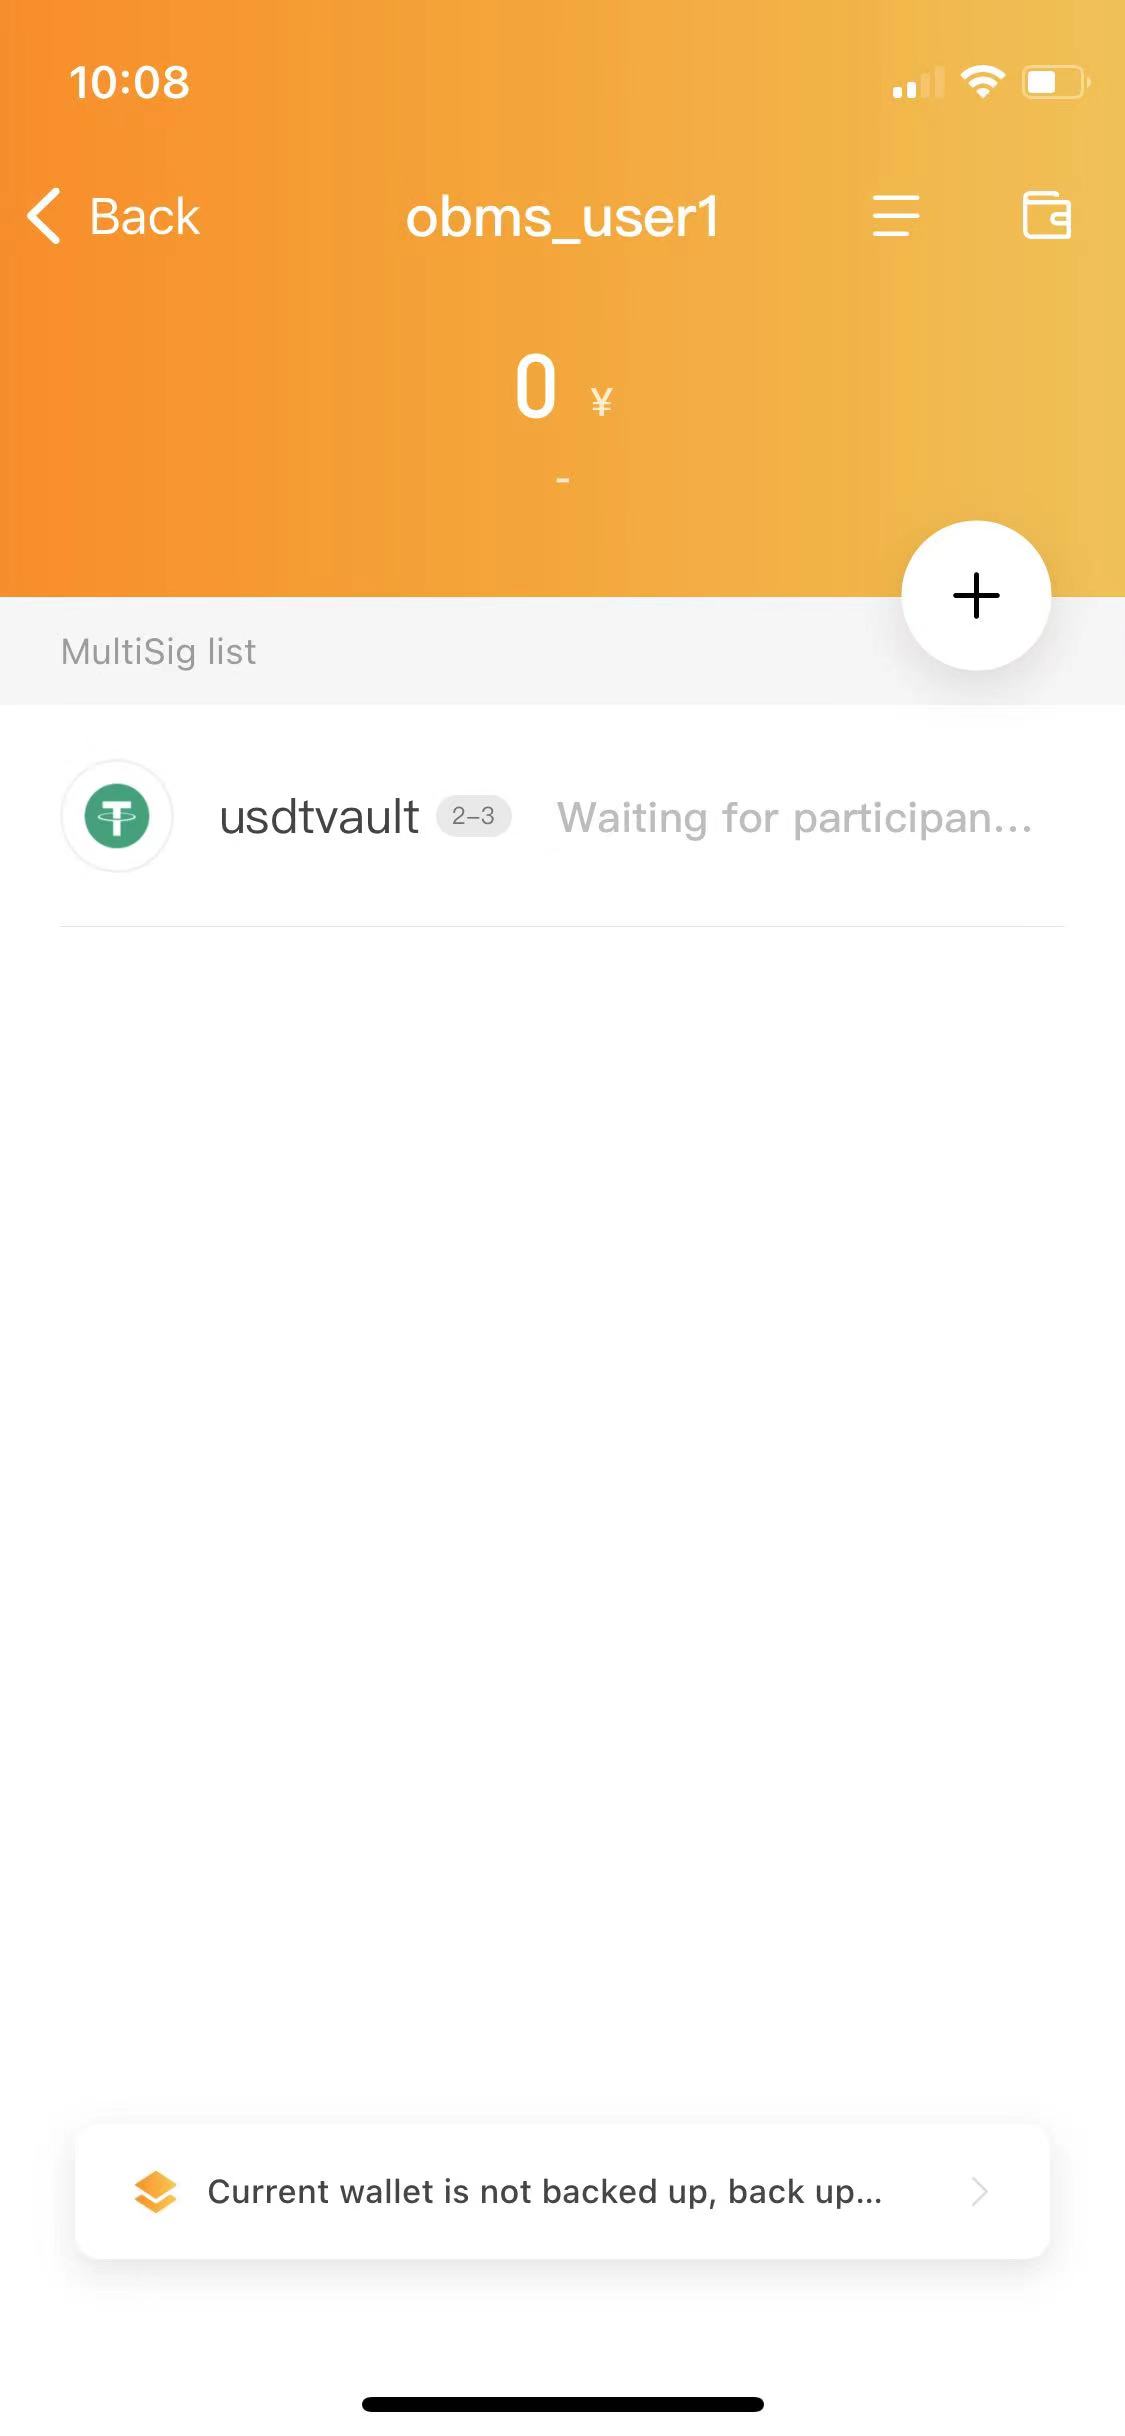
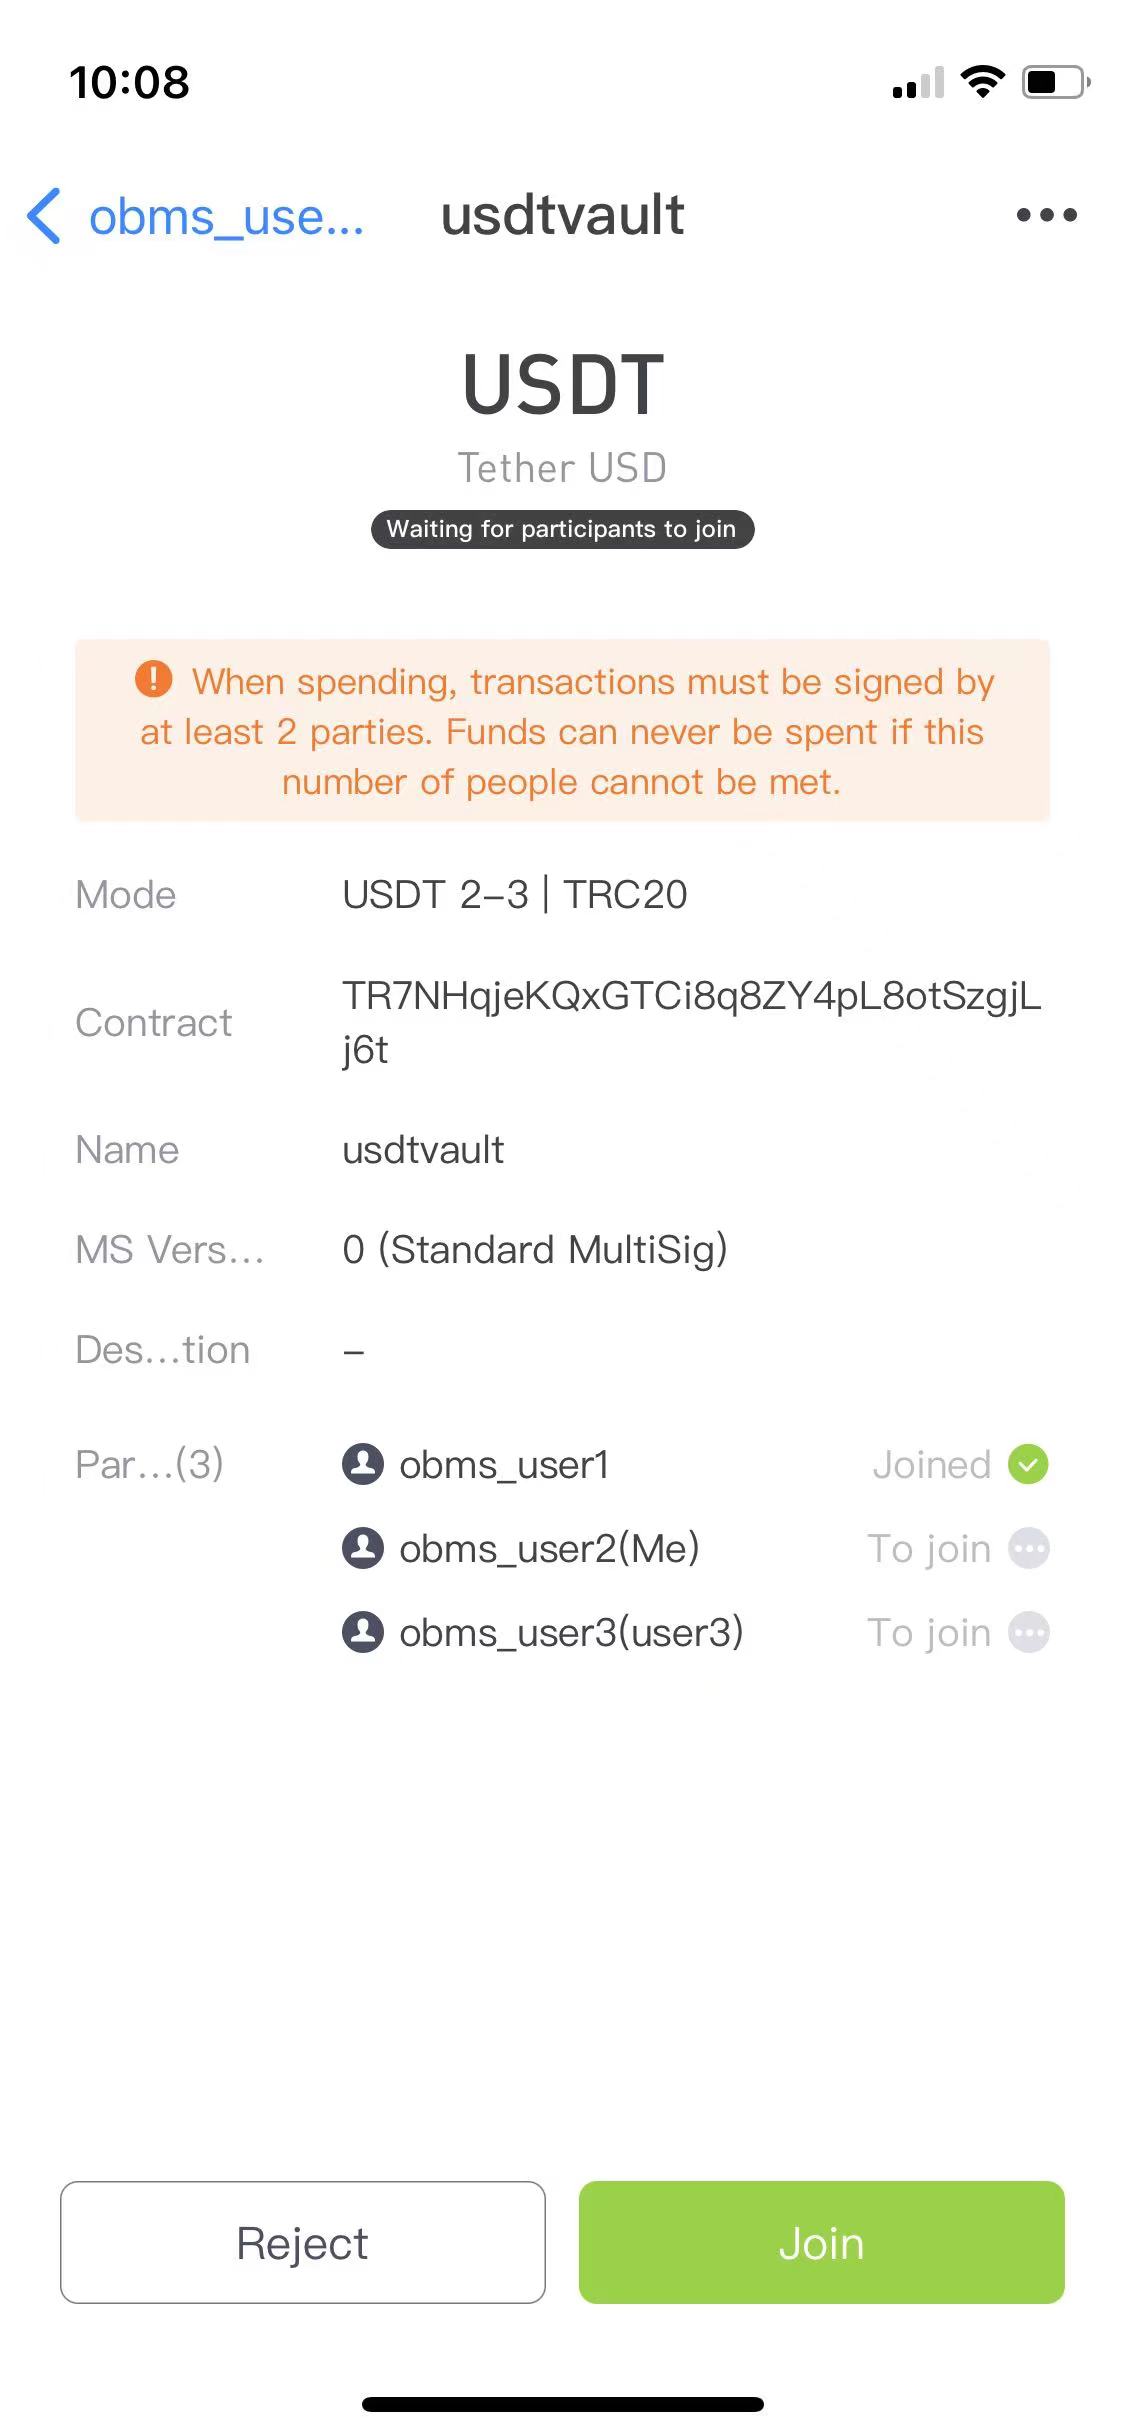
At this time, the corresponding MultiSig entries will also appear in the Ownbit wallets of other participants, click on the corresponding page, and click the "Join" button, as shown below:
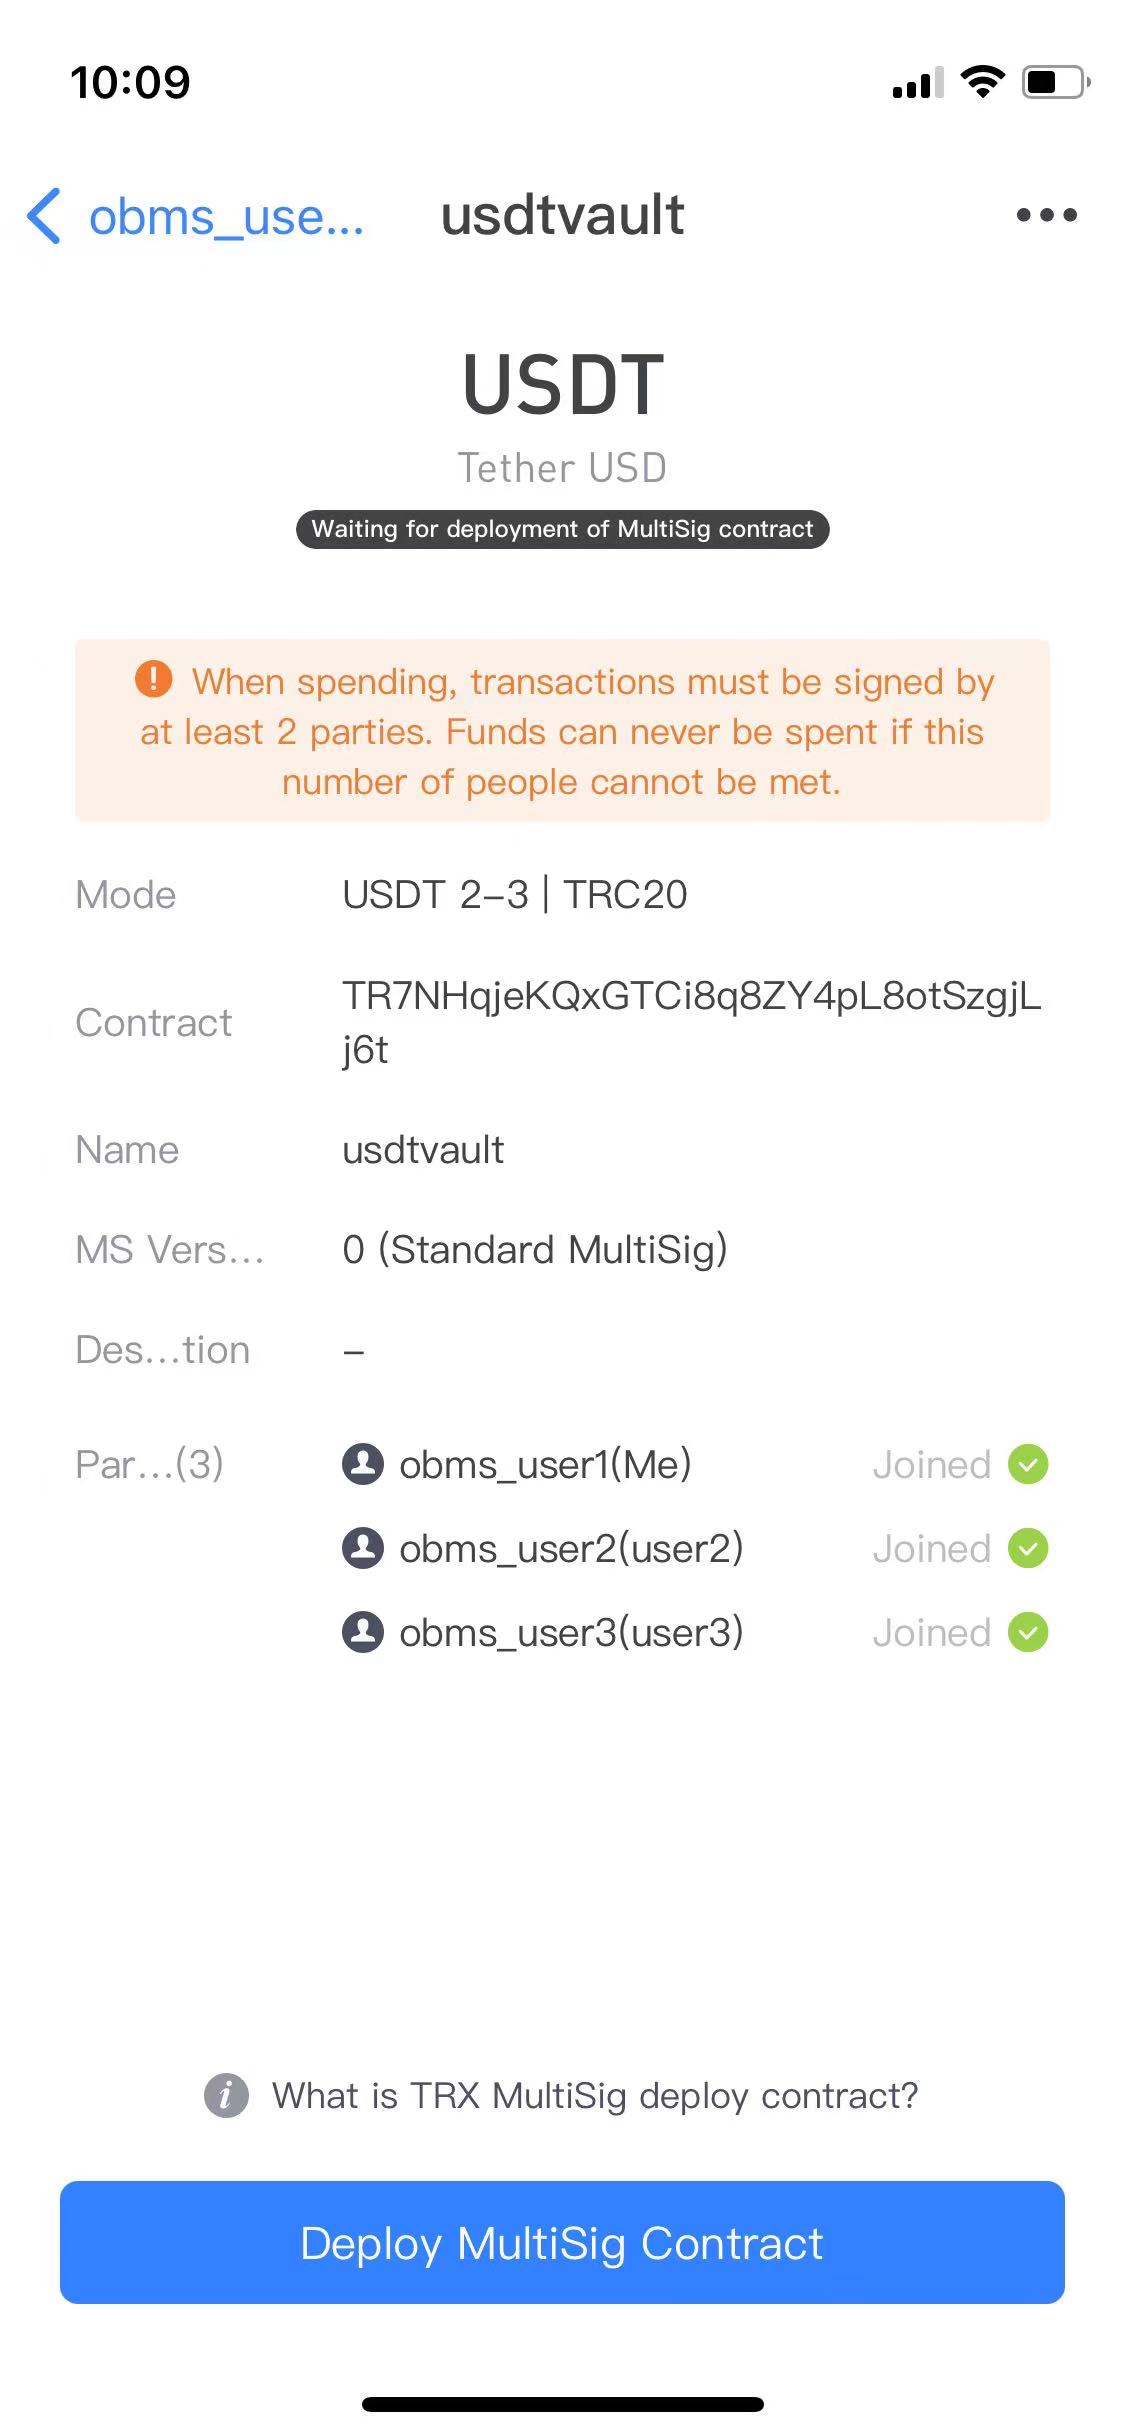
After all participants join successfully, the corresponding page of the MultiSig creator will enter the state of "Deploy MultiSig Contract", as shown in the following figure:
Click the "Deploy" button, and you will be prompted to deposit an appropriate amount of TRX into the corresponding address:

After the deposit is completed, continue to deploy, and the MultiSig creation will be finally completed. After completion, it will look like this:
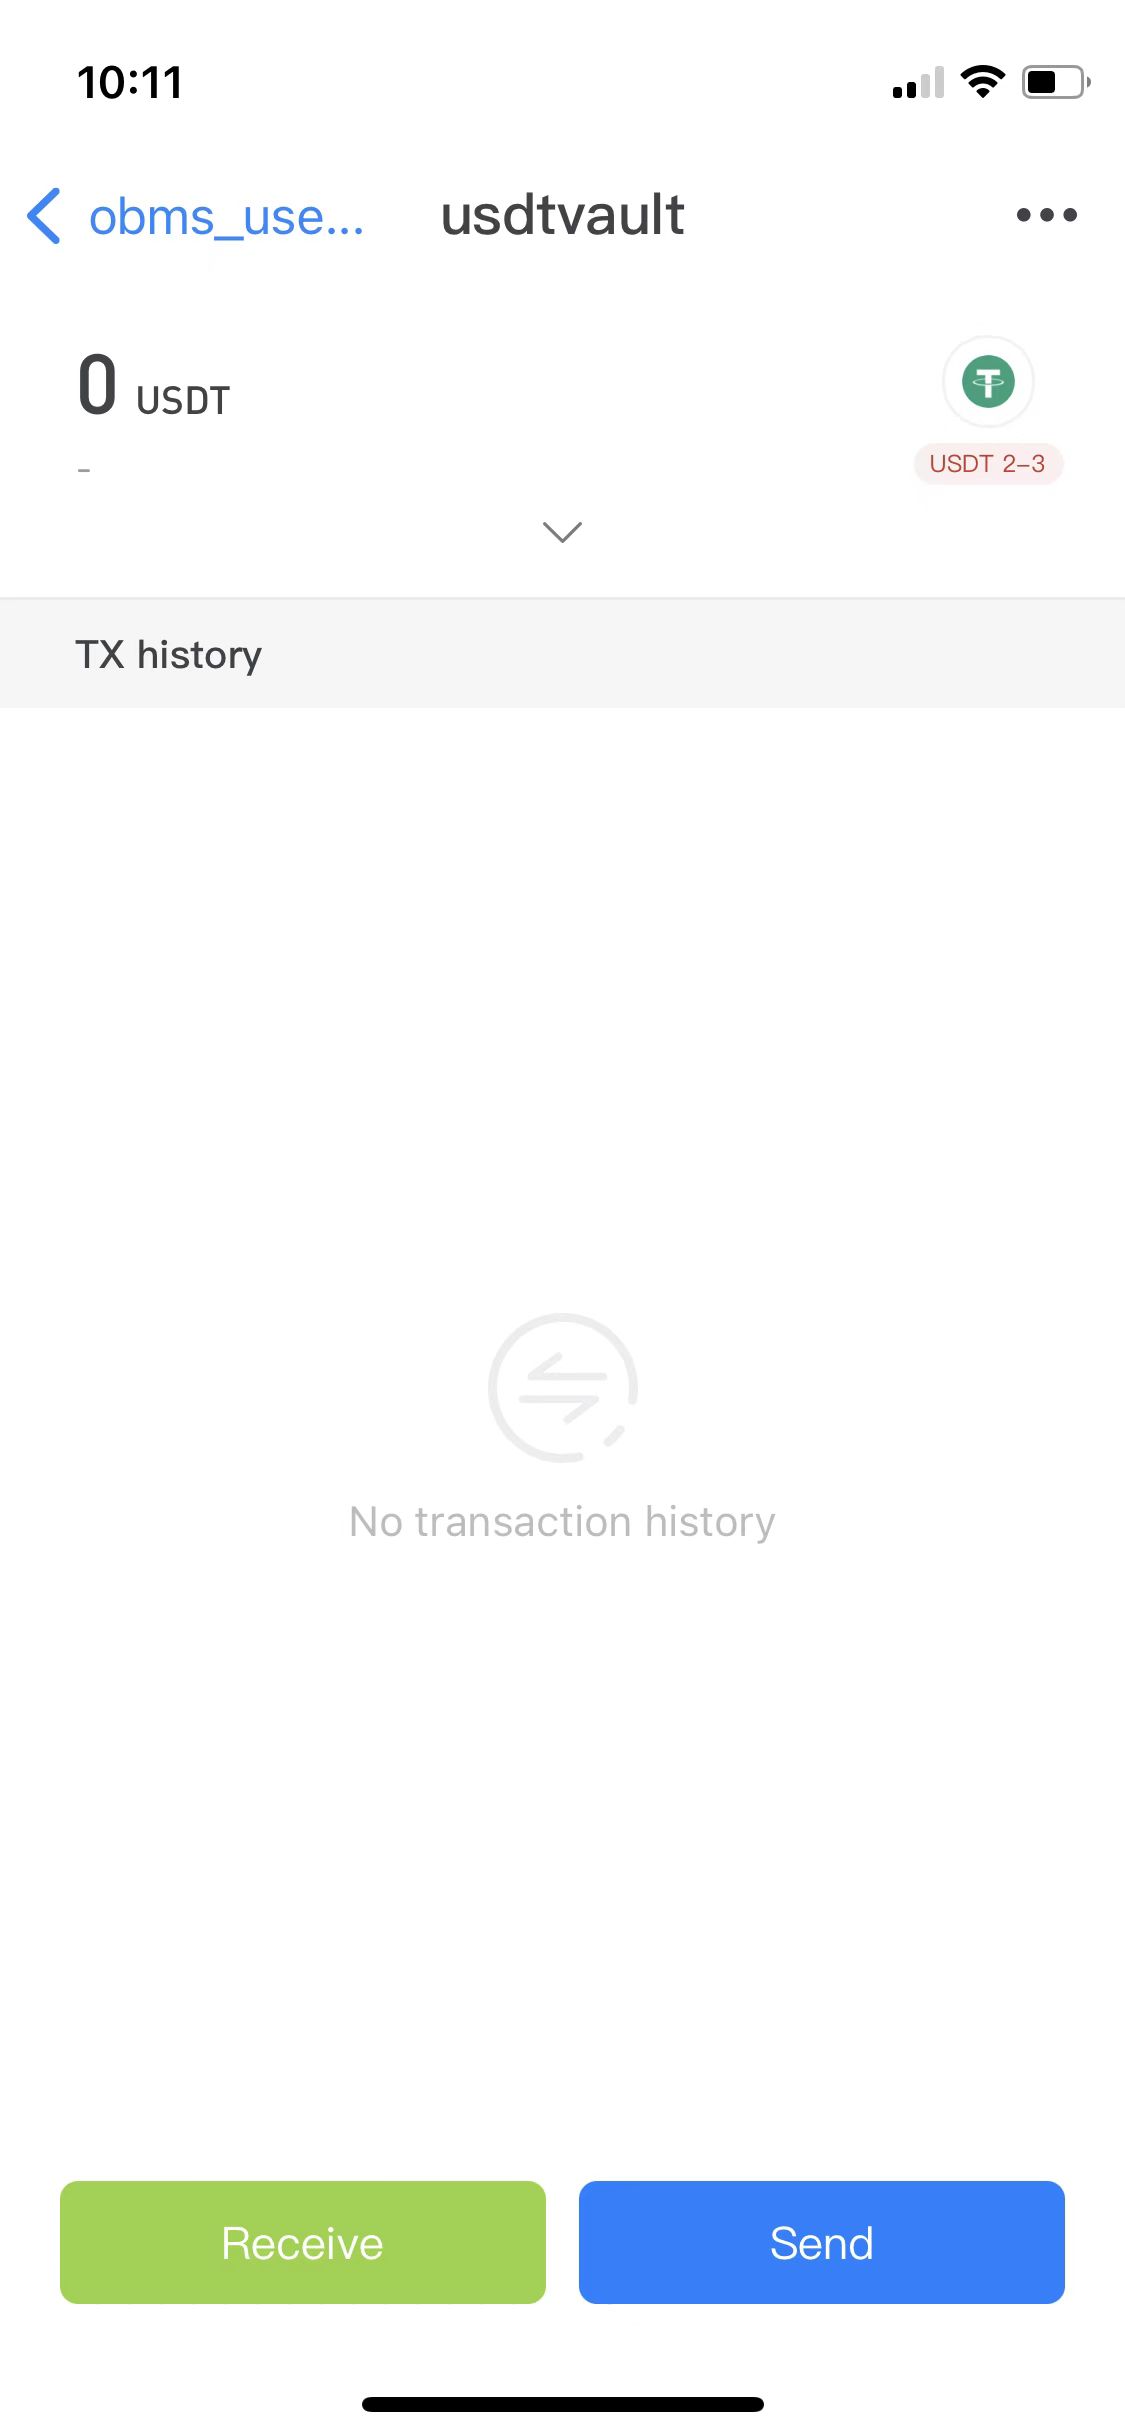
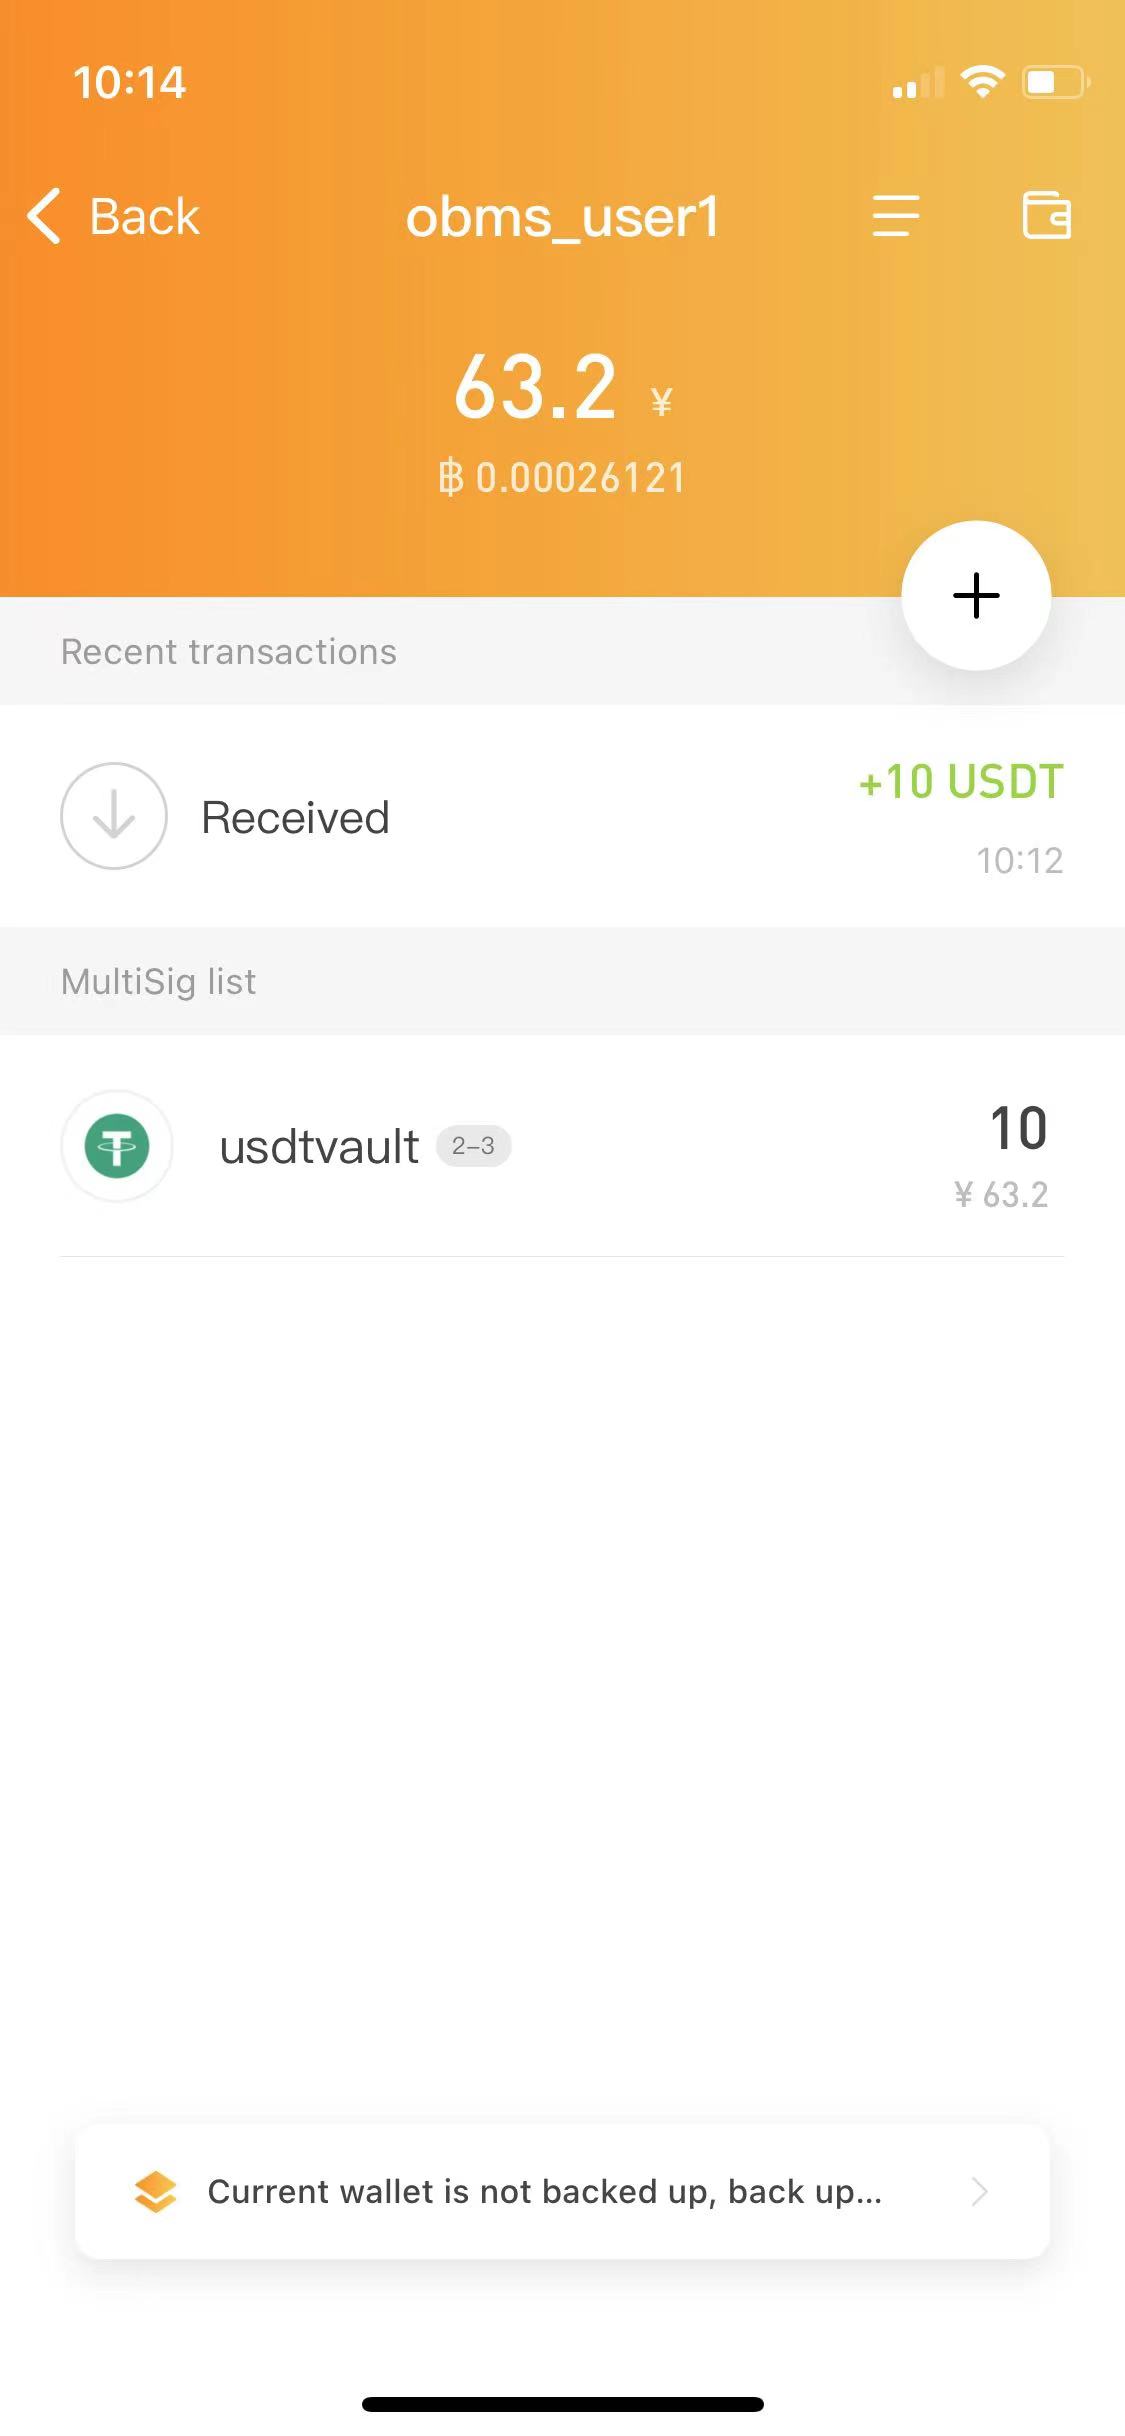
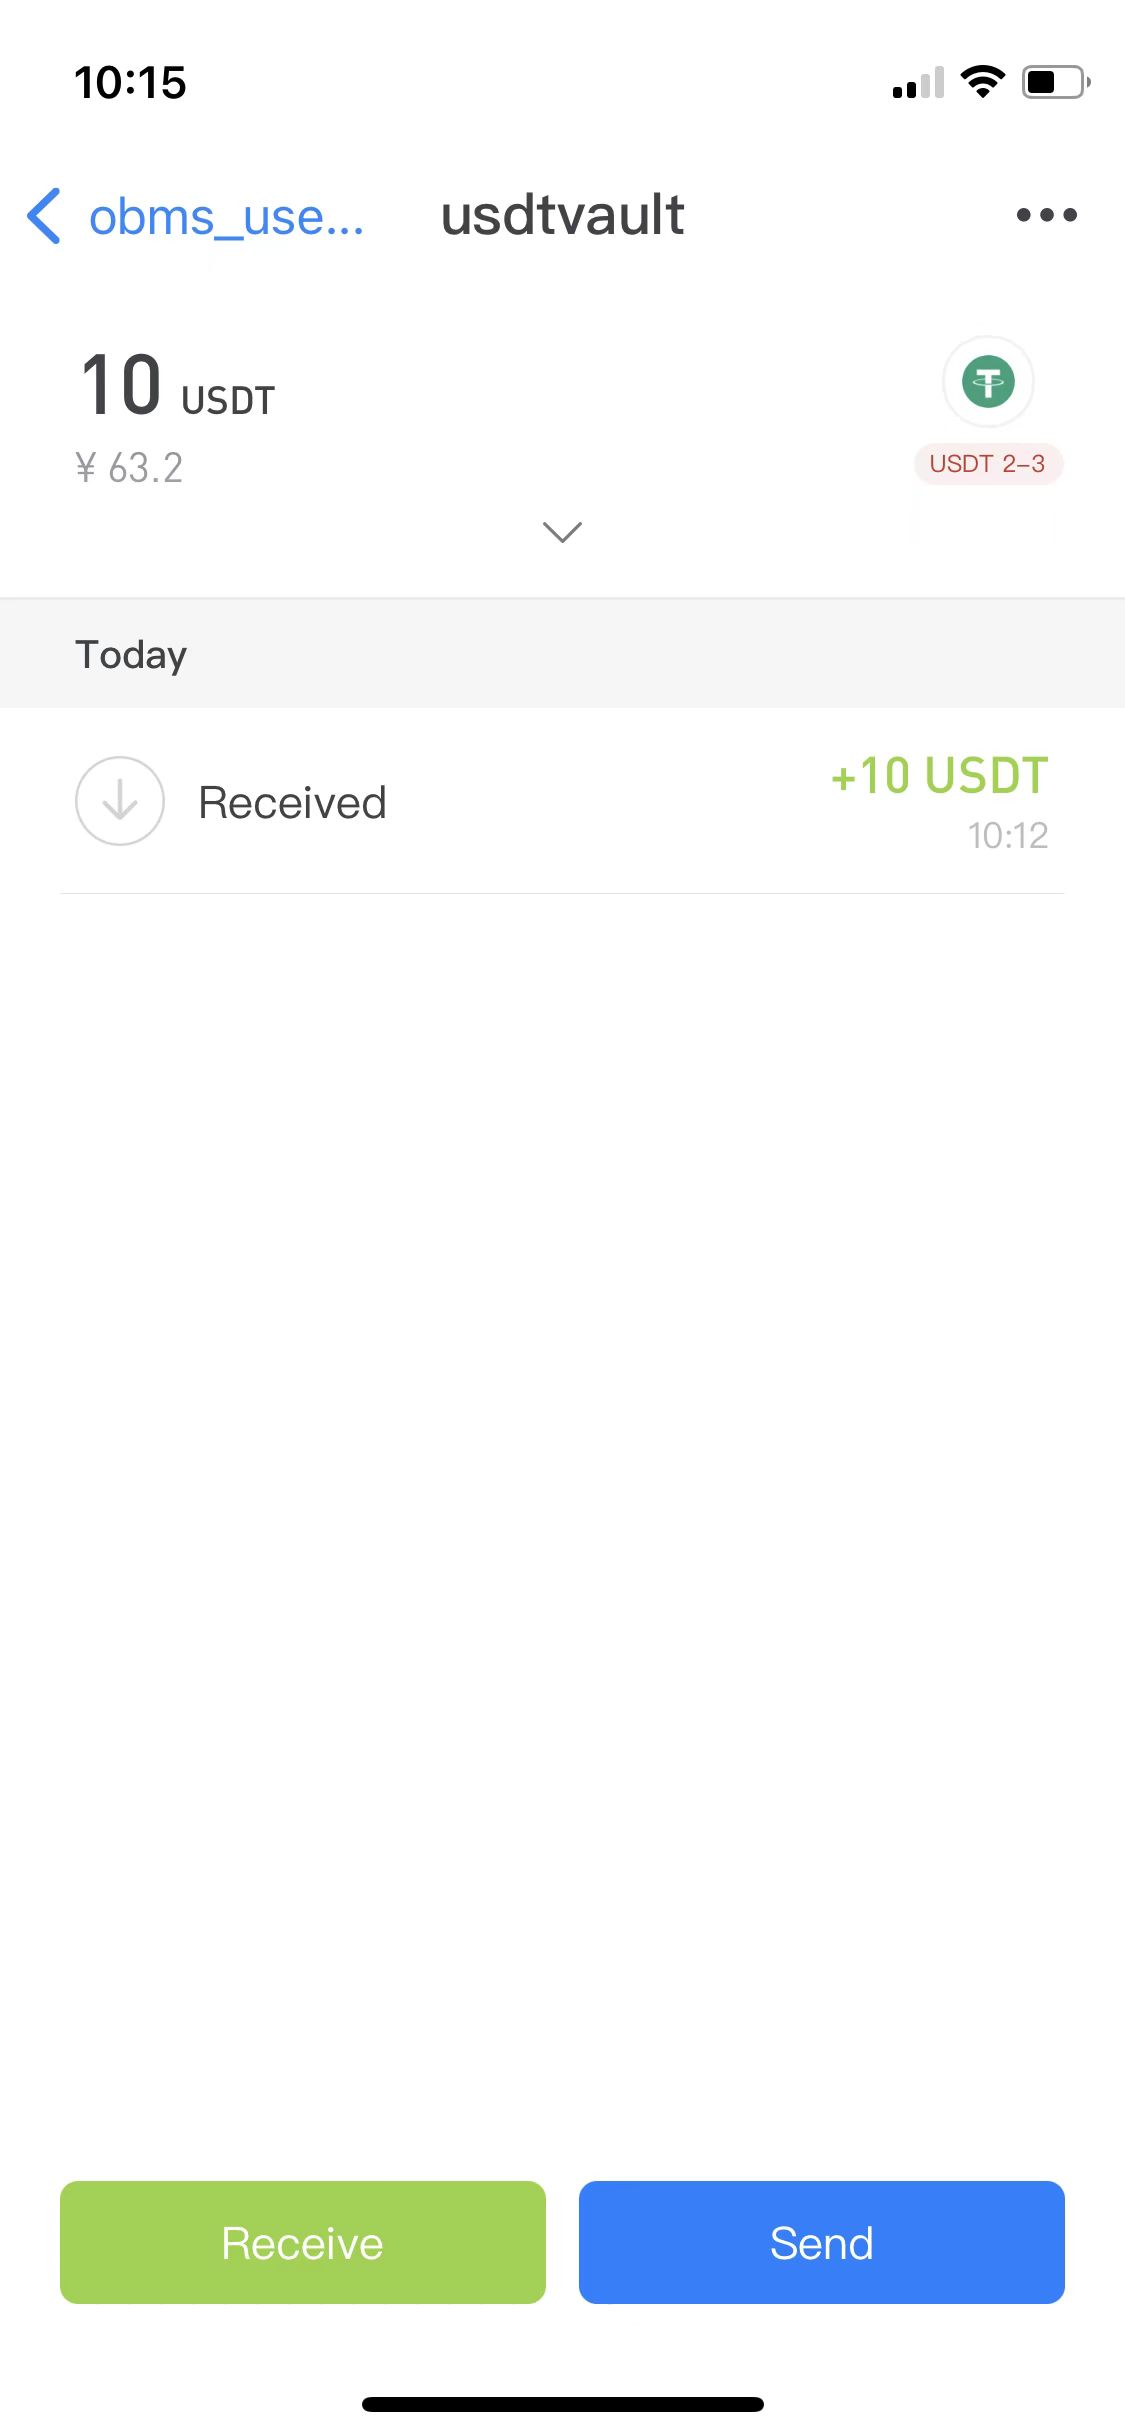
At this point, you can try to deposit USDT to the address you just created, as shown below:
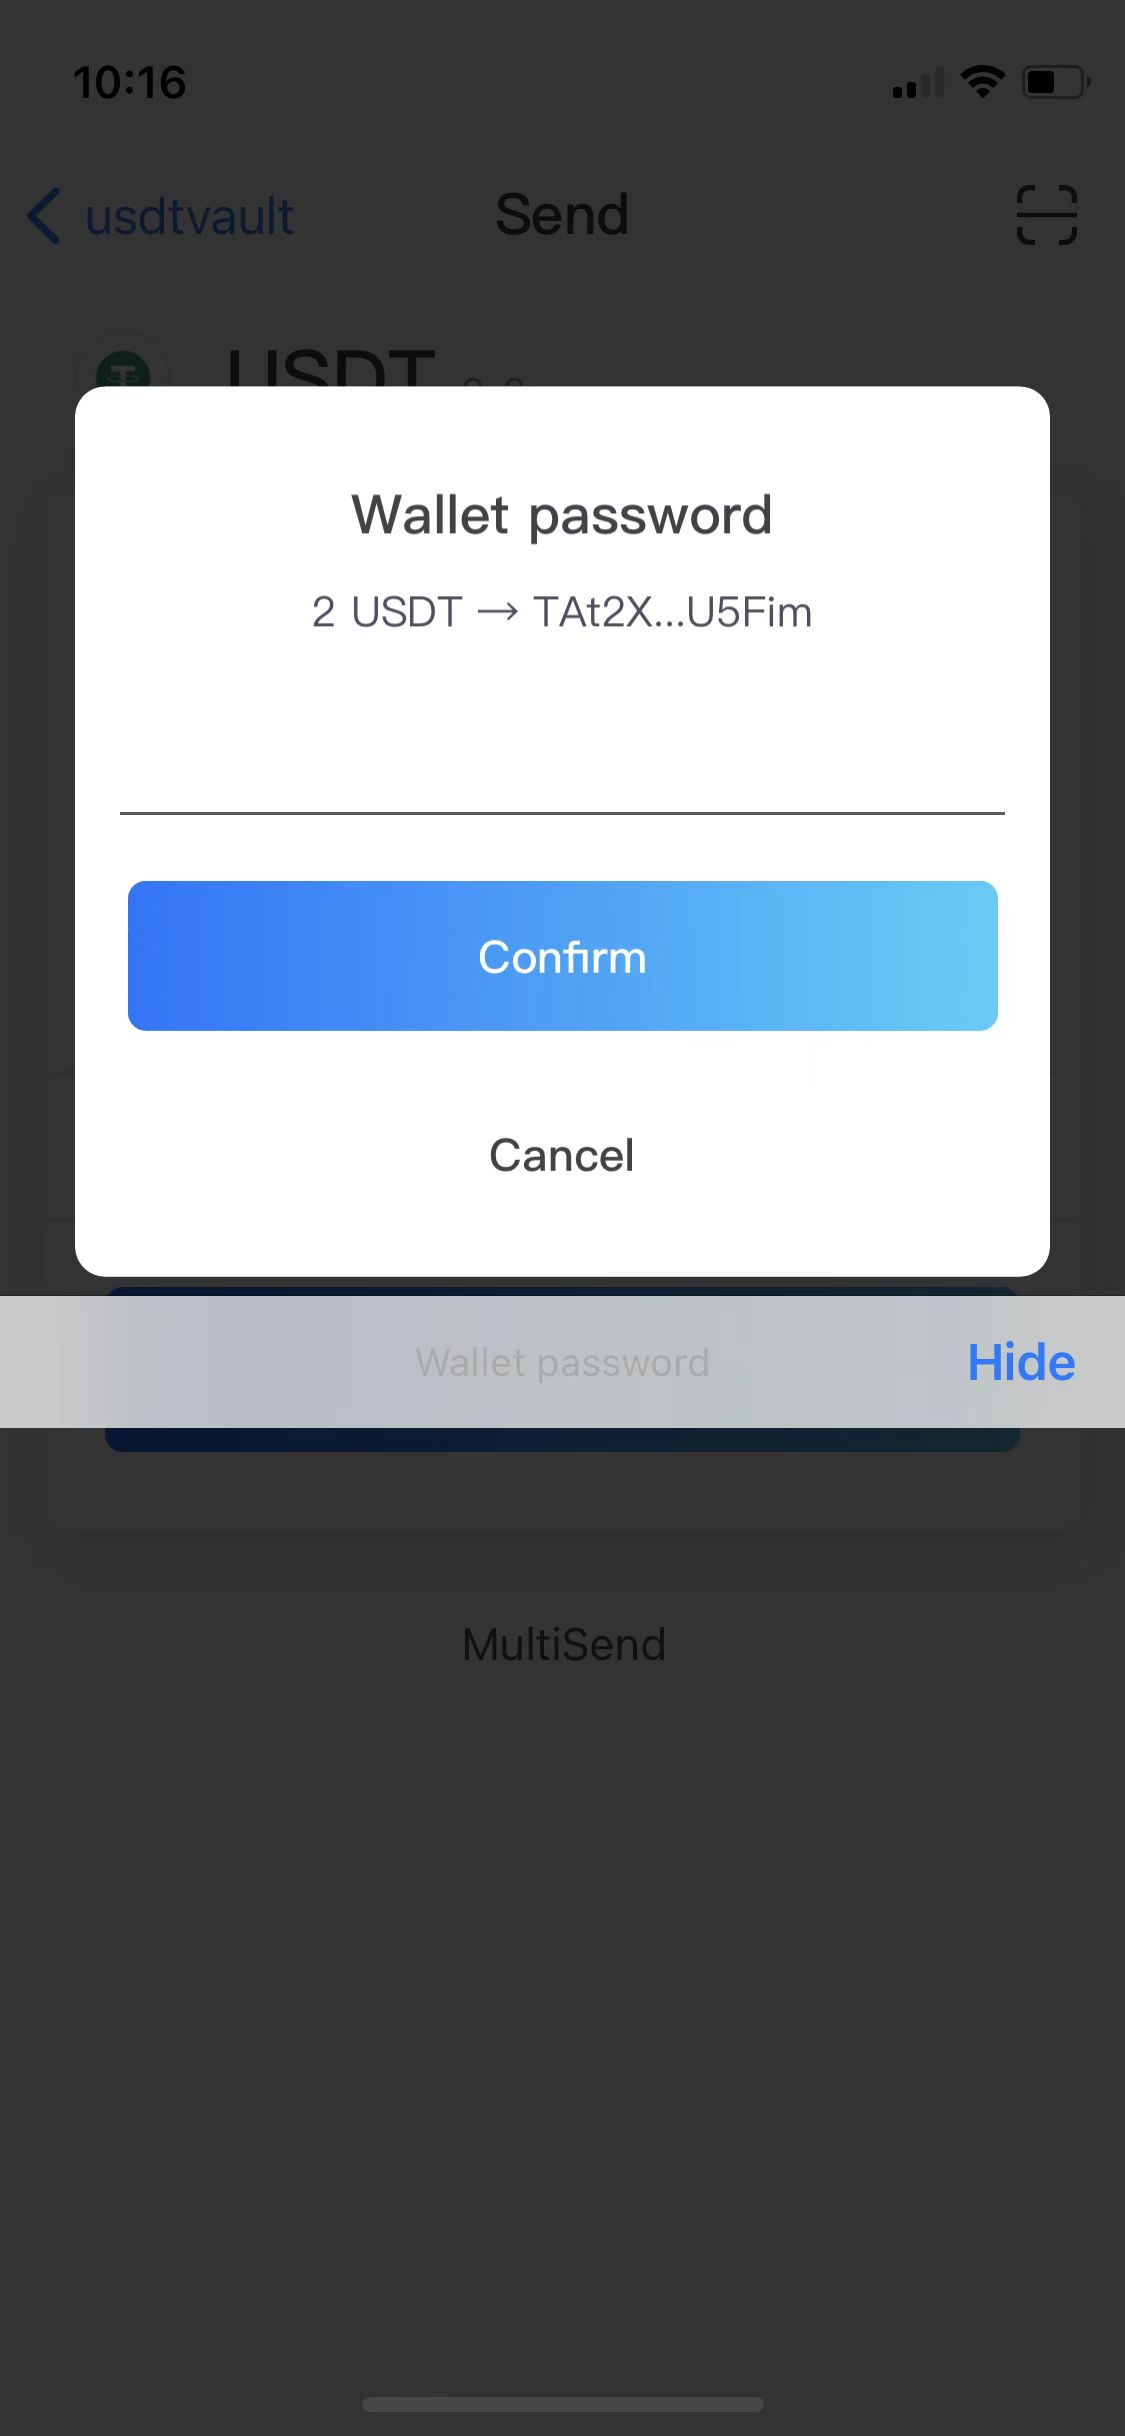
How to spend (send) MultiSig assets?
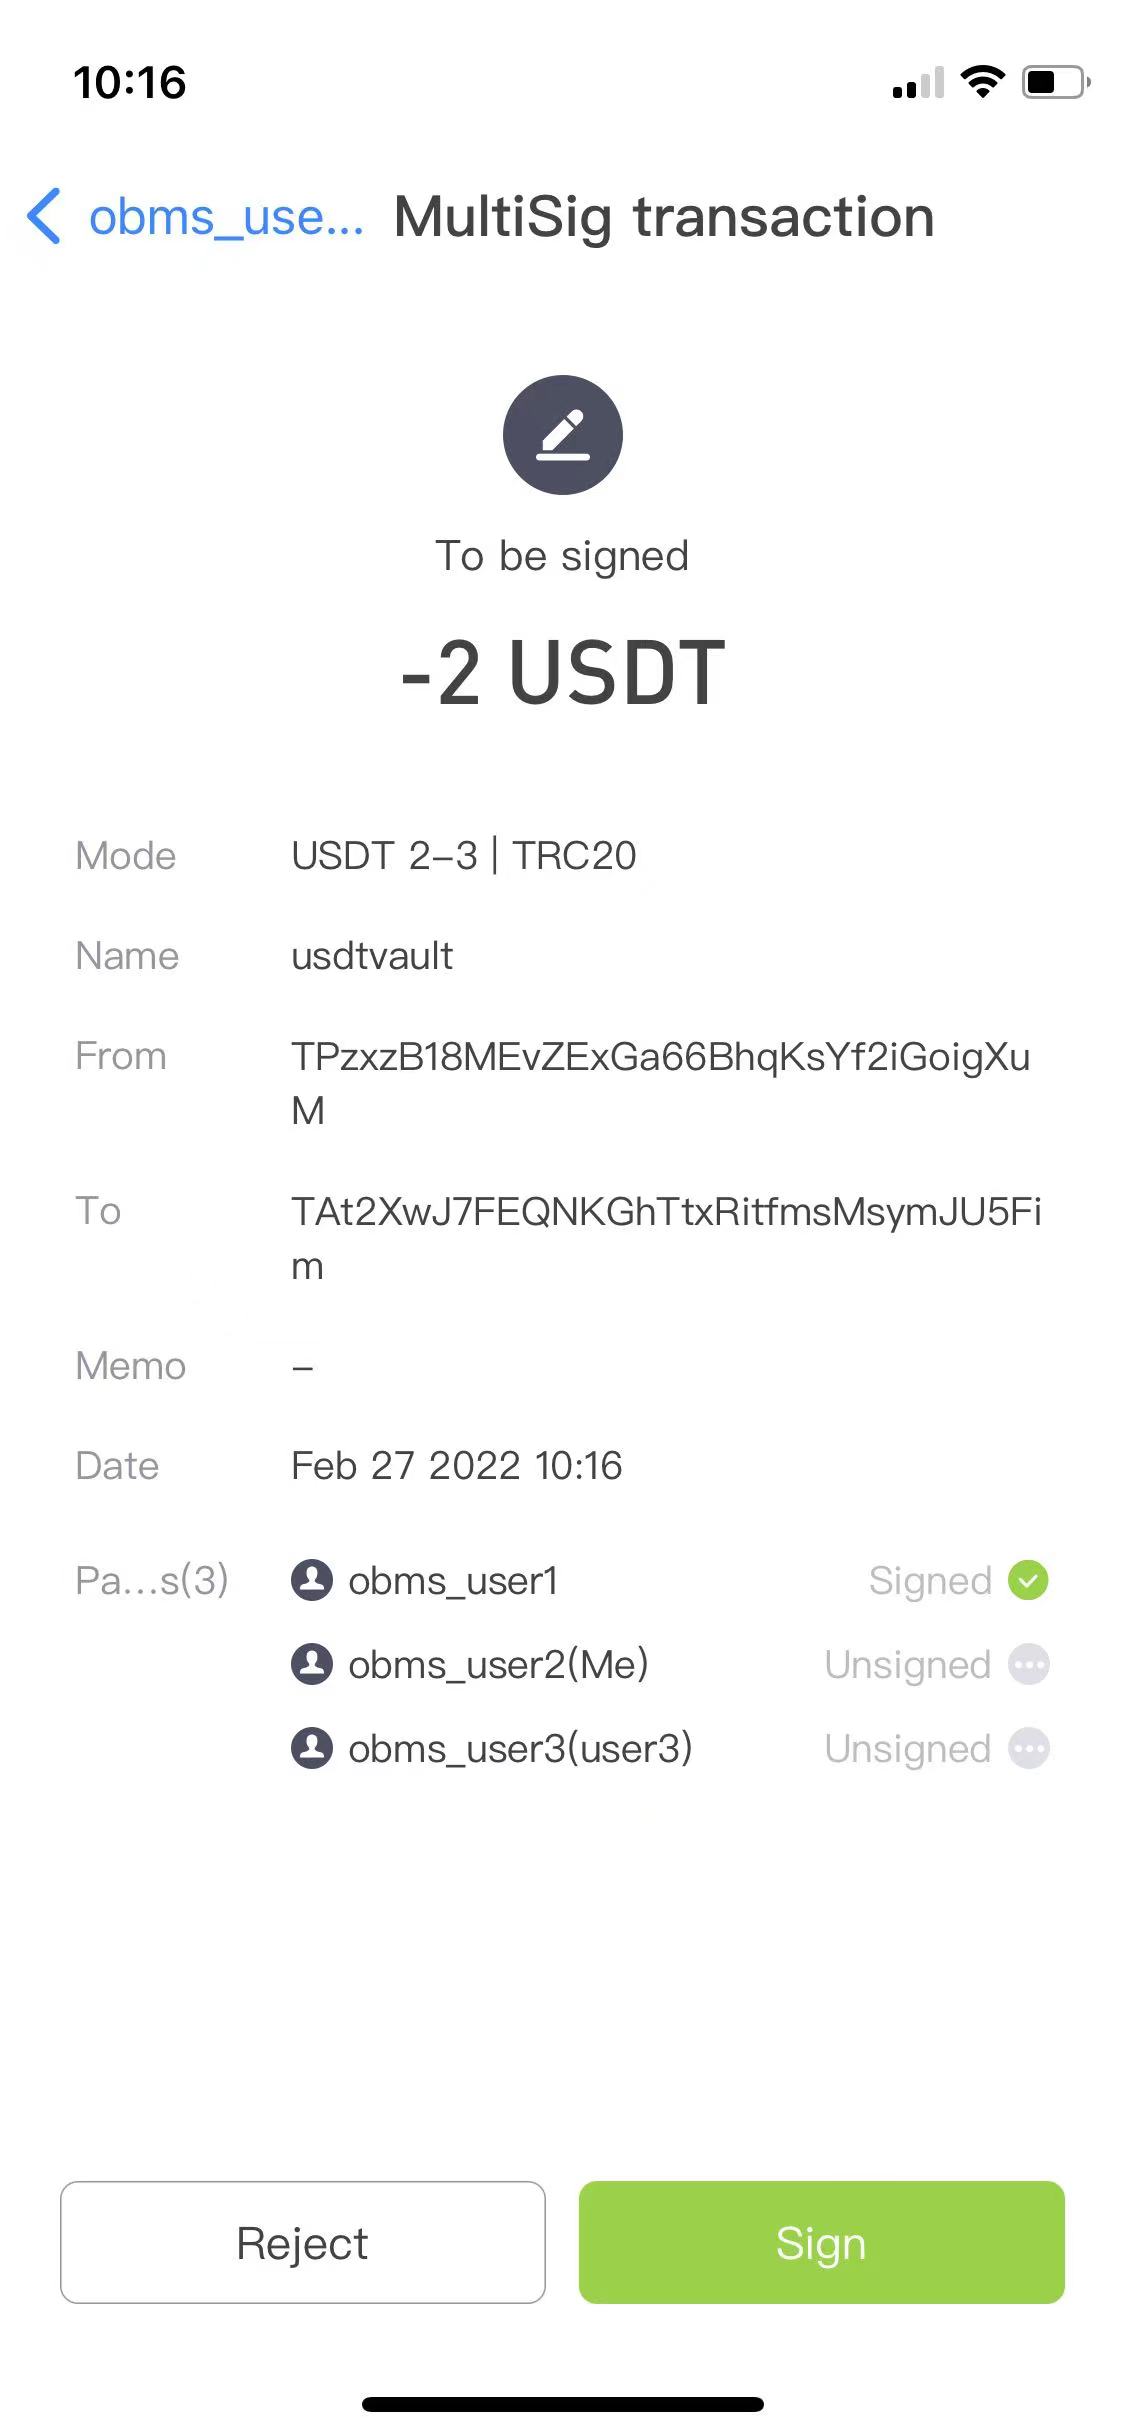
When spending MultiSig assets, one party clicks the "Send" button on the MultiSig page and enters the password, as shown below:
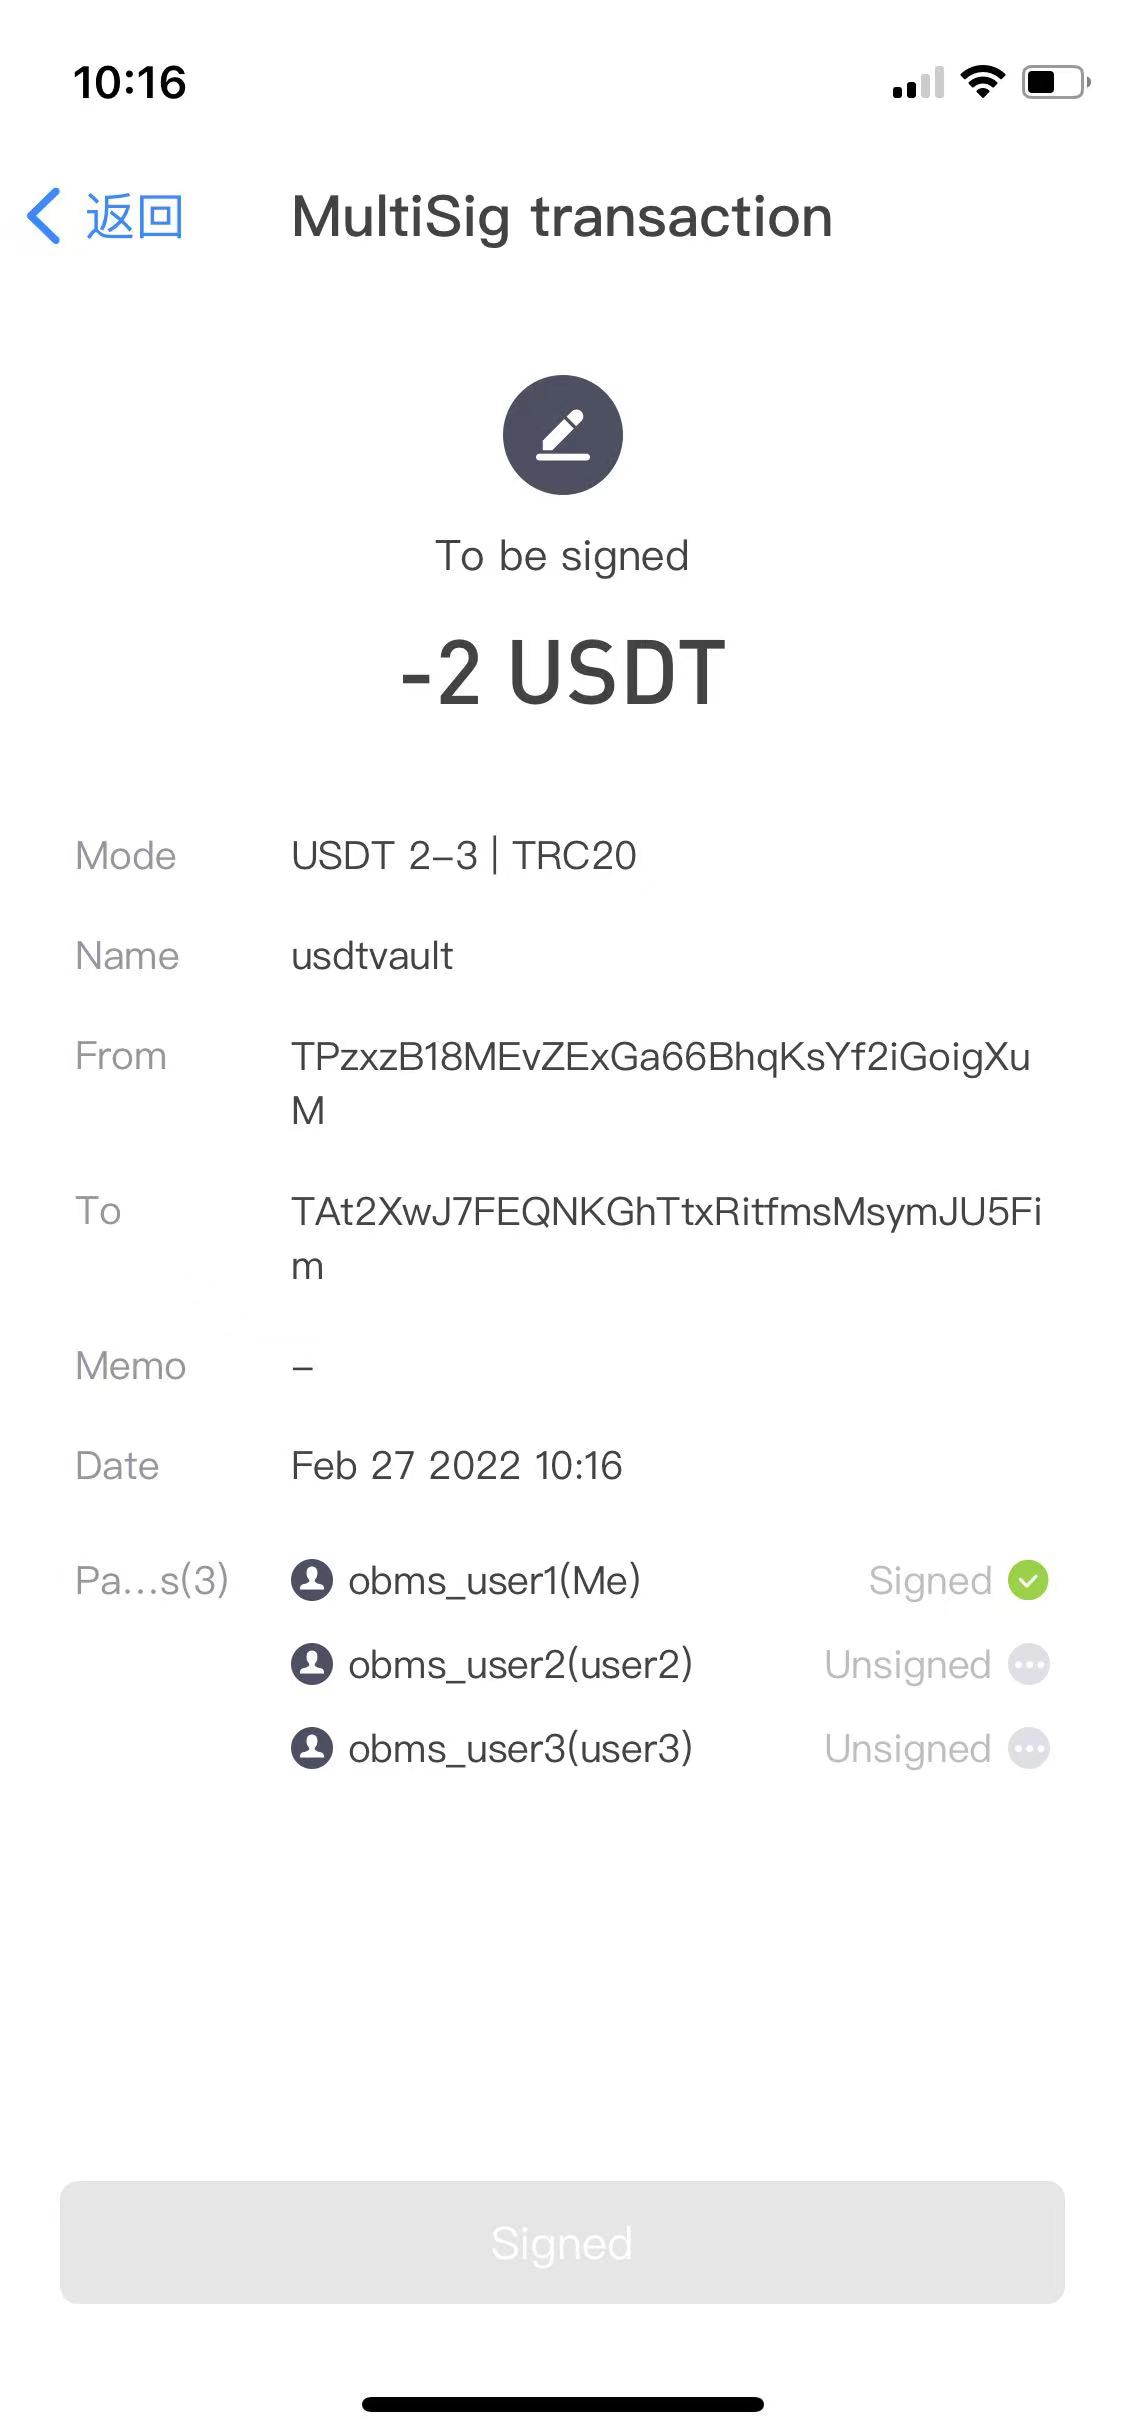
Other participants will receive corresponding signature reminders, as shown below:
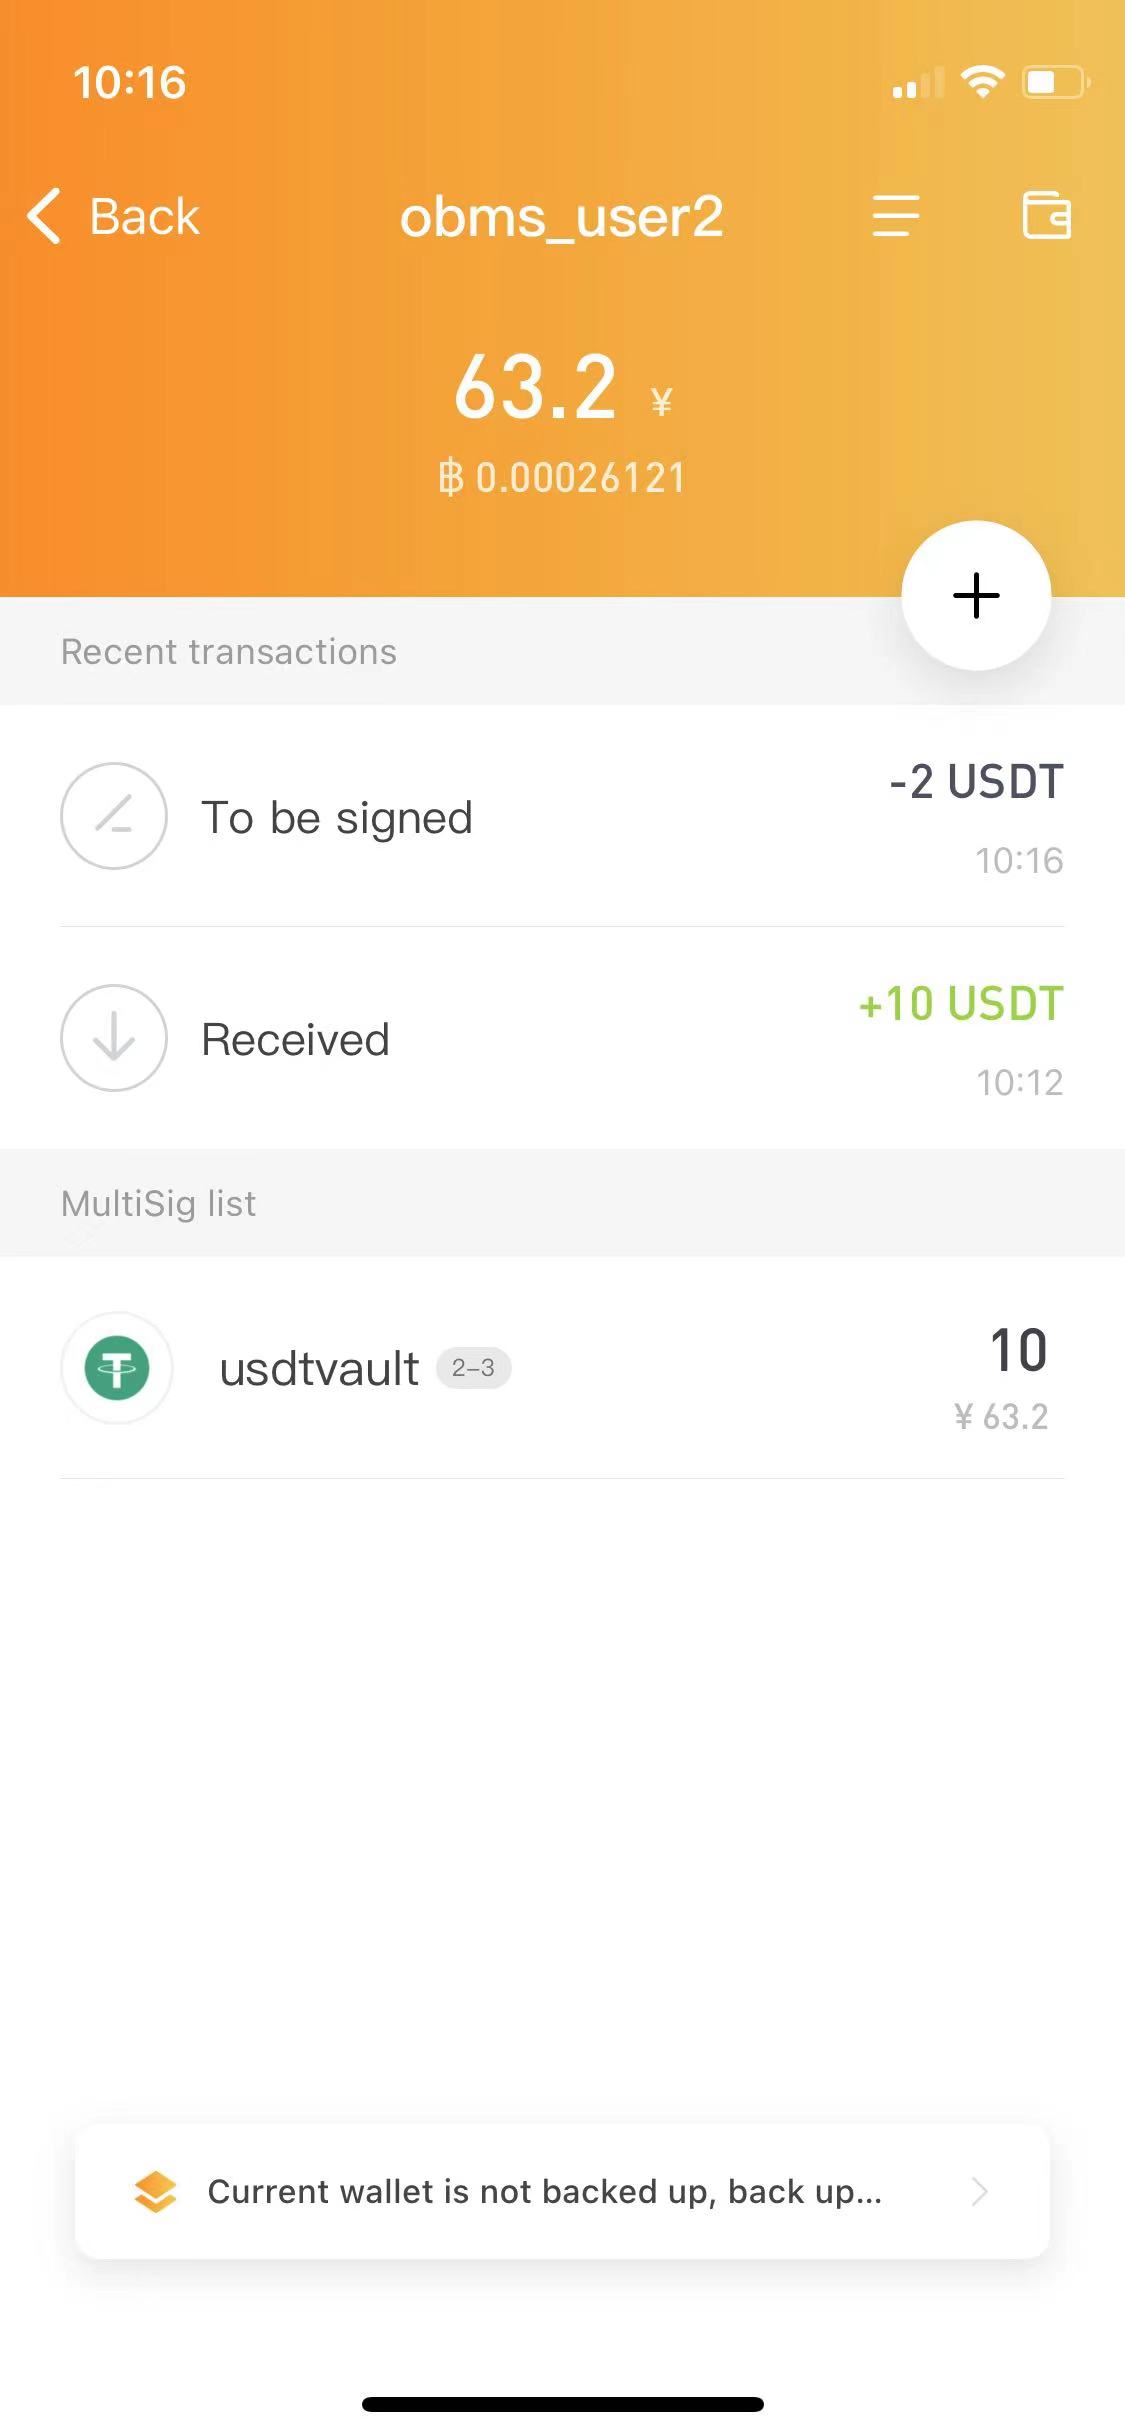
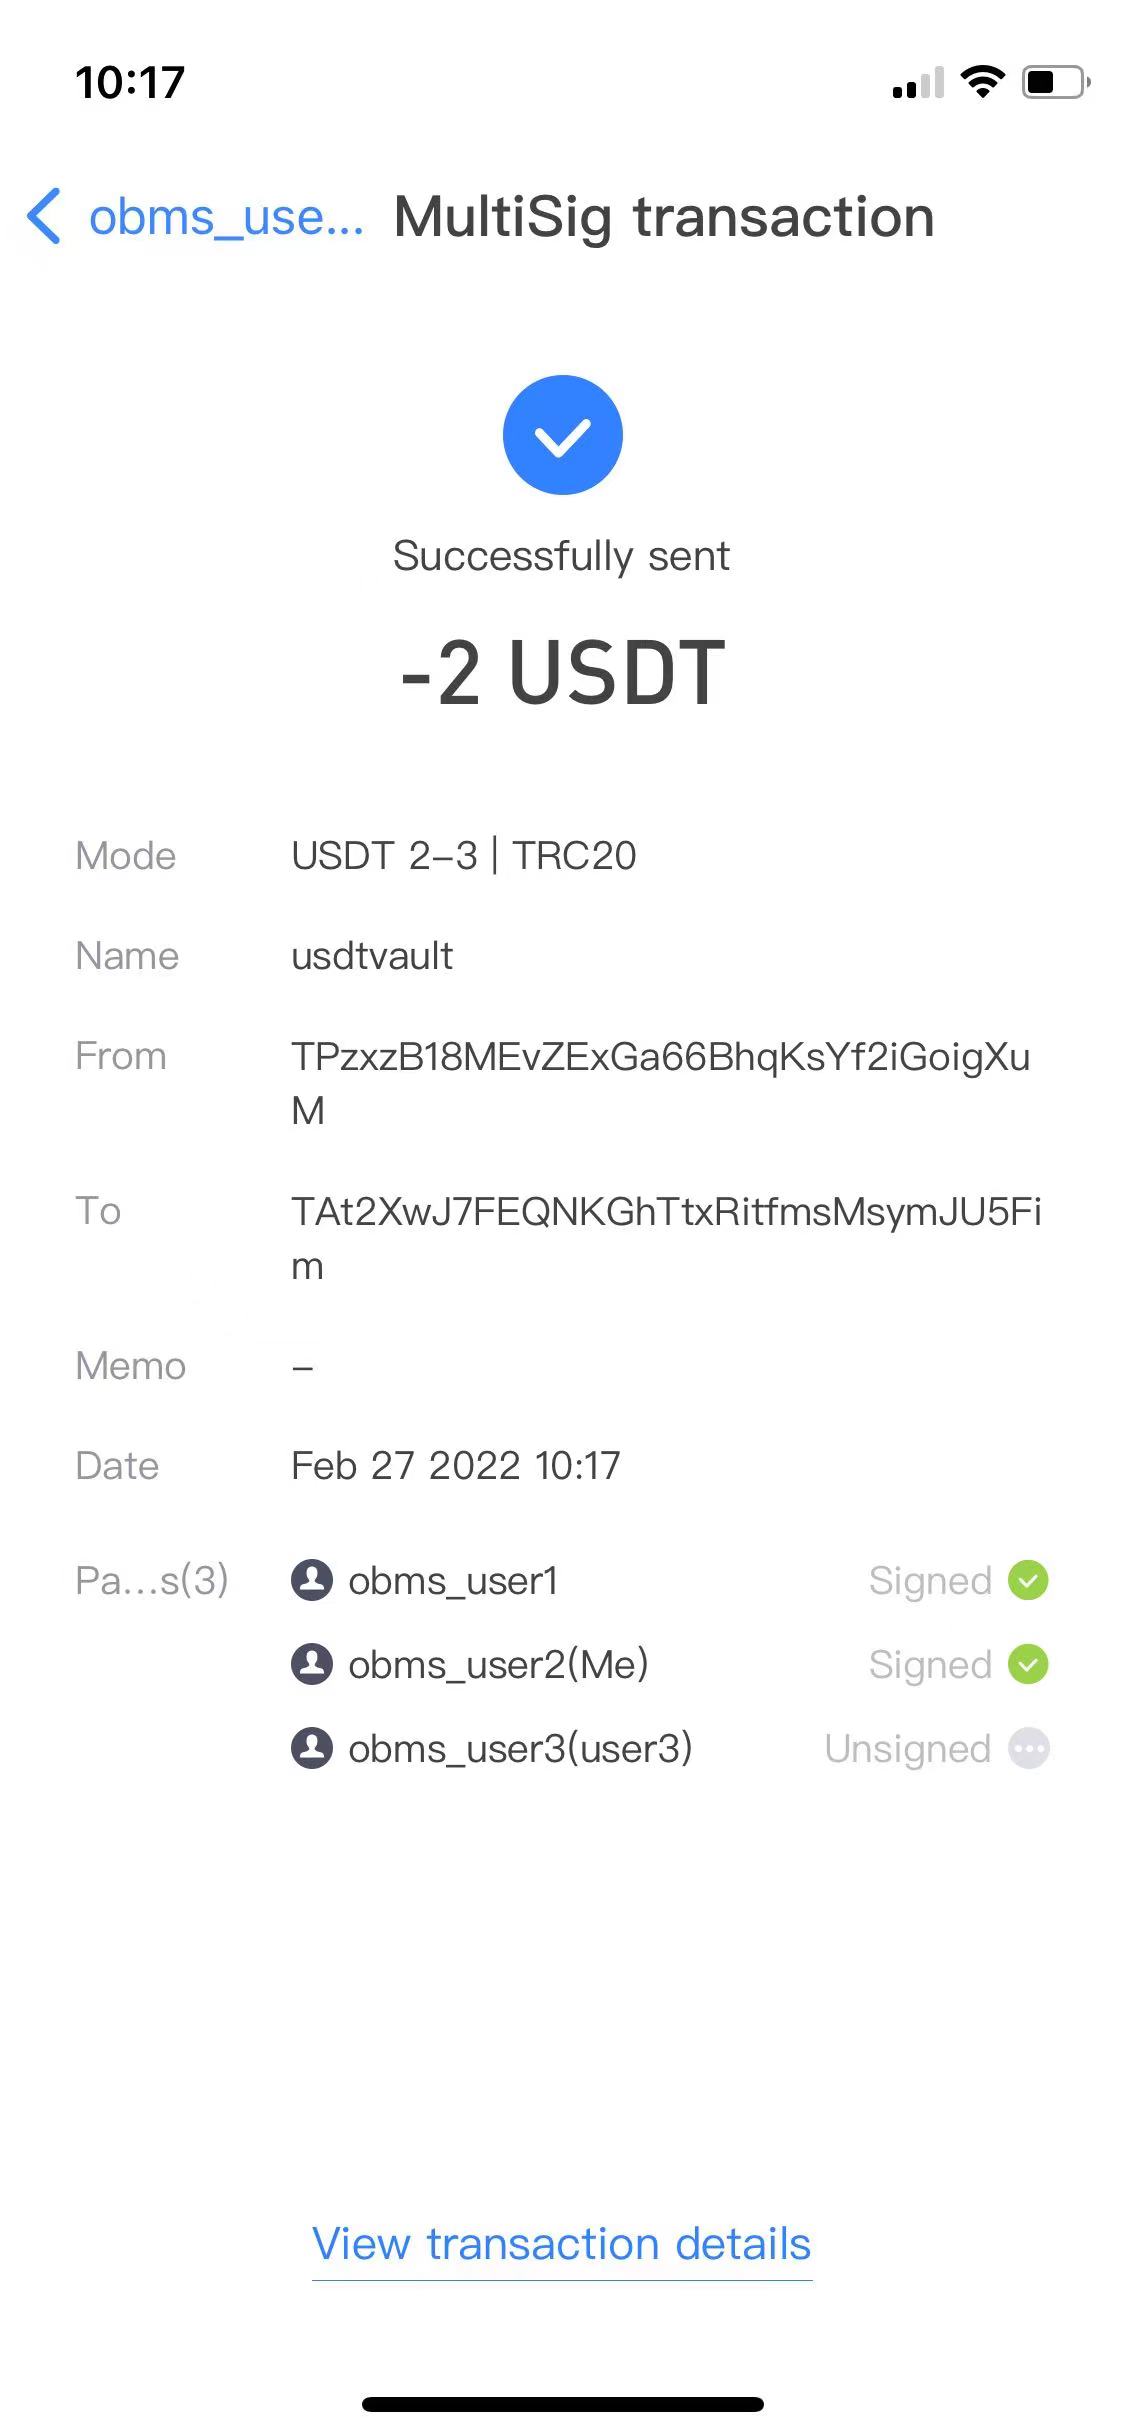
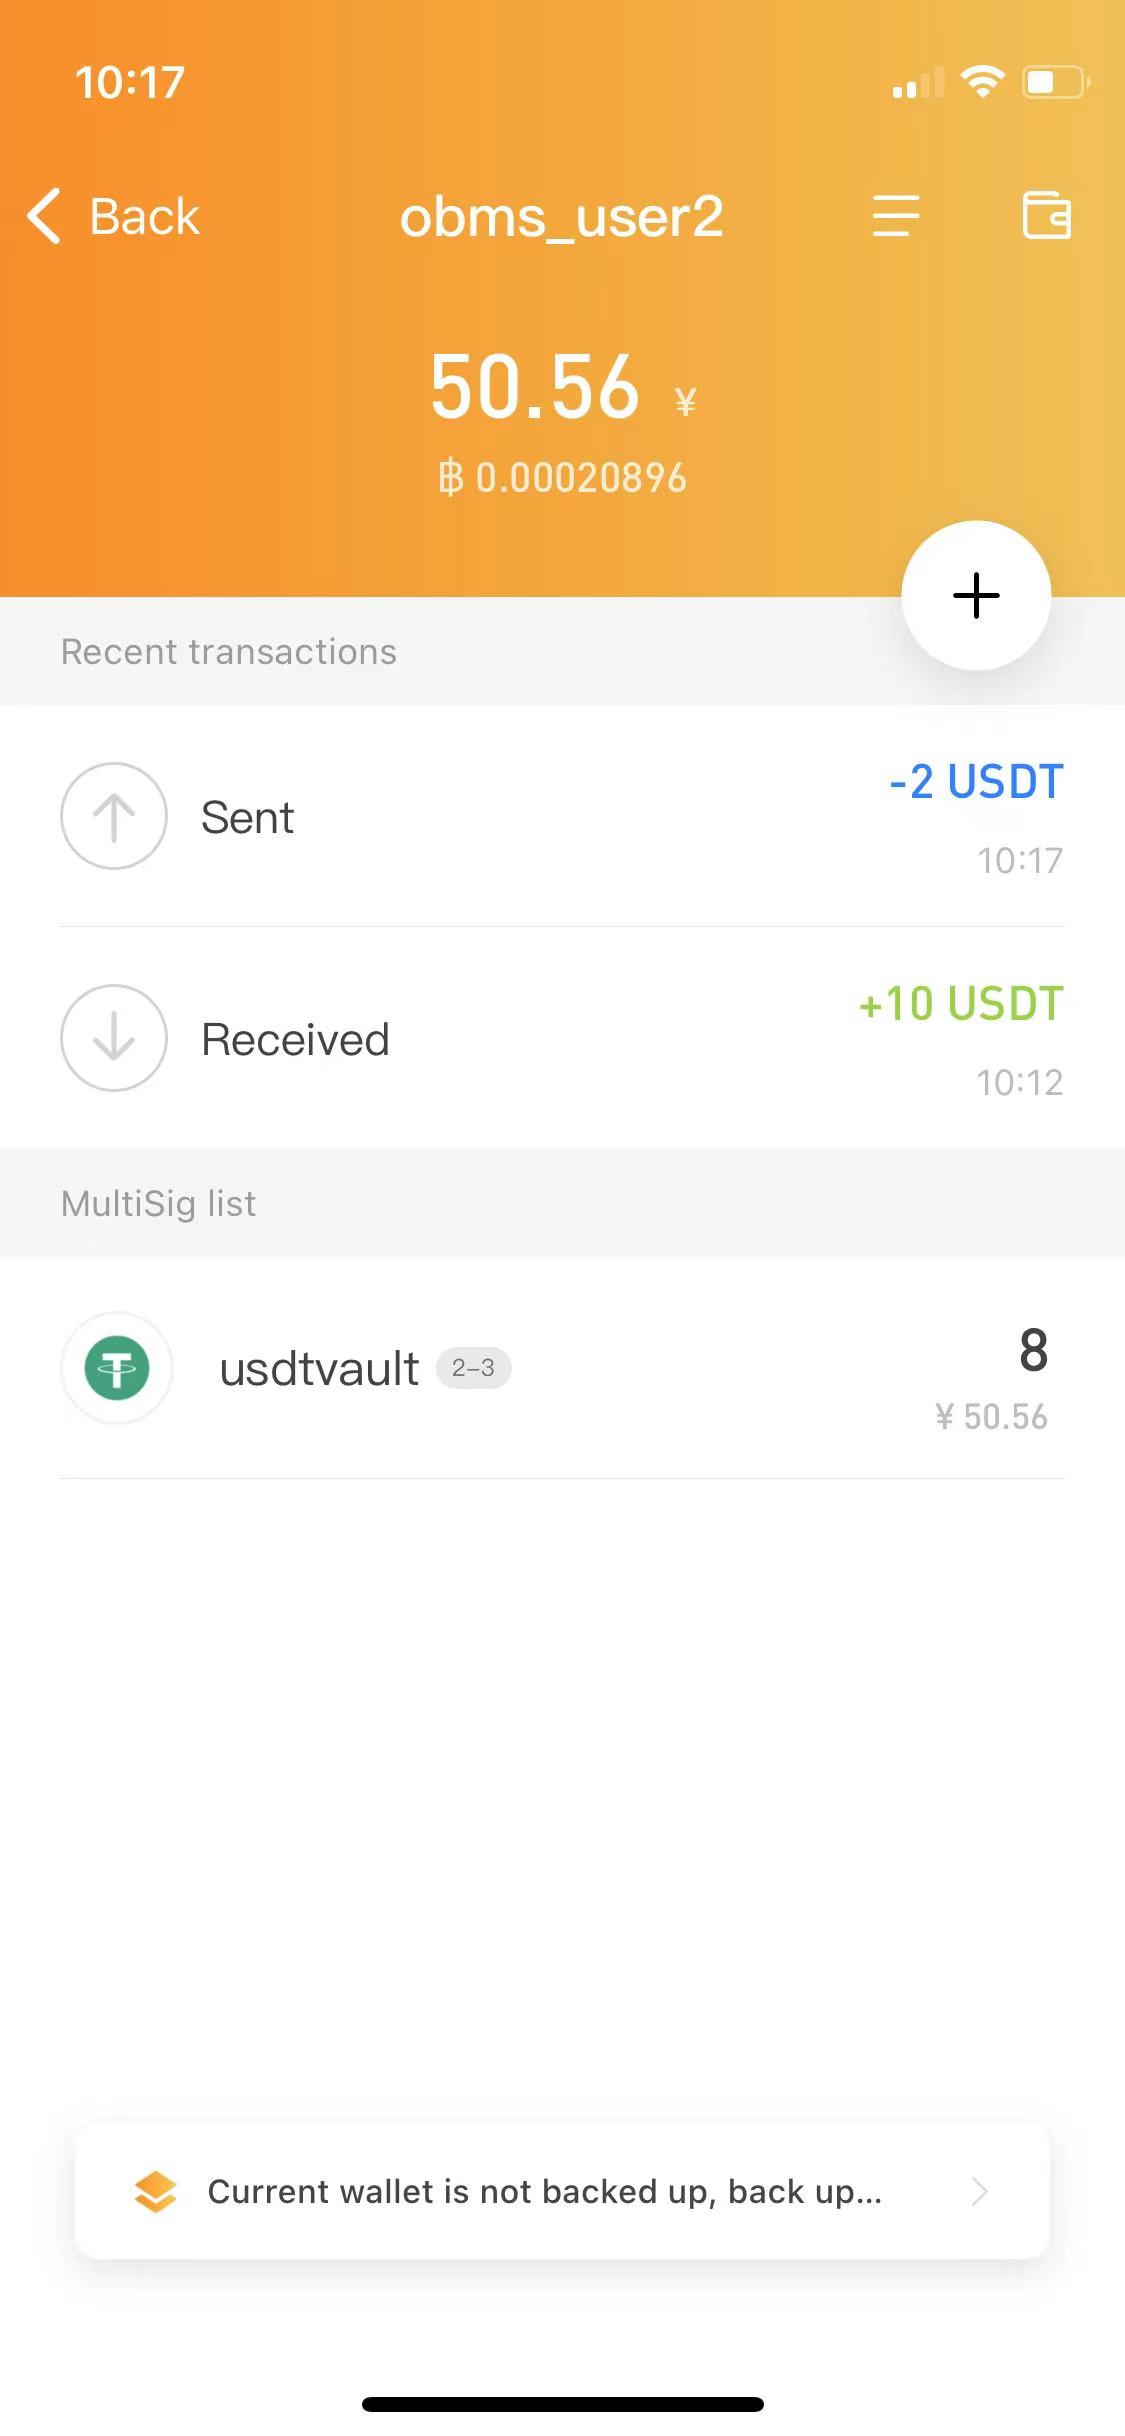
When the number of signers reaches the required minimum, the transaction will be automatically sent to the network and take effect, as shown in the figure below:
How to add TRX MultiSig or other TRC20 token MultiSig?
TRC20 MultiSig addresses can receive TRX and any TRC20 tokens. When a new token is received, a new MultiSig entry will be automatically generated (without you having to add it manually). However, due to certain anti-spam policies, not all tokens are added automatically. In some cases, you need to add a new MultiSig entry manually. (There is a menu item on the MultiSig page of the MultiSig initiator: Add MultiSig Token), as shown below:


Just enter the contract address (token ID) of the TRC20 token you want to add. Note: Not all participants have this menu item, only the creator of the MultiSig has this menu item.
3. ETH/ERC20 MultiSig, BSC/BEP20 MultiSig (explained by USDT-BEP20 MultiSig)
ETH/ERC20 MultiSig is implemented in the form of smart contracts, and ether (ETH) is required in the process of creation and use, so before this, you need to create a personal wallet and have an appropriate amount of ether (ETH). BSC/BEP20 MultiSig is very similar to ETH/ERC20 MultiSig, except that the corresponding Ether (ETH) is replaced with BSC coin (BSC coin in Ownbit is the BEP20 version of BNB coin). This article takes USDT-BEP20 as an example to explain:
Have a personal wallet and have an appropriate amount of BSC coins (ETH coins if it is ETH/ERC20 MultiSig), as shown below:
Click the + sign on the MultiSig wallet page to enter the MultiSig creation process page, fill in the MultiSig name, as shown below:

Select USDT-BEP20 (Note: The latest version no longer has a separate USDT-BEP20 option. BEP20 always selects the coin type: BSC.) as the coin type, and select the corresponding signature mode (this article uses the 2-3 mode as an example to explain, that is, there are 3 participants, and the assets can be spent with 2 signatures), as shown below:

Choose between "Standard Contract" mode or "Accident Protection" mode. The standard mode is the MultiSig mode in the general sense. Taking 3-3 MultiSig as an example, assets can be spent when 3 signatures are reached. If for whatever reason the requirement is not met, the asset can never be spent. For example, when one of the three asset signers has a life accident and he does not leave a backup mnemonic, the remaining two will never be able to spend the asset. In the accident protection mode, participants are required to actively submit transactions to the blockchain network to indicate that they are active, otherwise it will be regarded as an accident. When the system thinks that an accident has occurred, the number of signatures required will be automatically reduced. In the previous example, the person who had the accident failed to remain active for a long time (usually about 416 days), and the remaining two people could still spend the asset.
How to choose? Standard mode and accident protection mode have their own advantages and disadvantages, and users should make a prudent decision after fully understanding their characteristics. Usually 2-3, 3-5 types of MultiSig are recommended to use the standard mode, while 3-3, 5-5 and the like use the accident protection mode (suggestions are not standard approvals, users should make their own prudent decisions).
This article takes selecting accident protection mode as an example. After selecting, create a MultiSig (hint: if you need to add participants, please refer here), and wait for other participants to join. After all the participants have joined, the MultiSig contract can be deployed, as shown in the following figure:
According to the network status, a certain amount of BSC coins (ETH coins for ETH/ERC20 MultiSig) is required to deploy the contract as the network miner fee, and a personal wallet is selected for sending, as shown in the following figure:
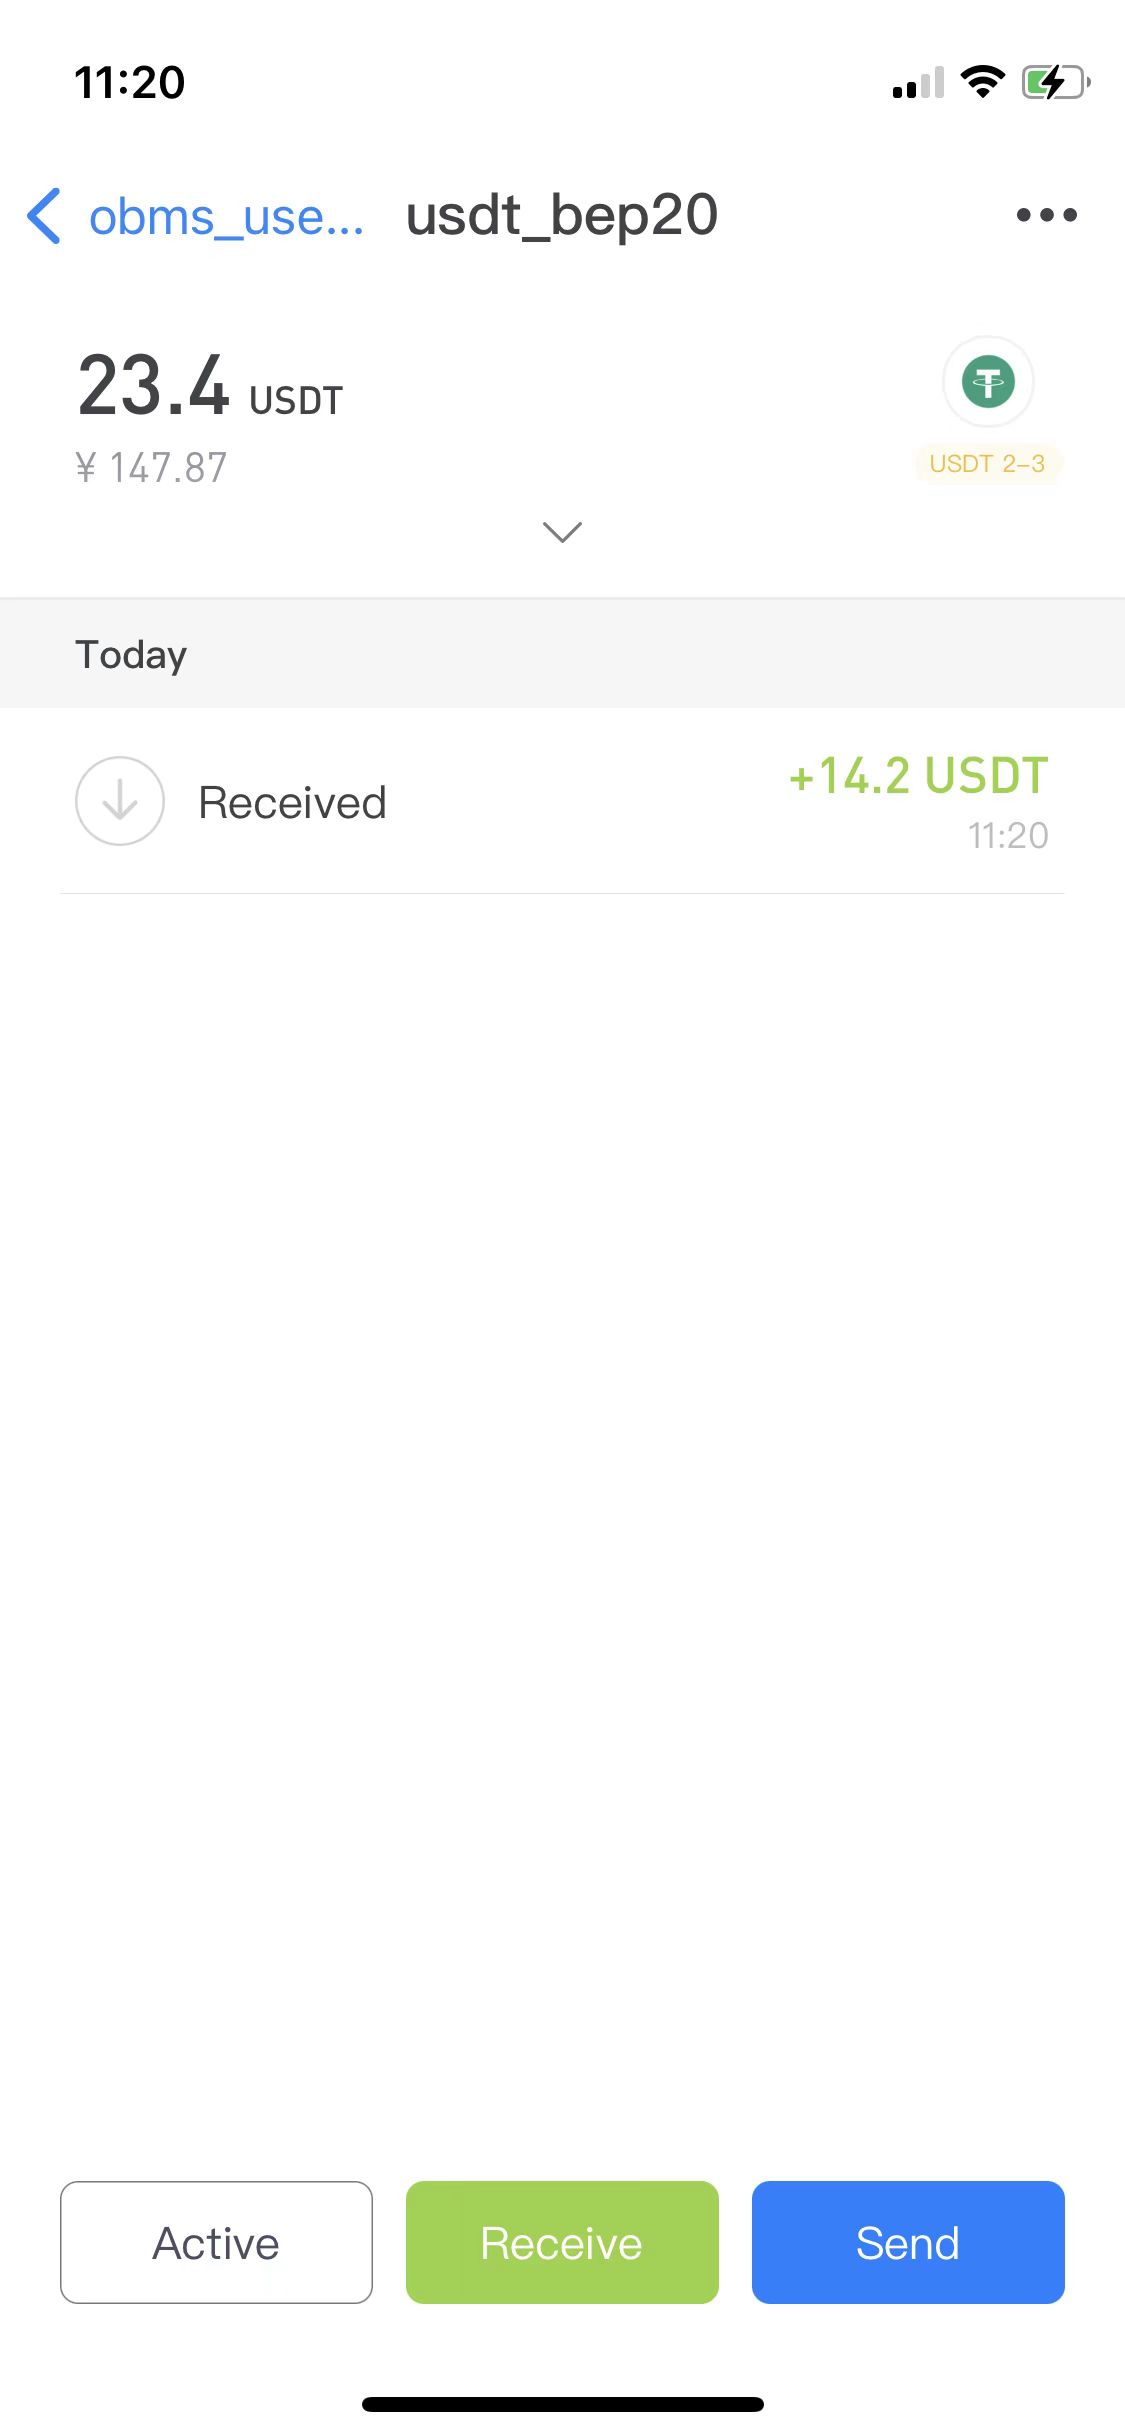
After the contract is deployed, the corresponding MultiSig is successfully created, and then you can deposit USDT-BEP20 in the corresponding address, as shown below:
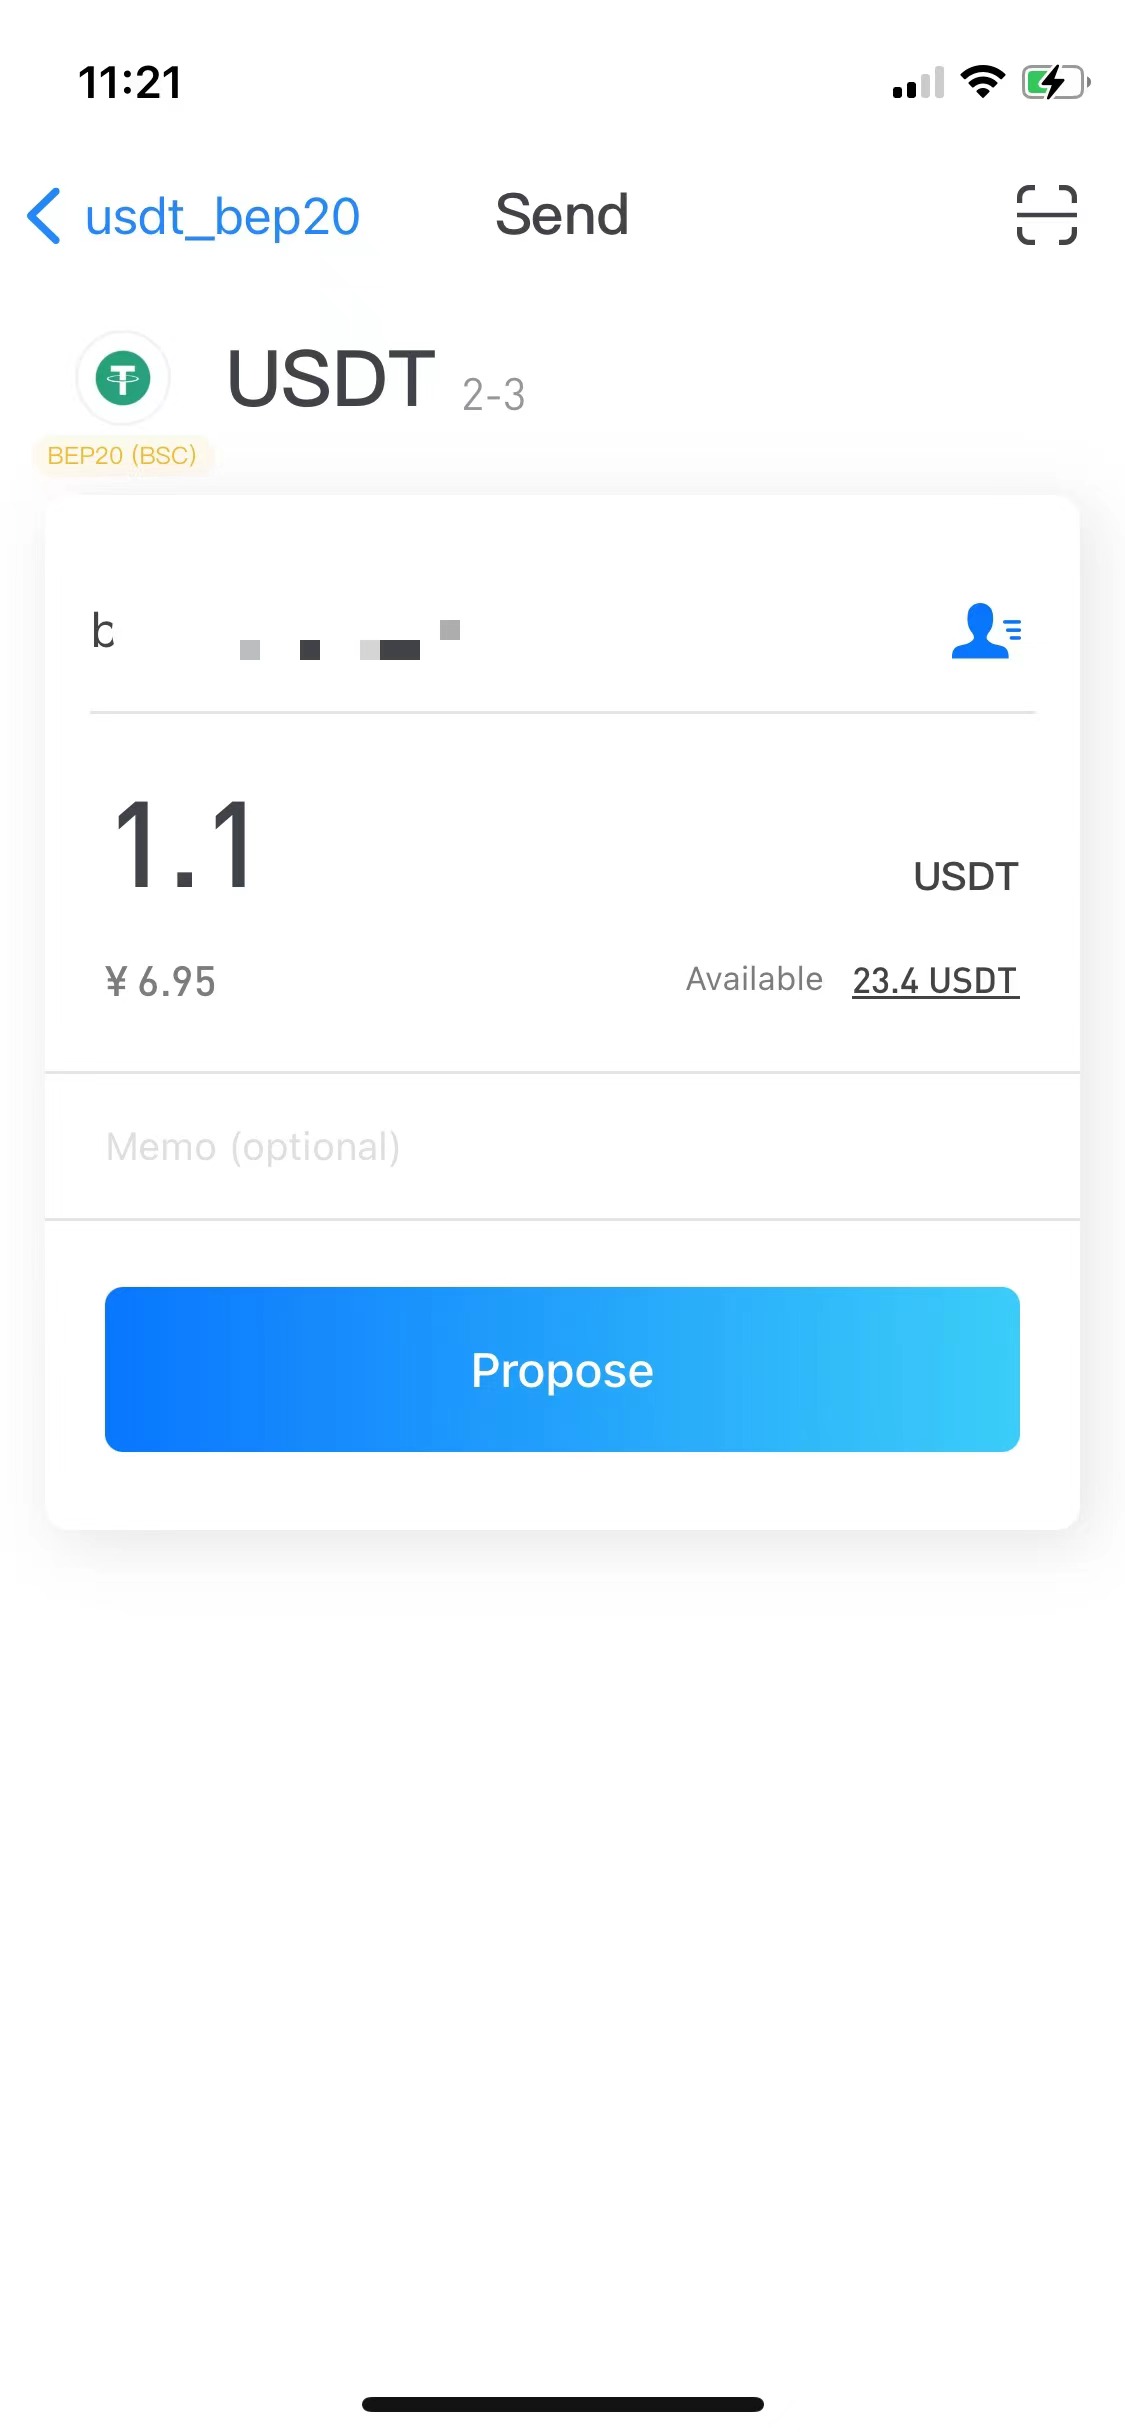
How to spend (send) MultiSig assets?
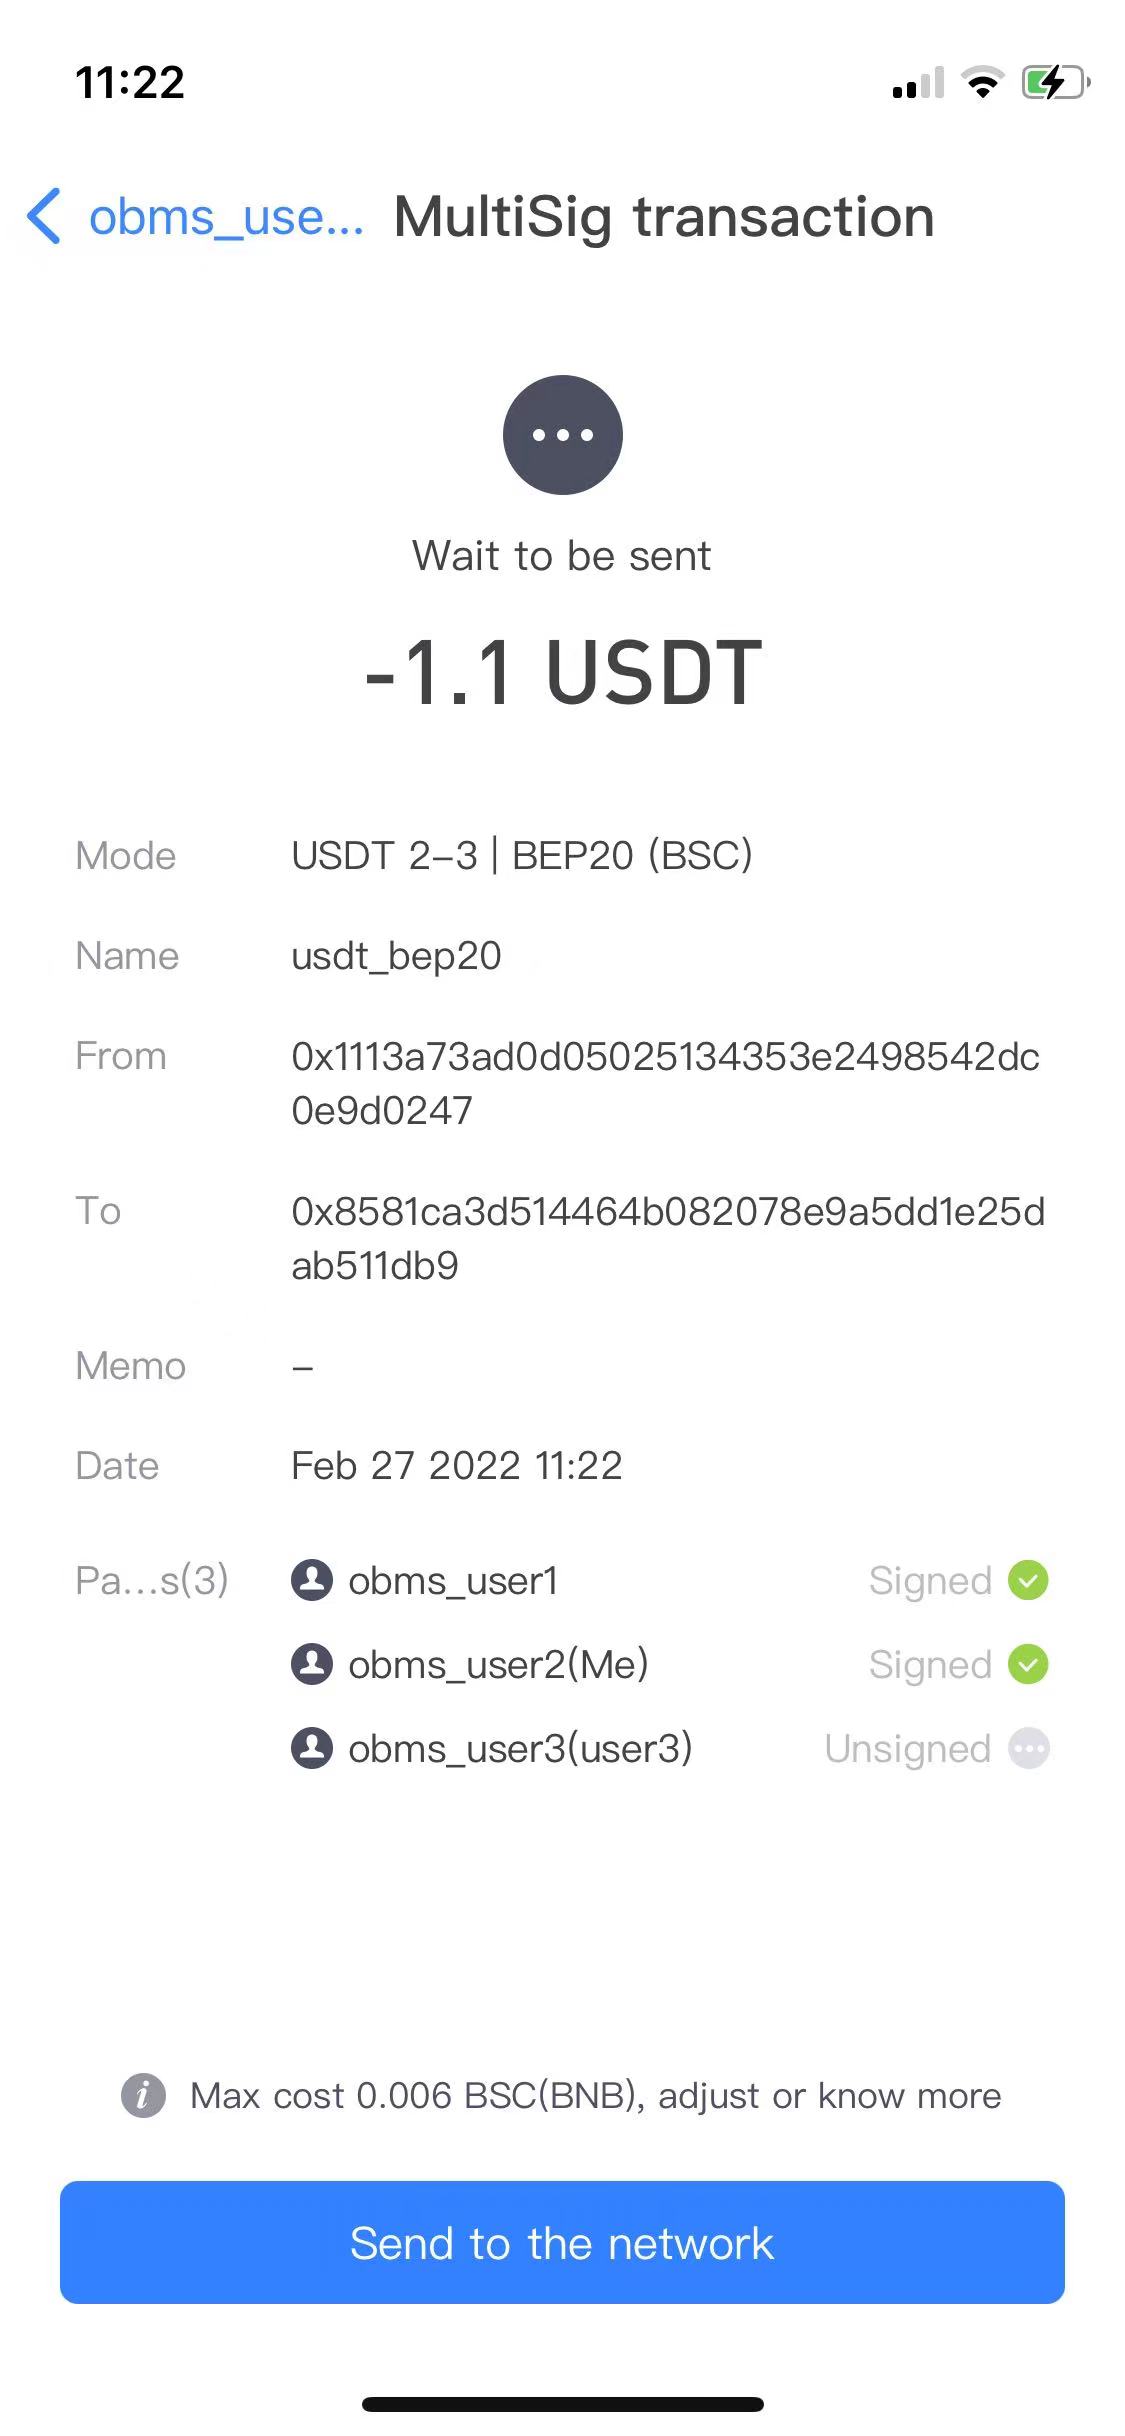
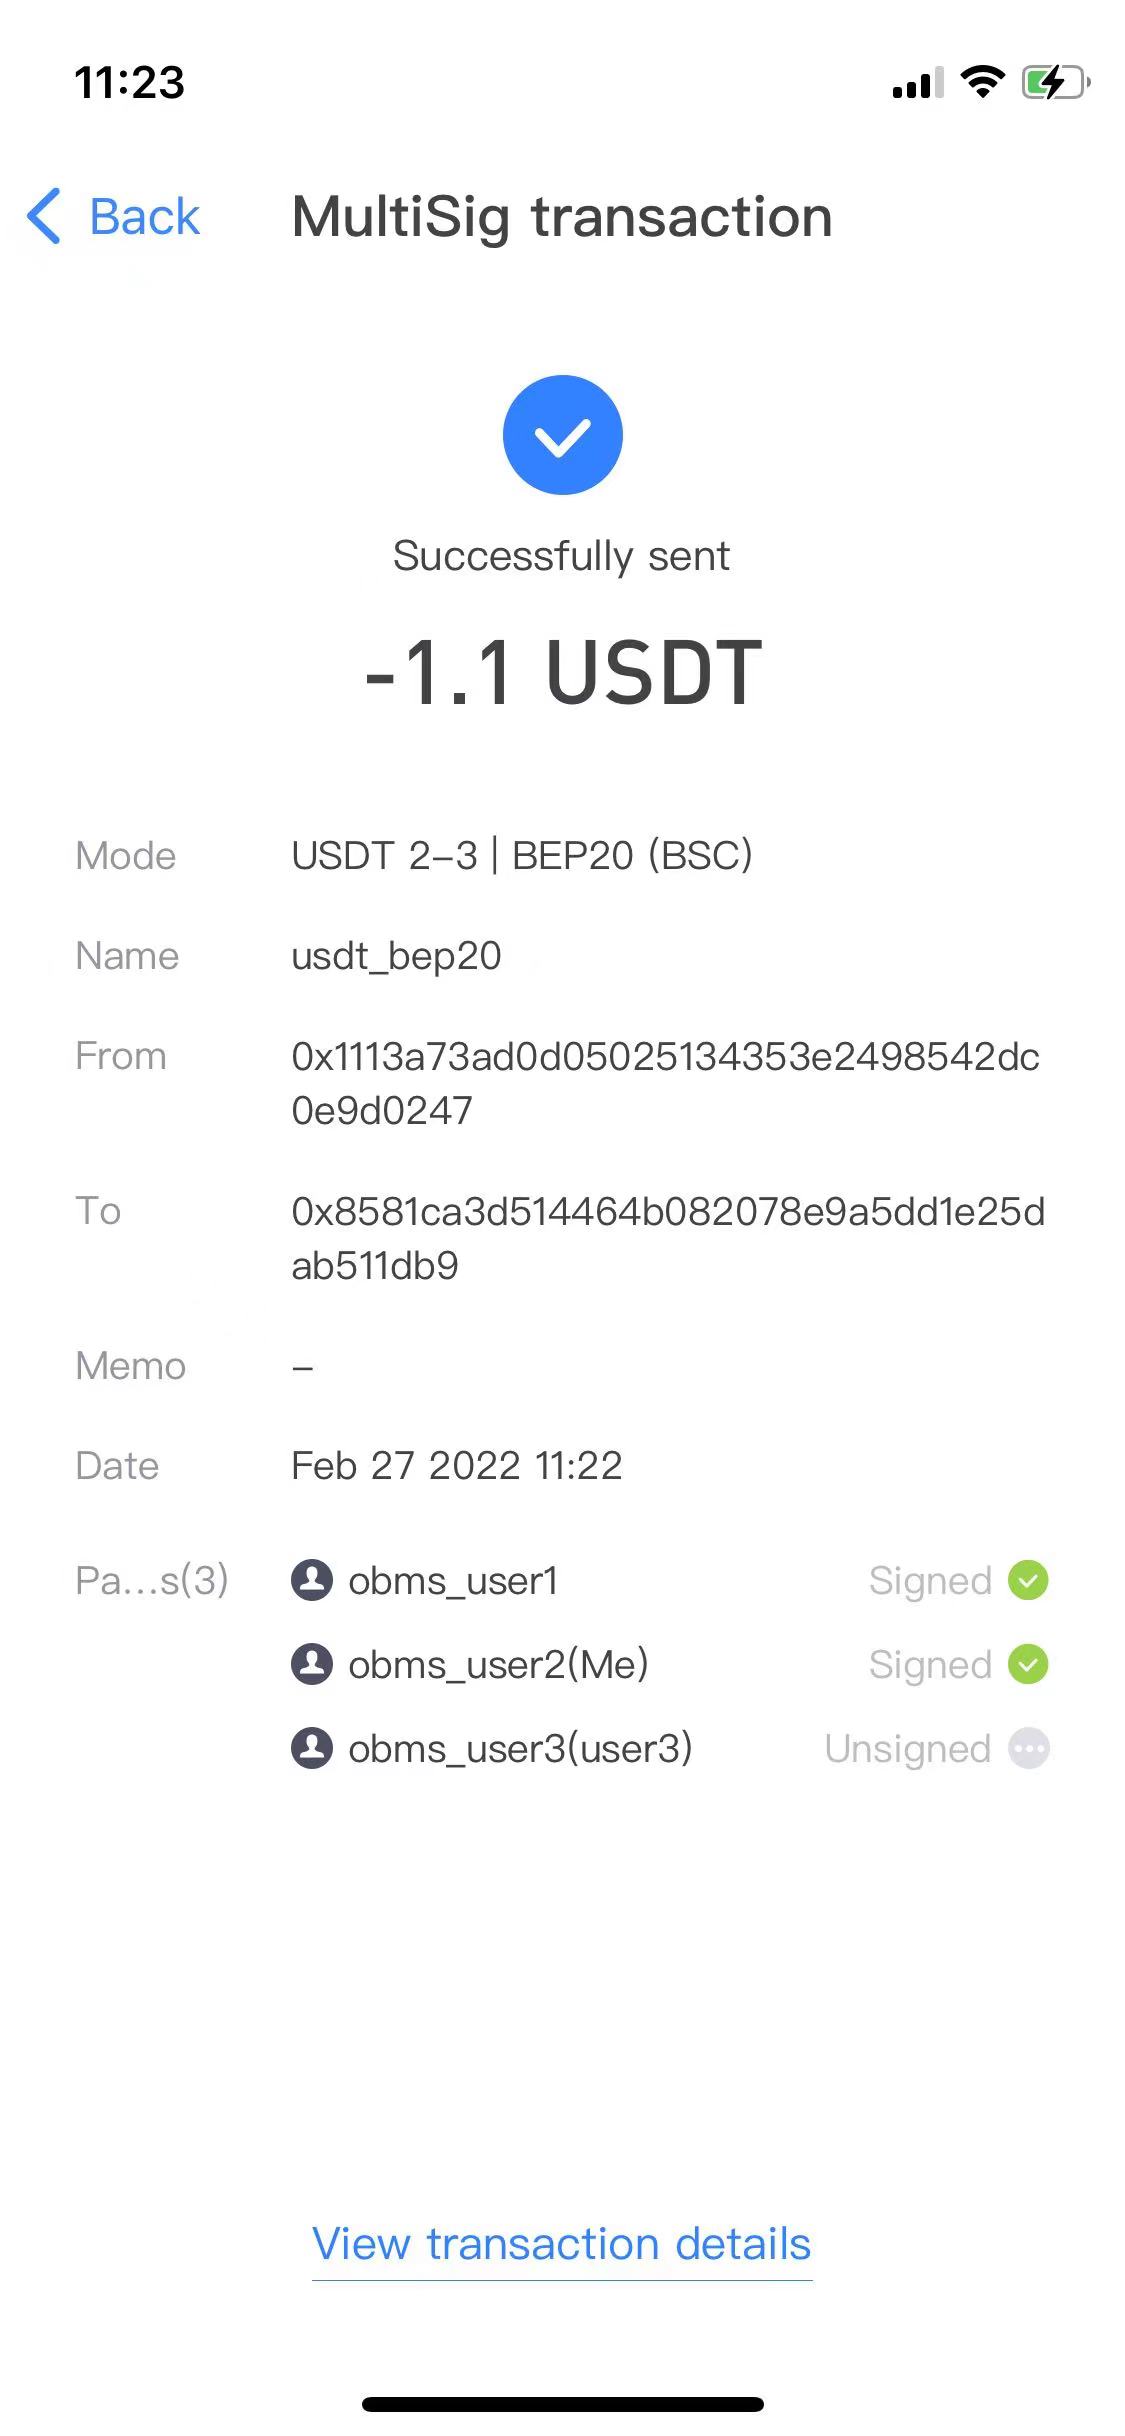
When spending MultiSig assets, one party clicks the "Send" button on the MultiSig page and enters the password, as shown below:
After the relevant participants sign, you need a personal wallet with an appropriate amount of BSC coins (ETH coins for ETH/ERC20 MultiSig) to send the transaction to the network. As shown below:
How to add BSC MultiSig or other BEP20 token MultiSig?
A BEP20 MultiSig address can receive BSC and any BEP20 tokens, new MultiSig entries will be automatically created when new tokens are received. You can also add new MultiSig entries by hand, procedures refer to TRX/TRC20 section. The same goes for ETH/ERC20 and other ETH style MultiSig. (There's an exception for old created ETH MultiSig. Check the MS version of the MultiSig. ERC20 can't be received if the version number is 0. New created MultiSig are all versions 4 or above.)
MultiSig contract is open source
ETH/ERC20, BSC/BEP20 MultiSig contract code is open source, click here to learn how to verify the security of MultiSig contract through code.
4. SOL/SPL MultiSig
The usage process of SOL/SPL MultiSig is very similar to TRC20 MultiSig, except that there is an additional step of "sending transactions to the network" in the process of sending MultiSig assets. For other steps, please refer to TRC20 MultiSig.
5. BTC MultiSig (LTC, DOGE, etc.)
This article explains the use of BTC MultiSig. Other UTXO-type coins (such as LTC, DOGE) implement MultiSig in the same way as BTC, so the usage process is also the same.
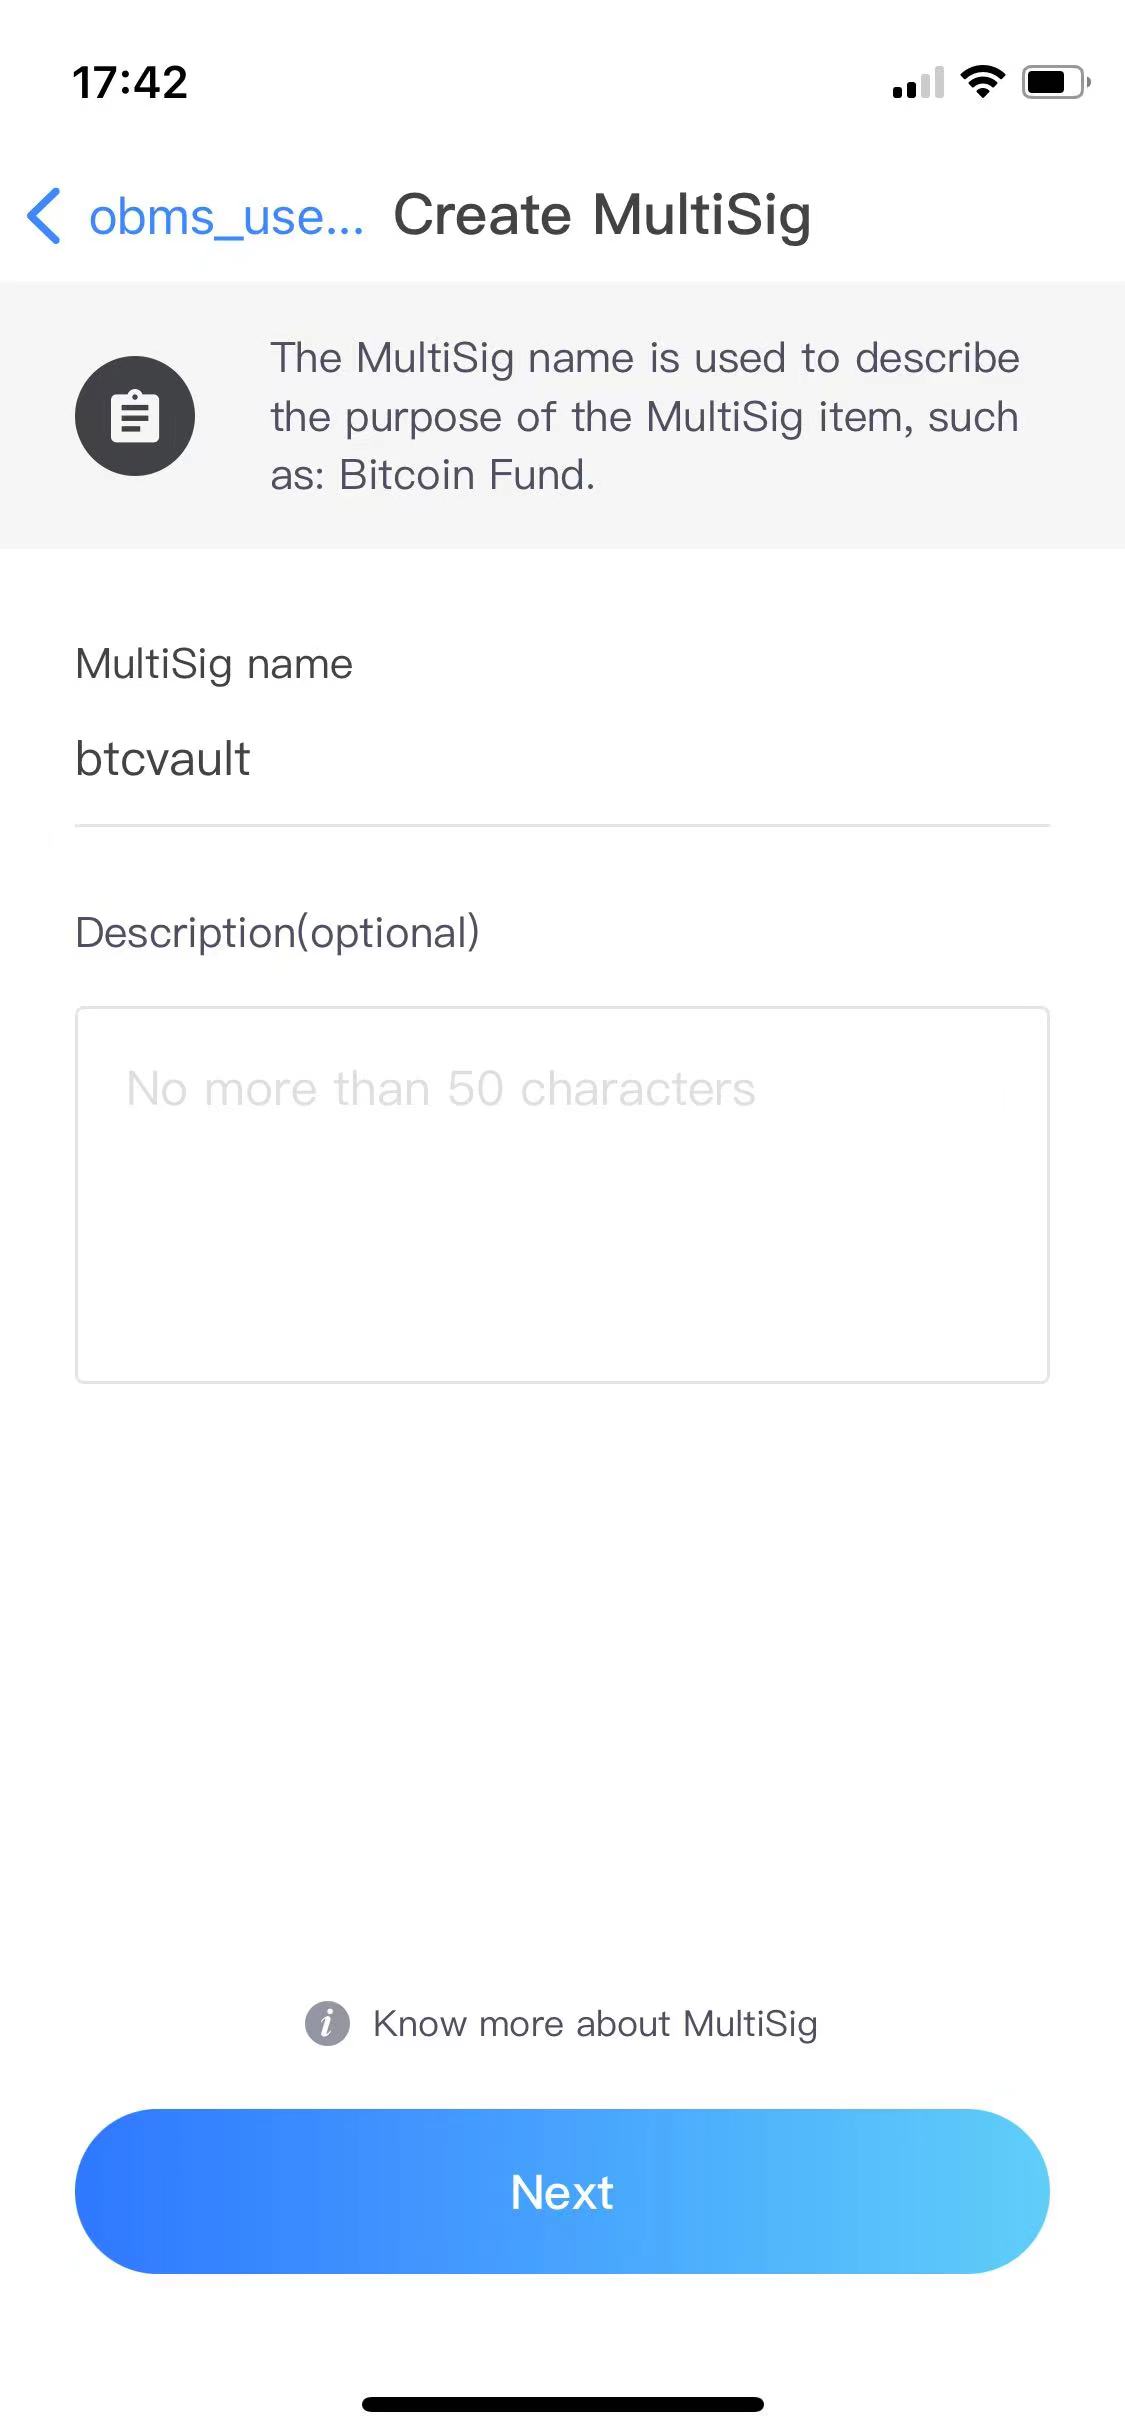
Click the + sign on the MultiSig wallet page to enter the MultiSig creation process page, fill in the MultiSig name, as shown below:
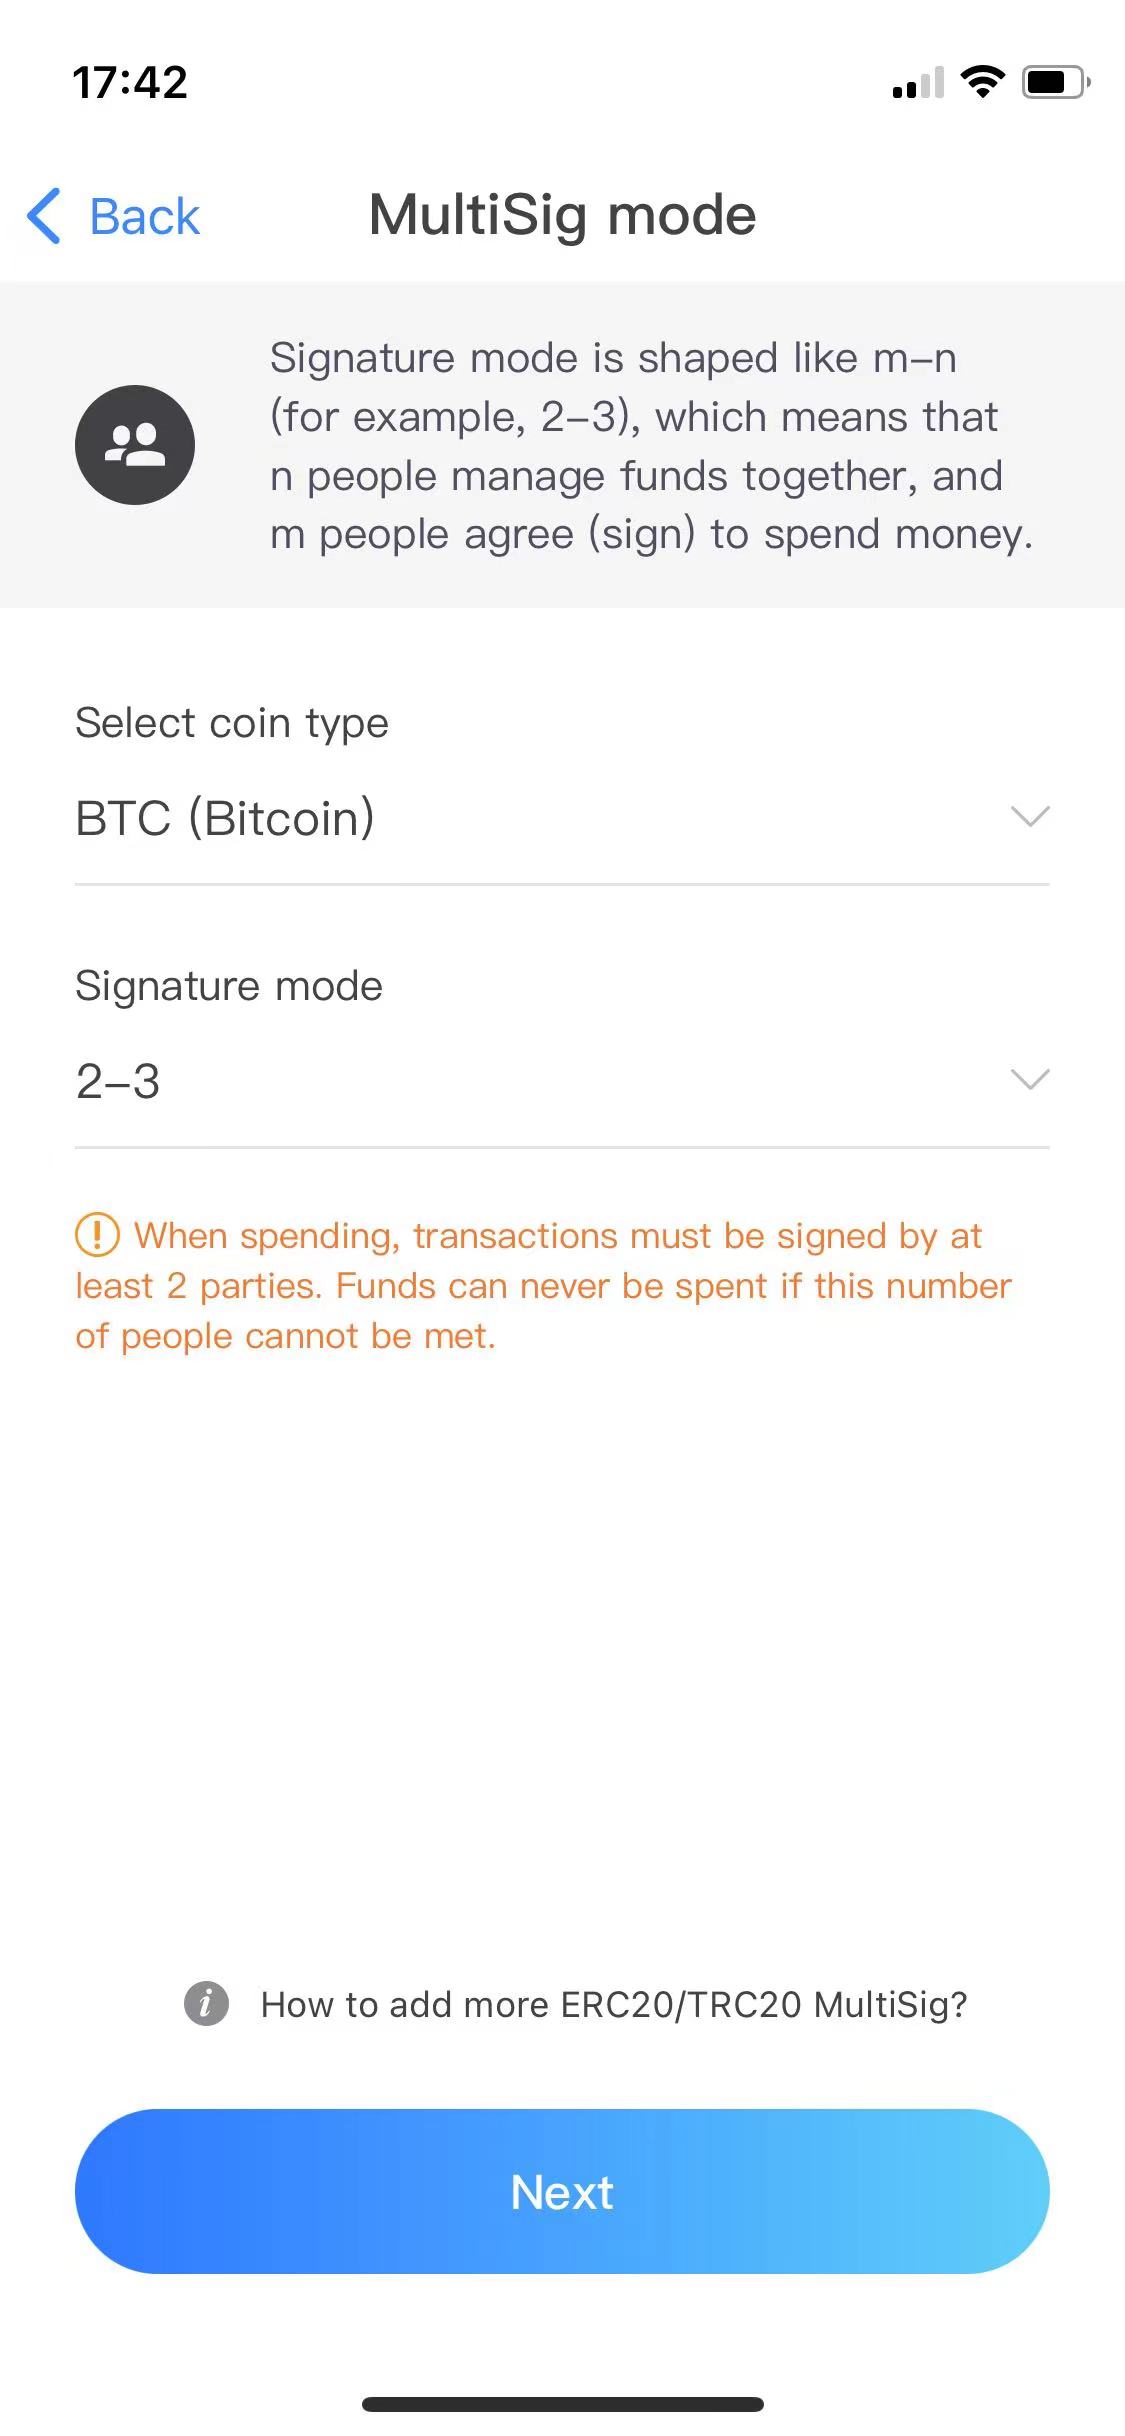
Select BTC as the coin type, and select the corresponding signature mode (this article takes the 2-3 mode as an example to explain, that is, there are 3 participants, and the assets can be spent with 2 signatures), as shown below:
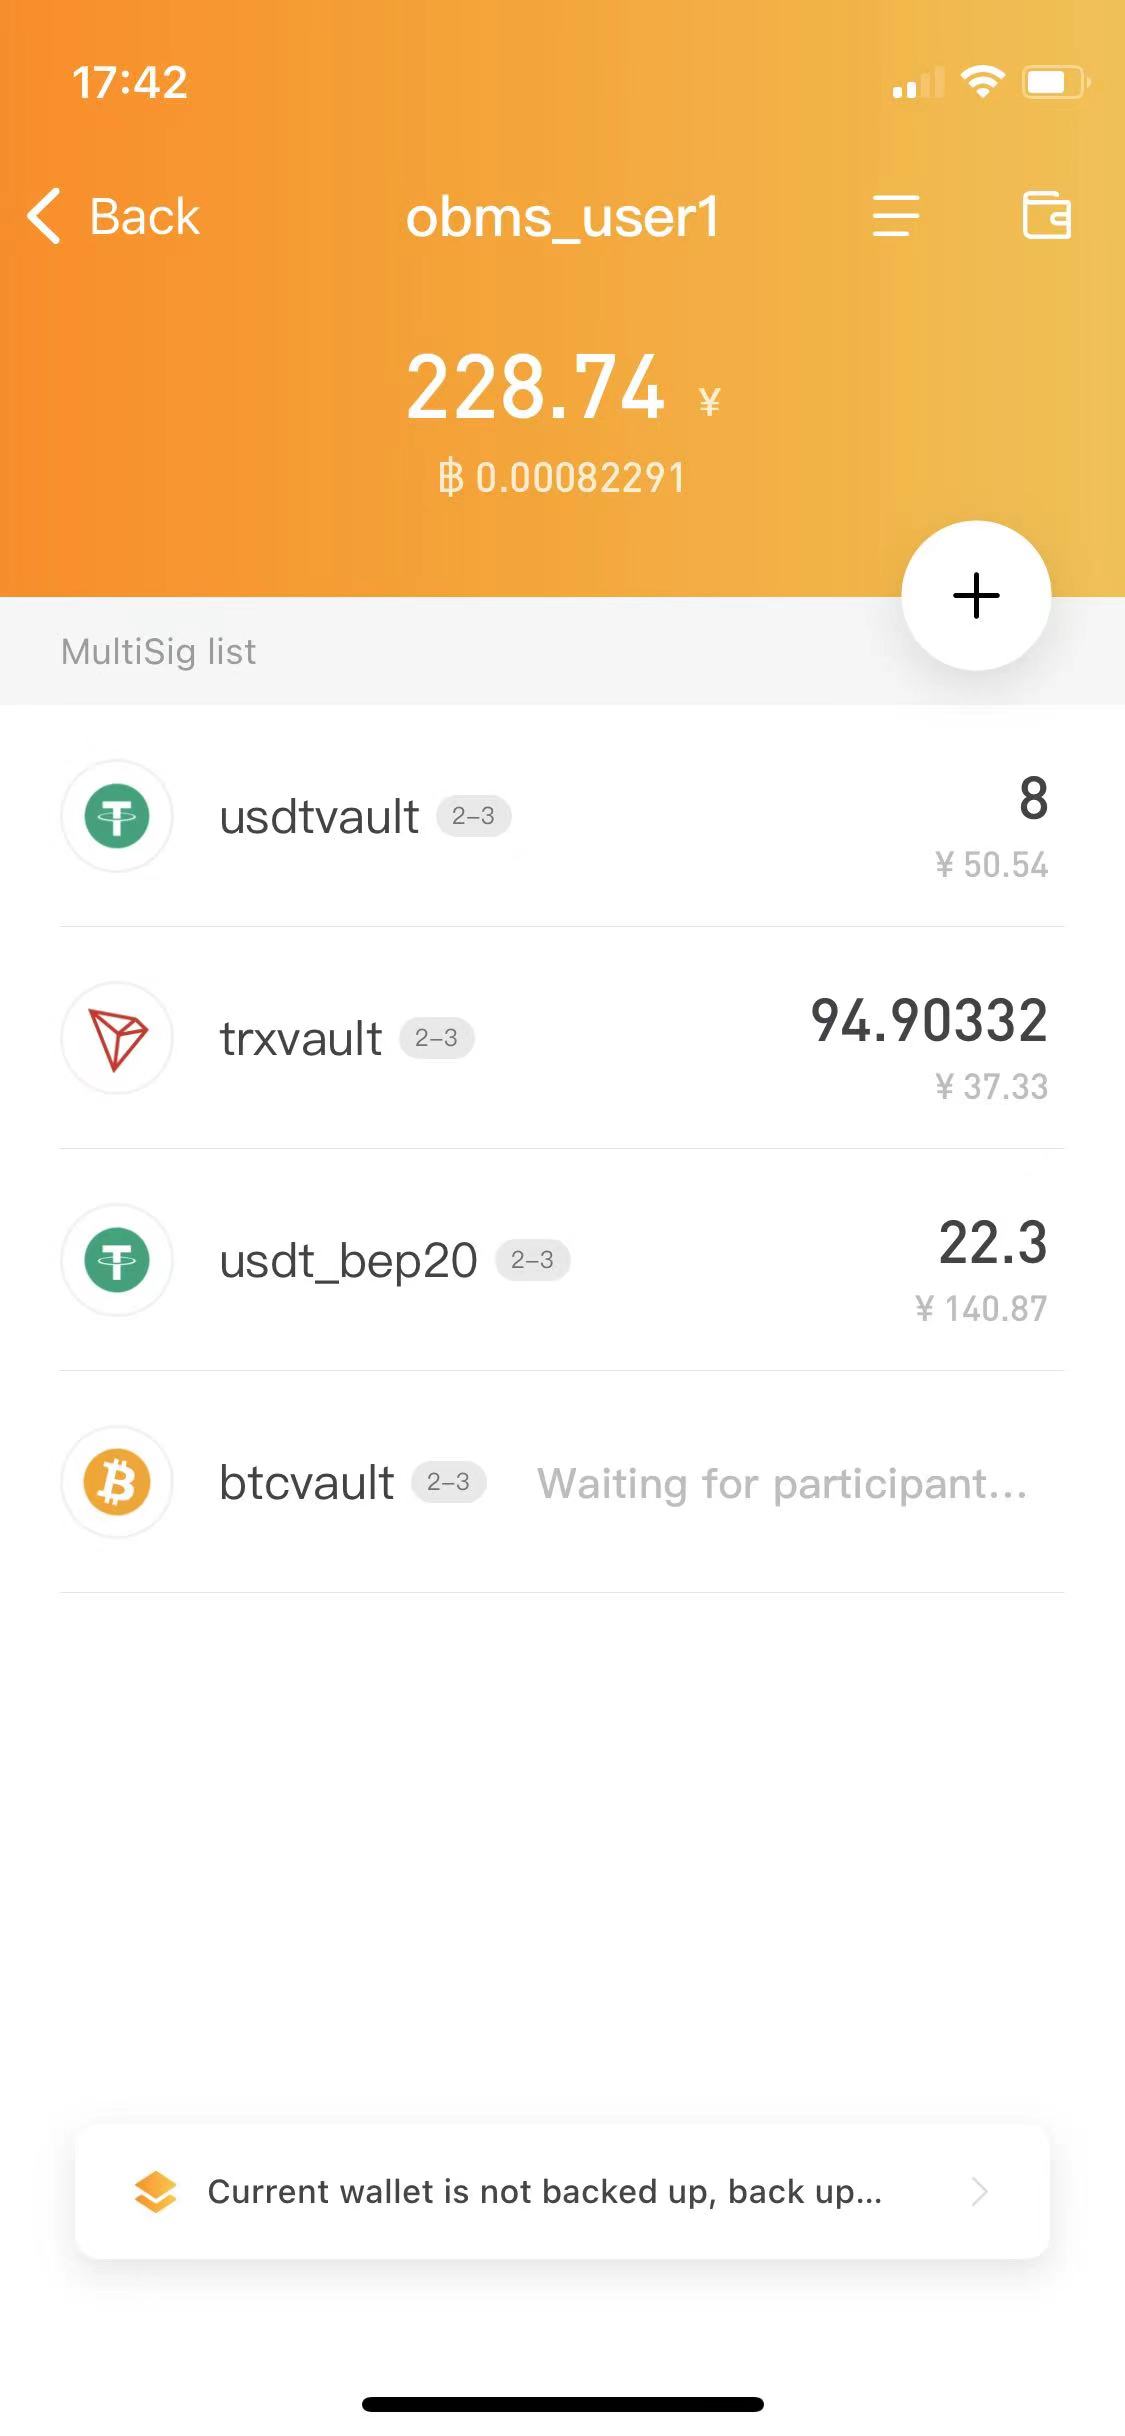
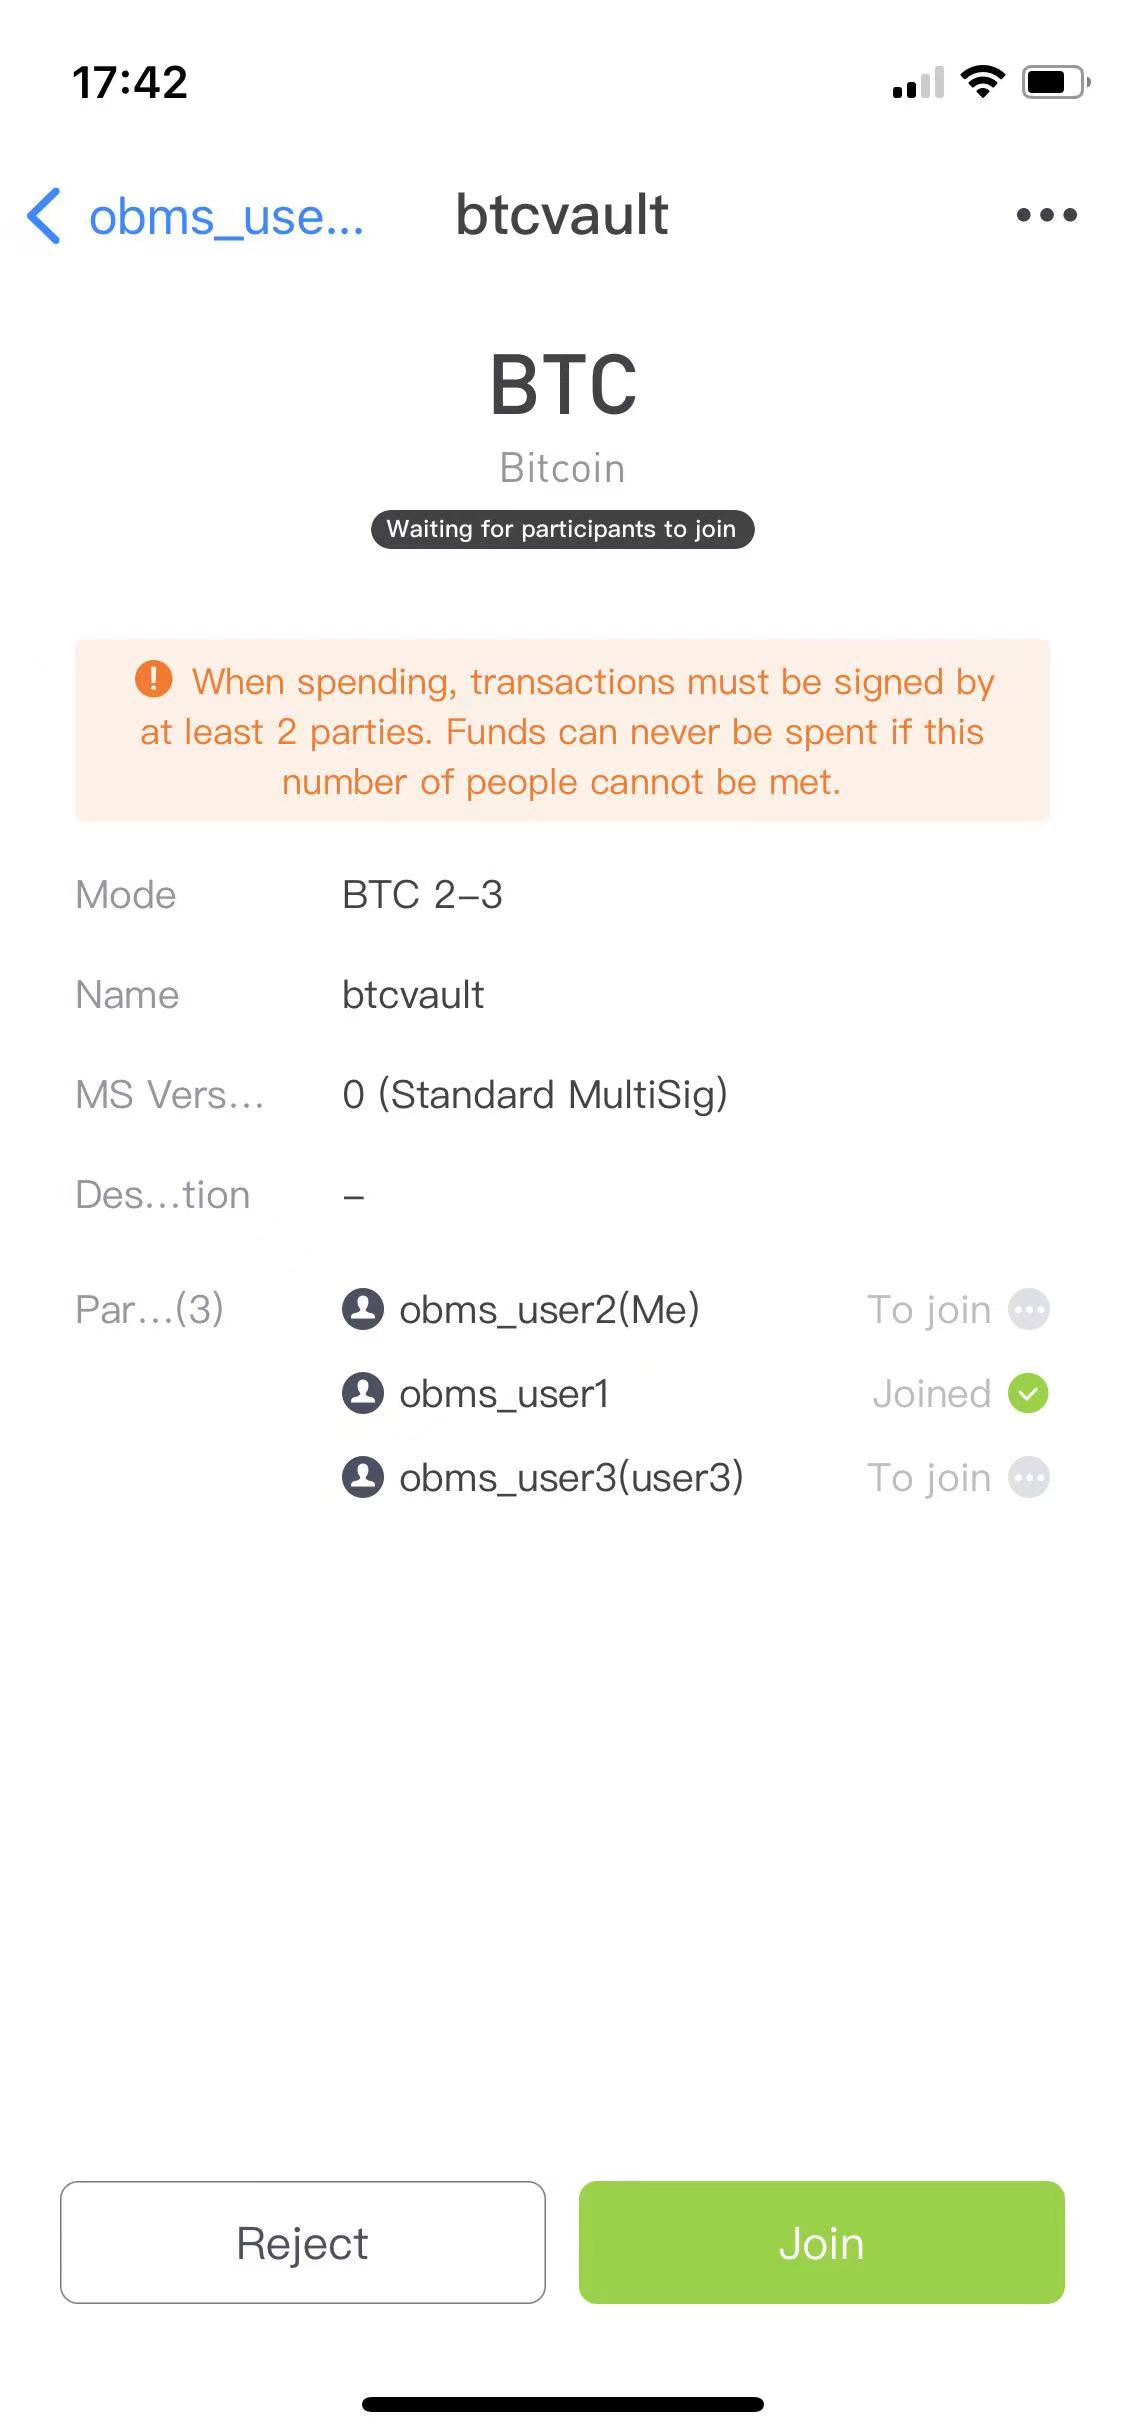
After clicking OK, wait for other parties to join. After all participants have joined, the BTC MultiSig will be created. As shown below:

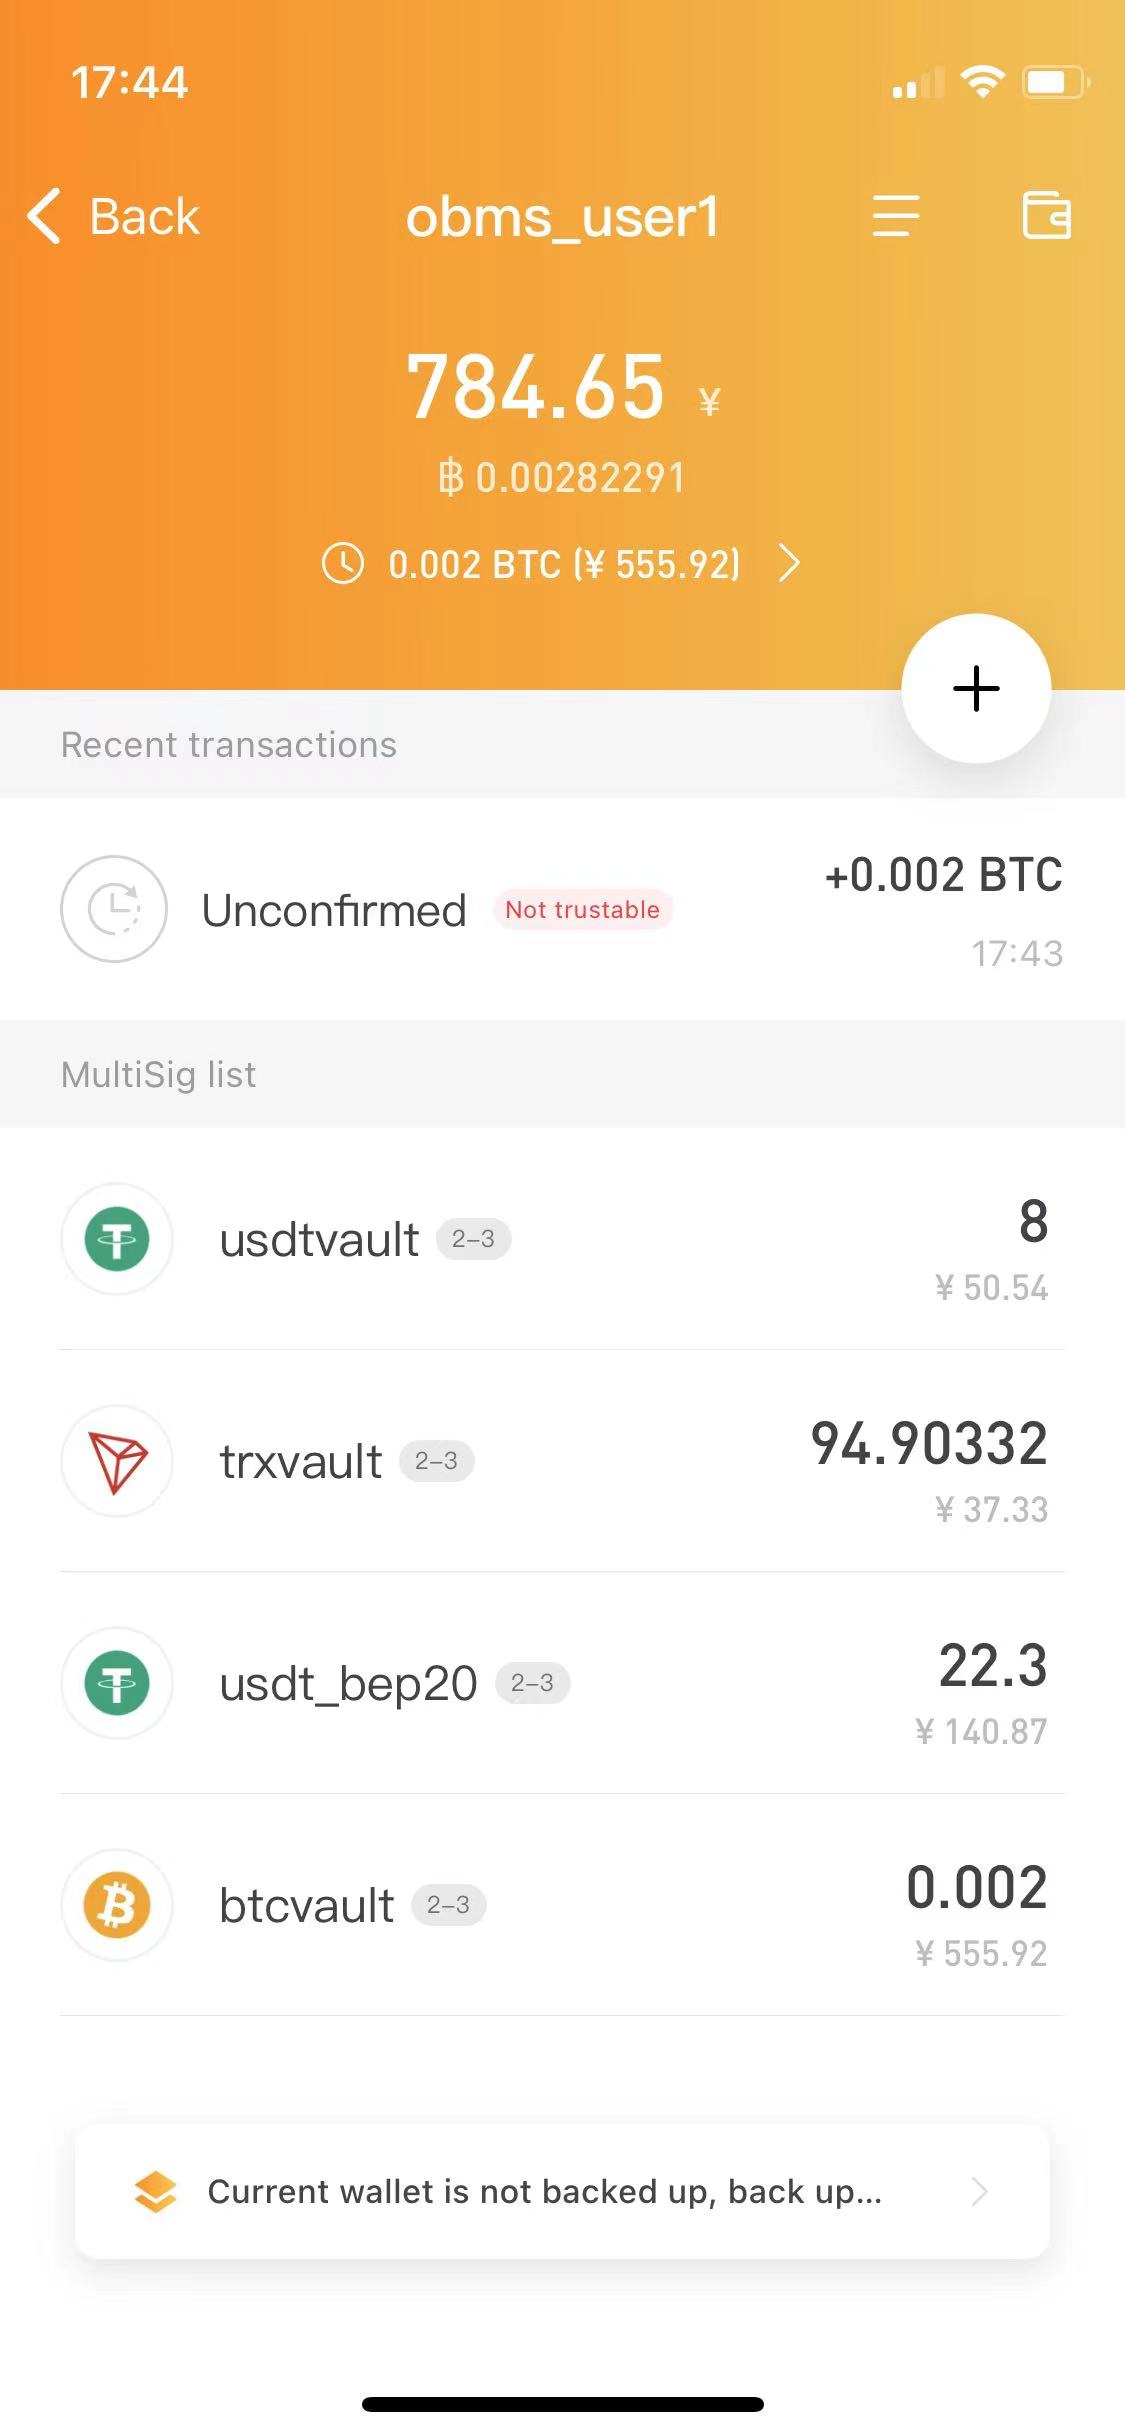
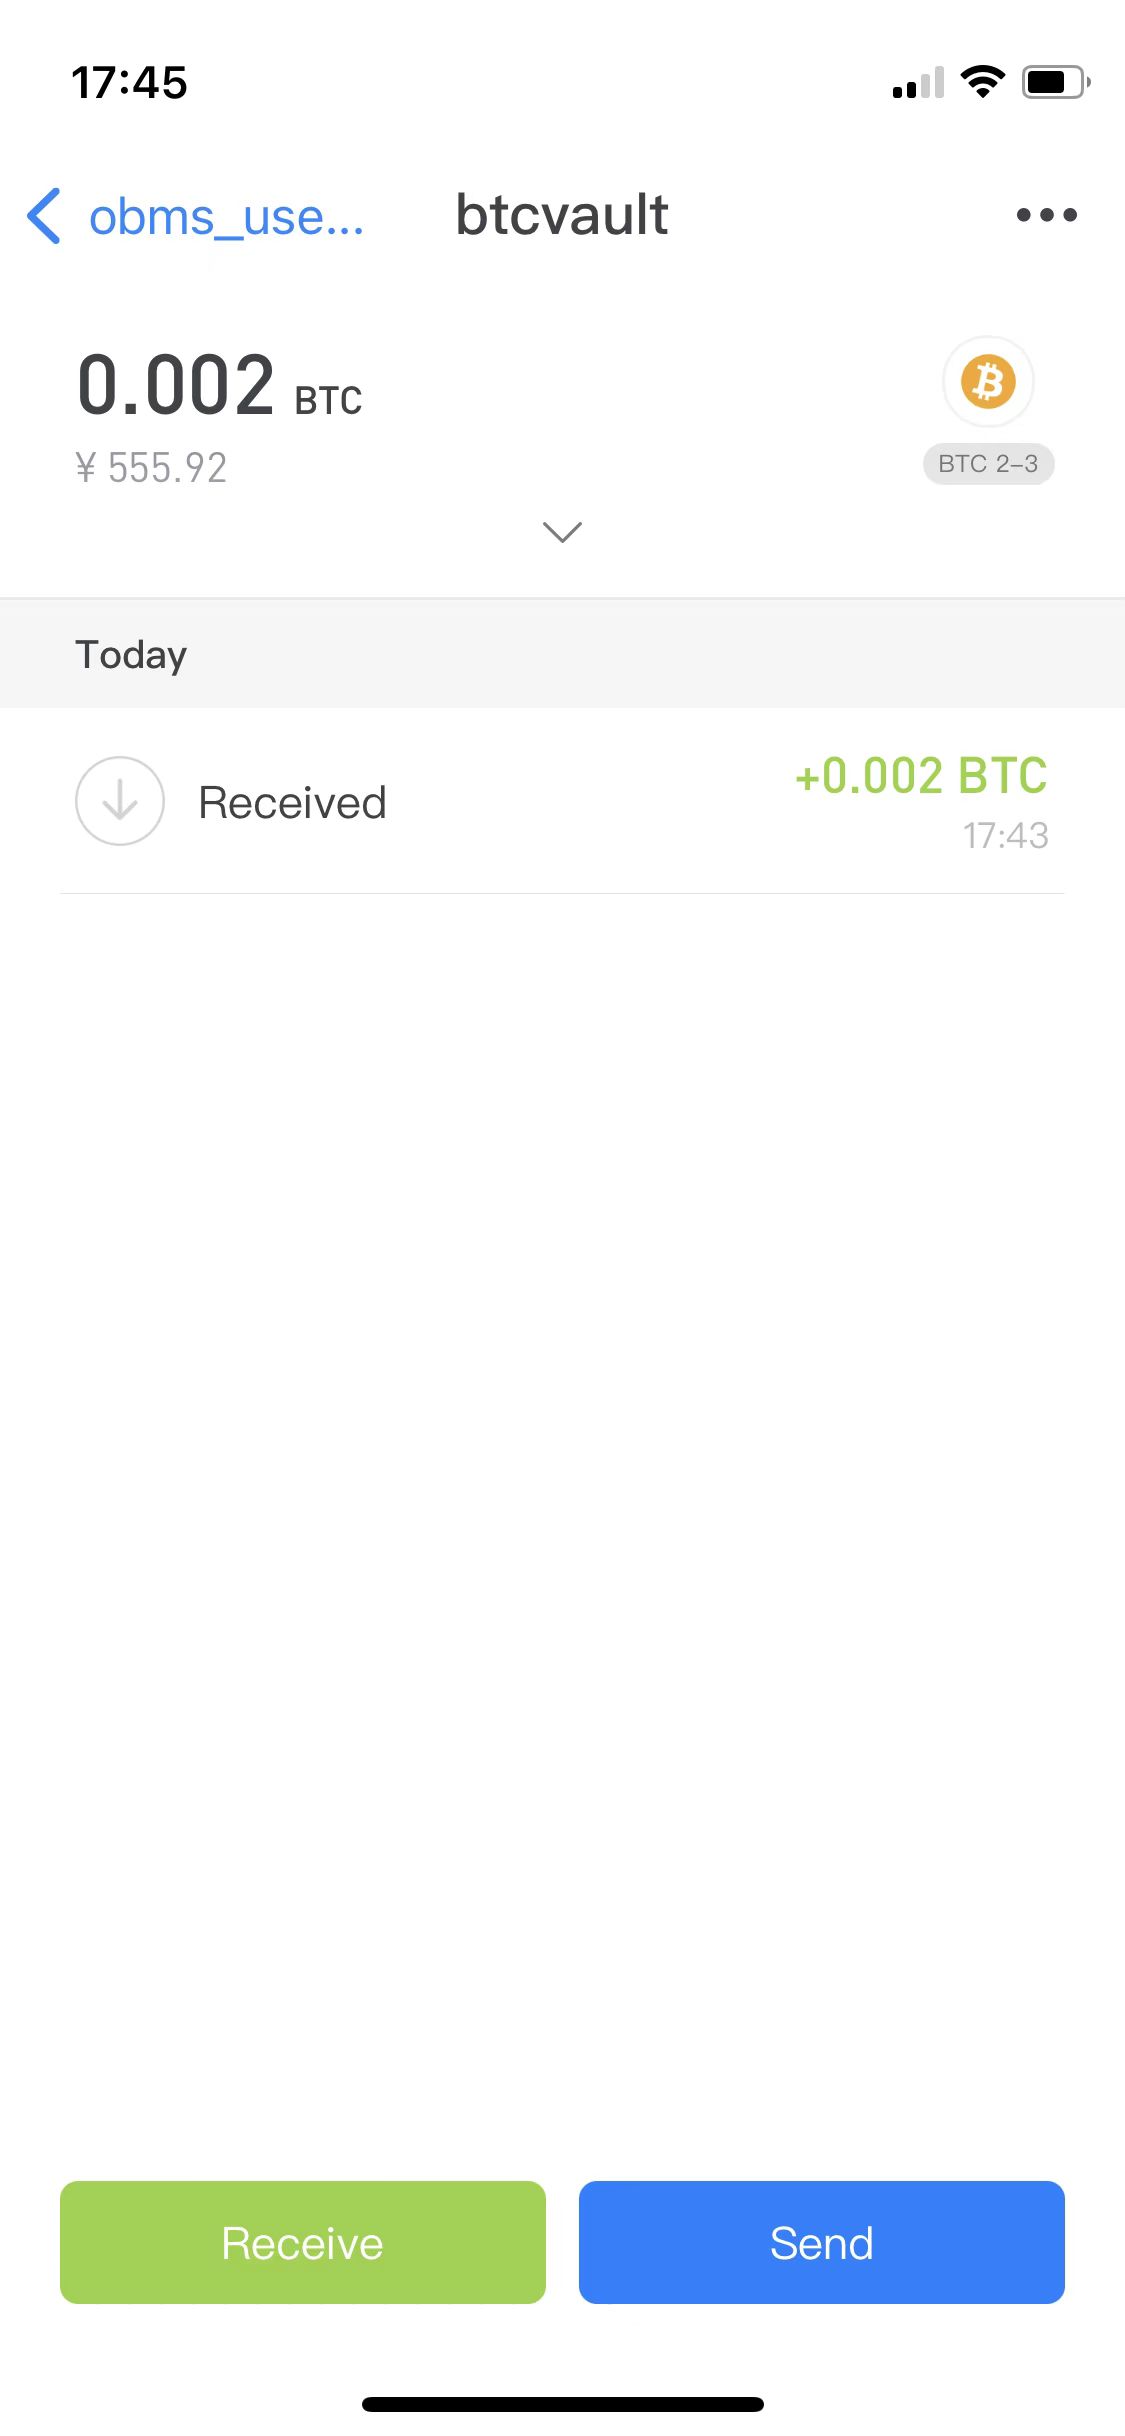
At this time, deposit some BTC for testing, as shown below:
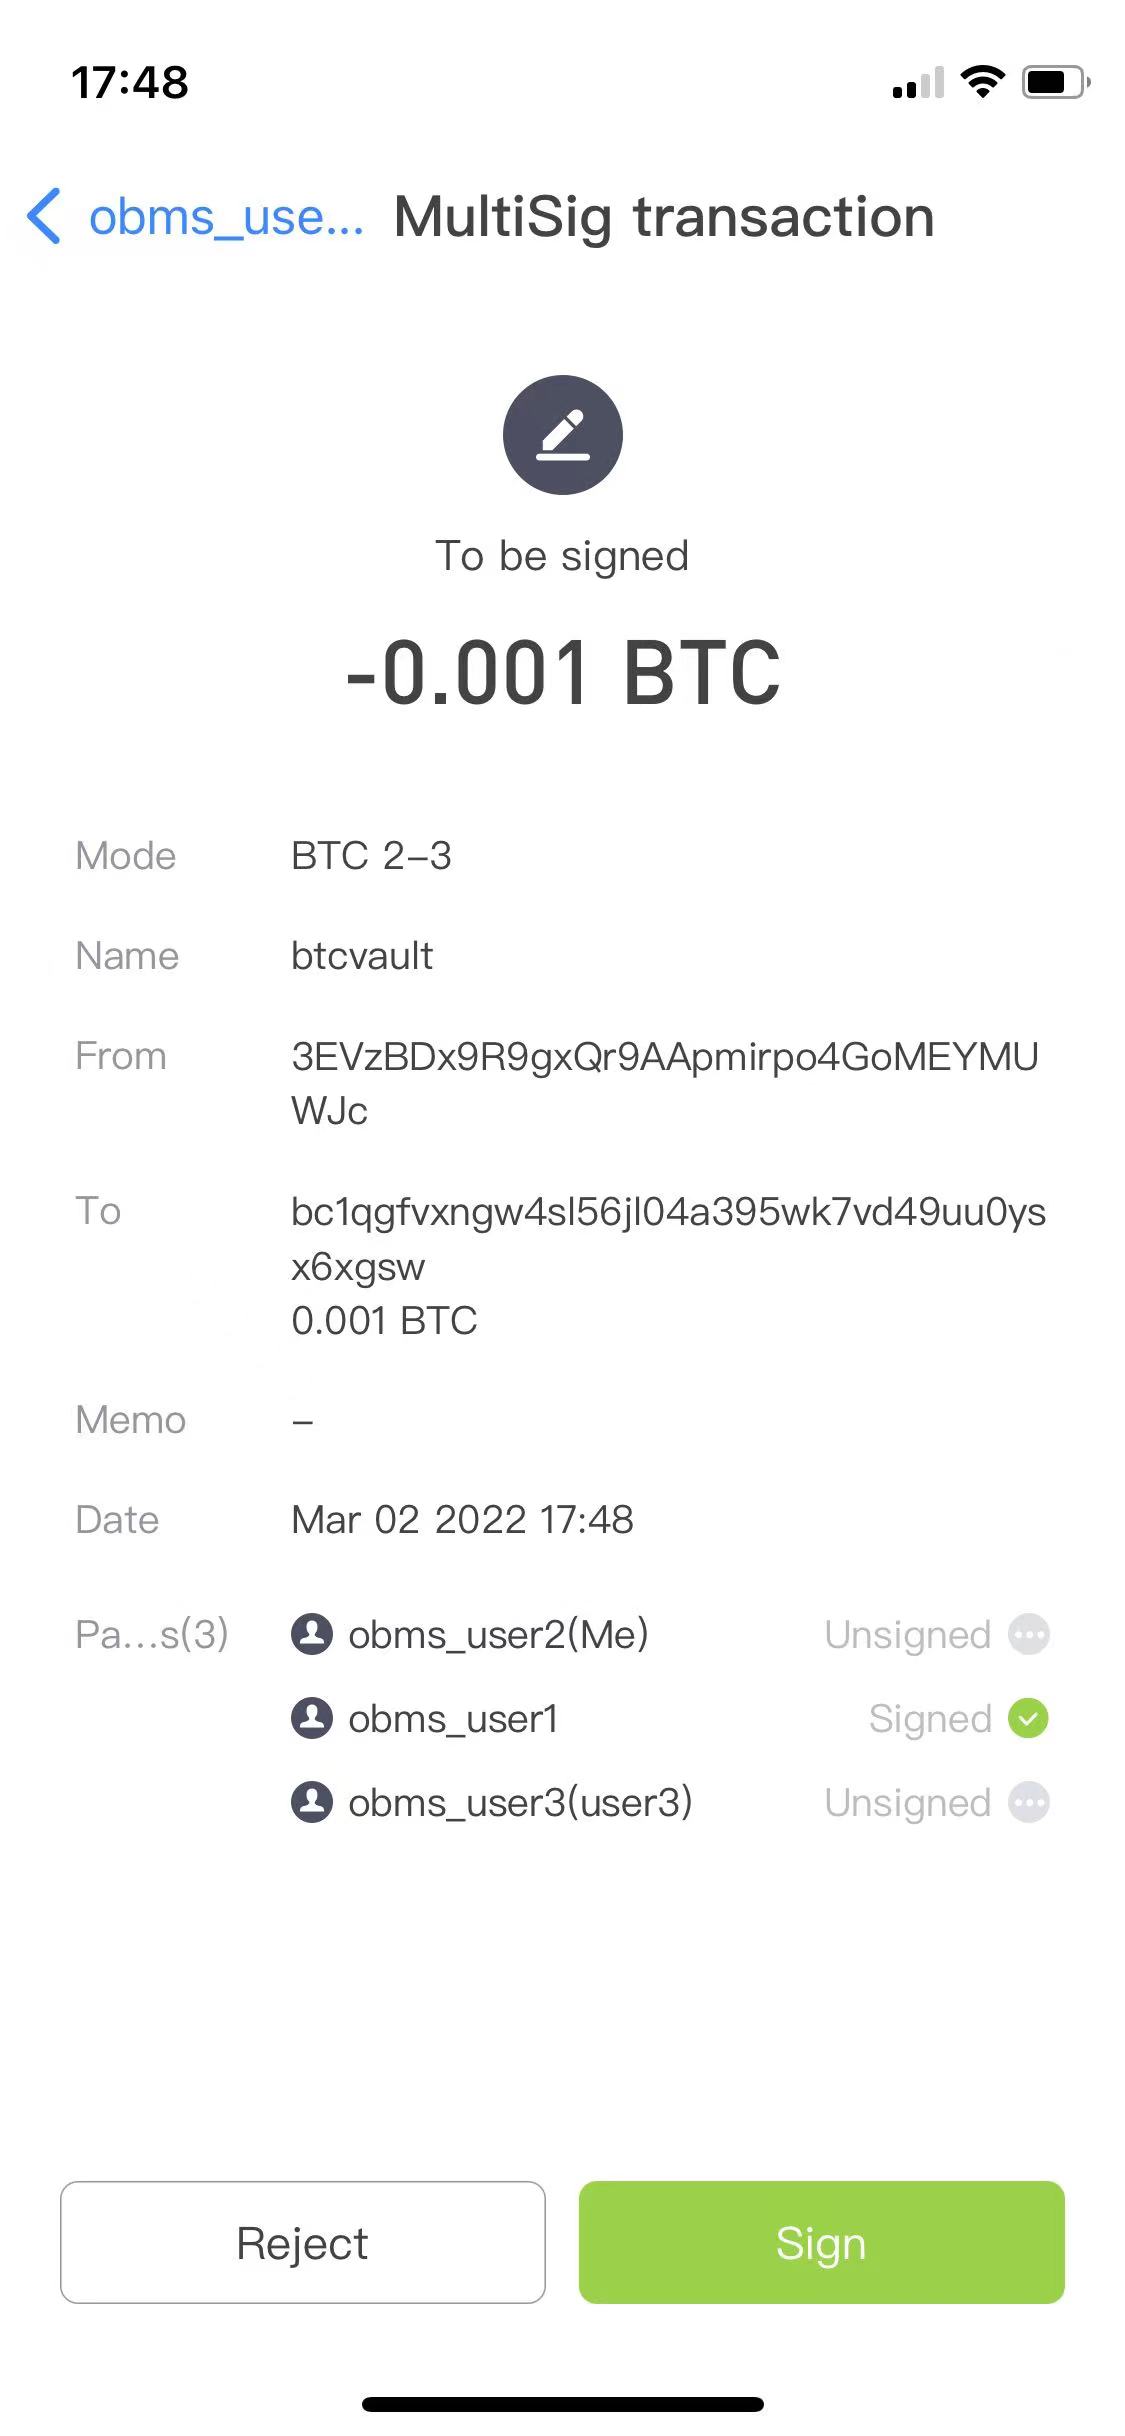
How to spend (send) MultiSig assets?
When spending MultiSig assets, one party clicks the "Send" button on the MultiSig page, as shown below:
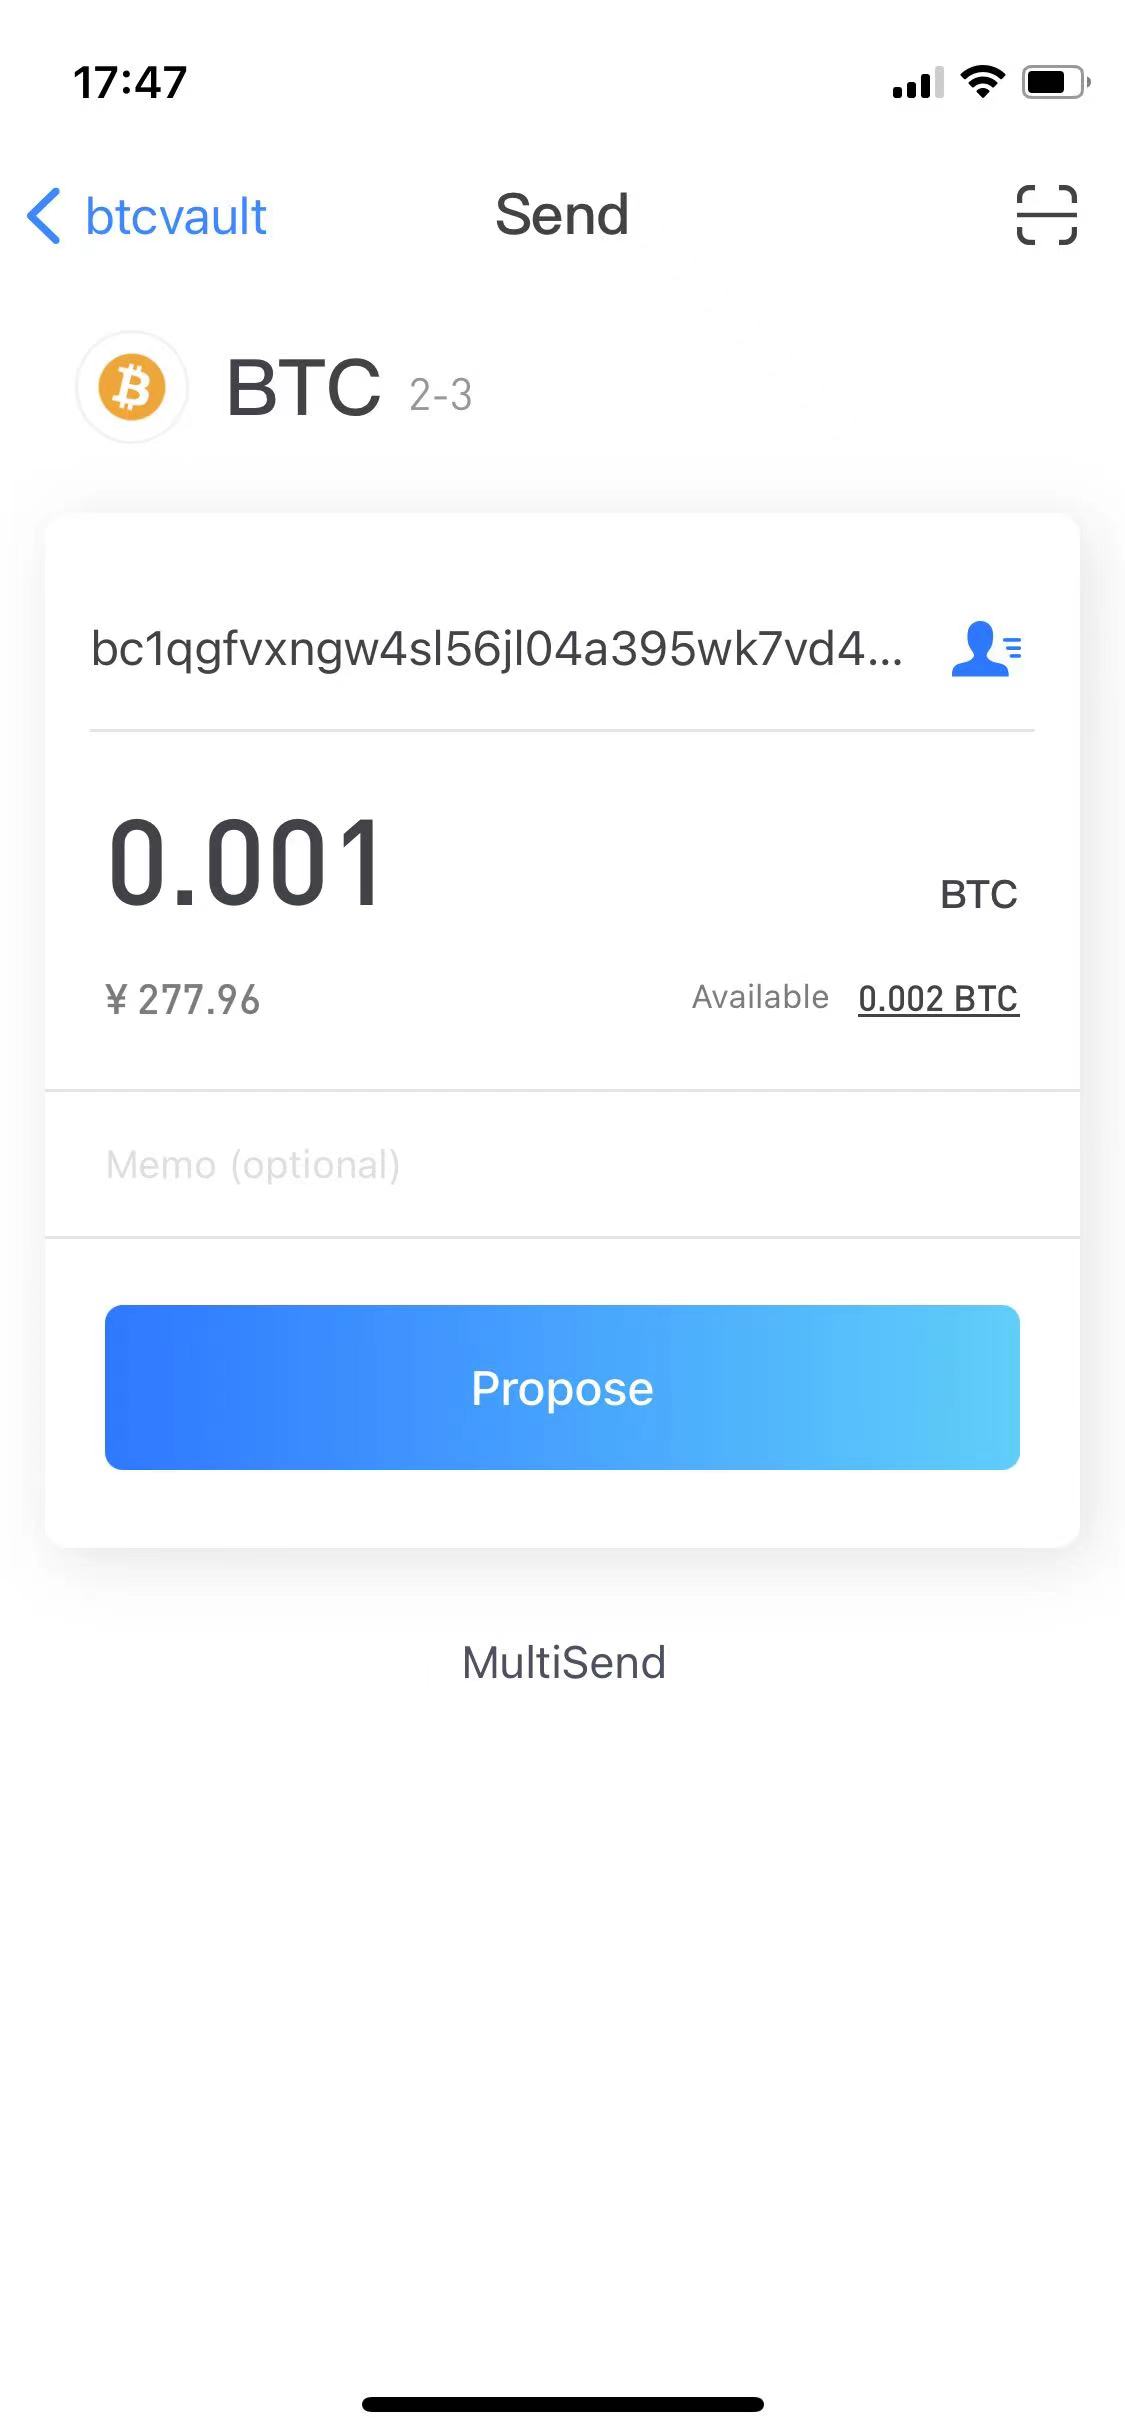
Enter the password, and then wait for other participants to sign, as shown below:
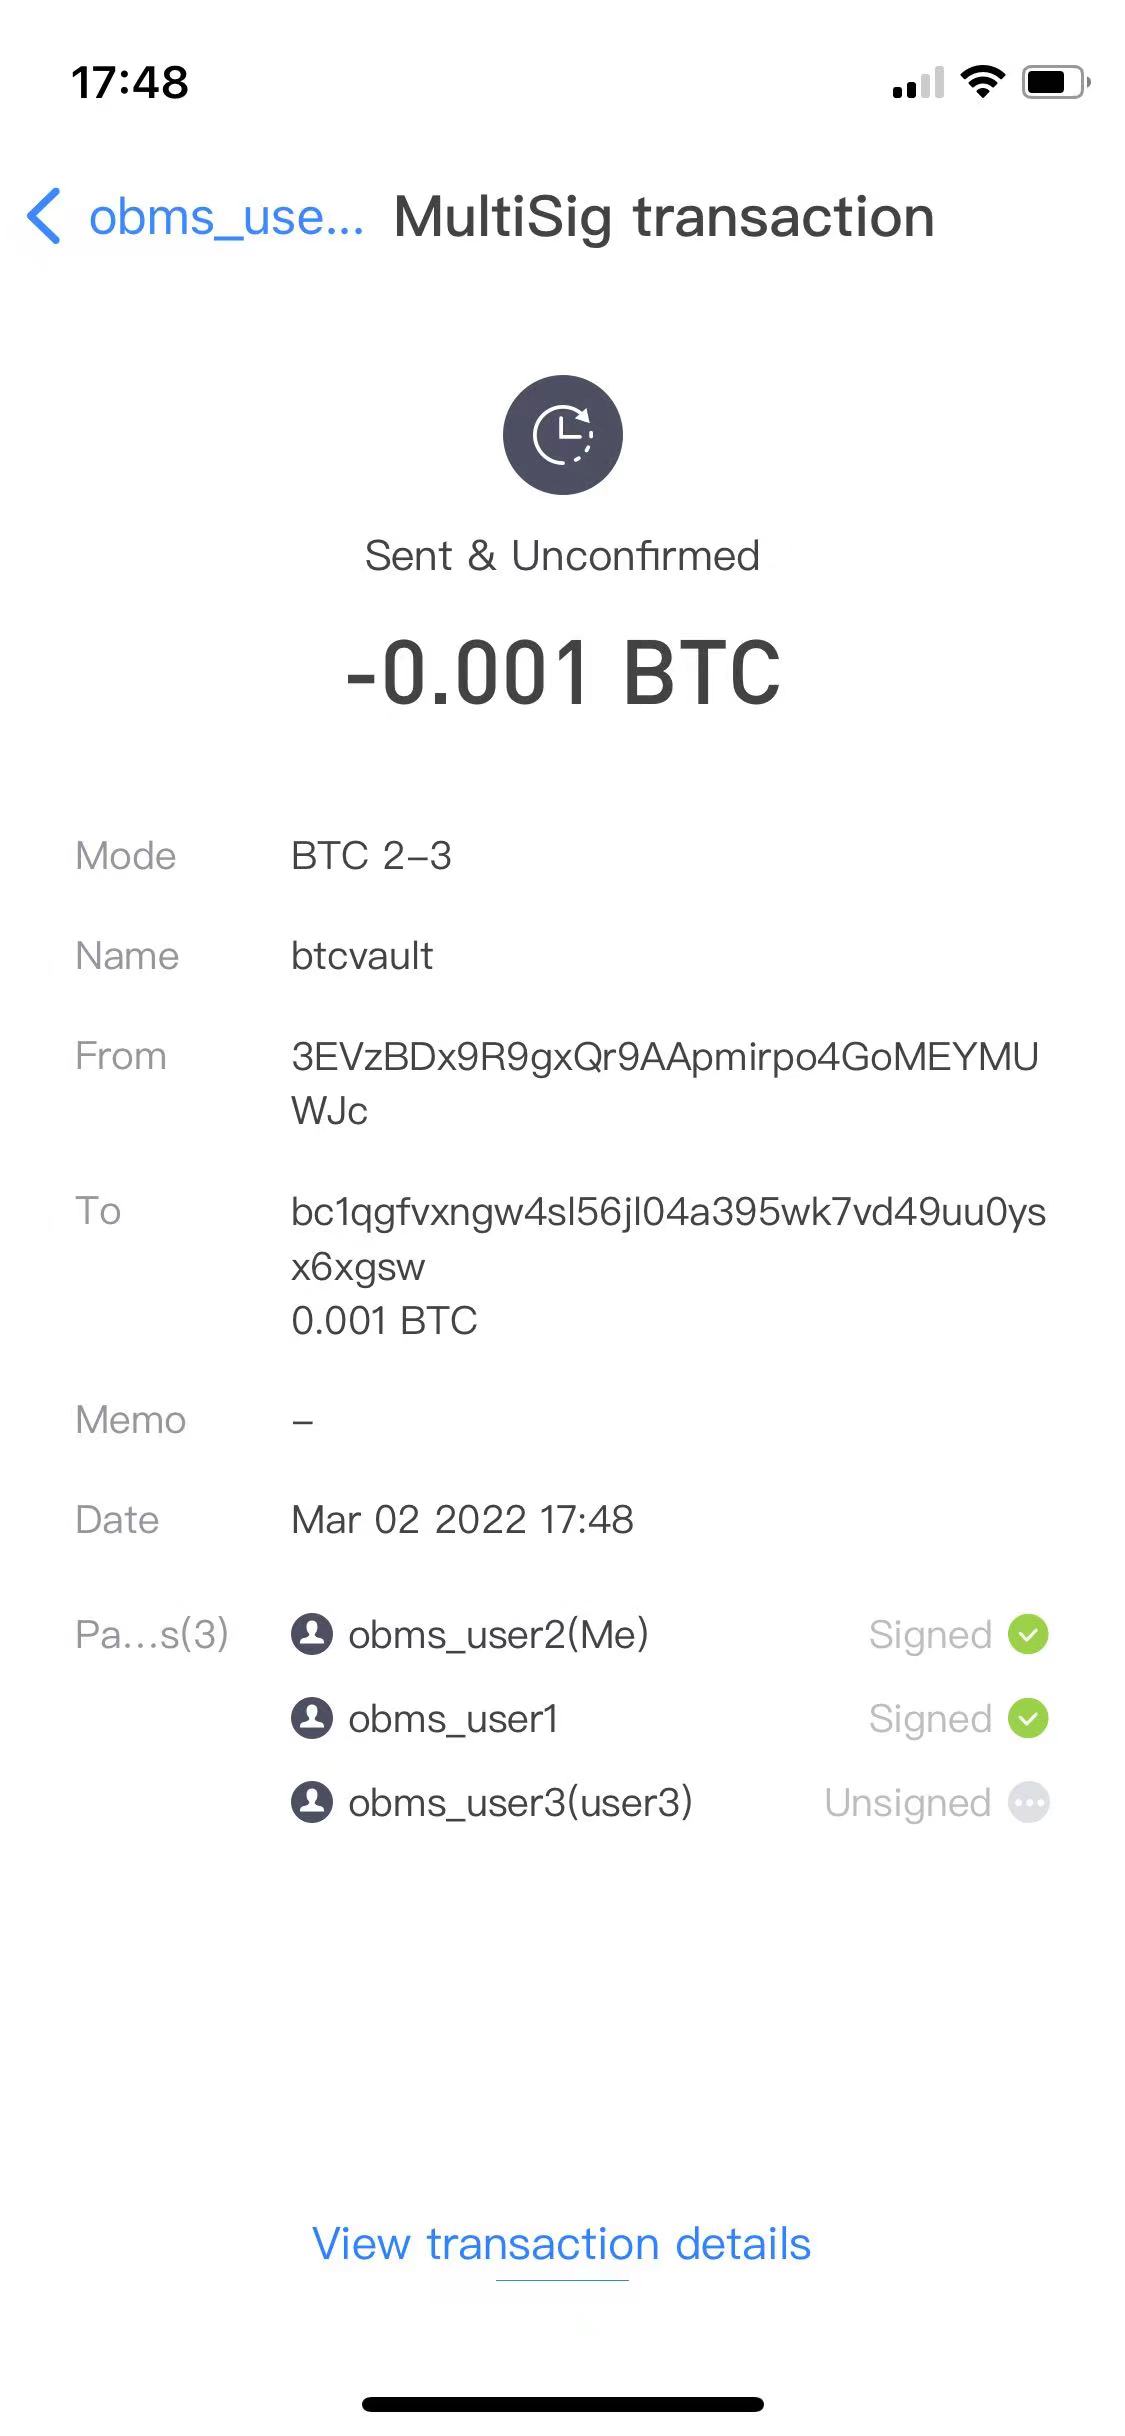
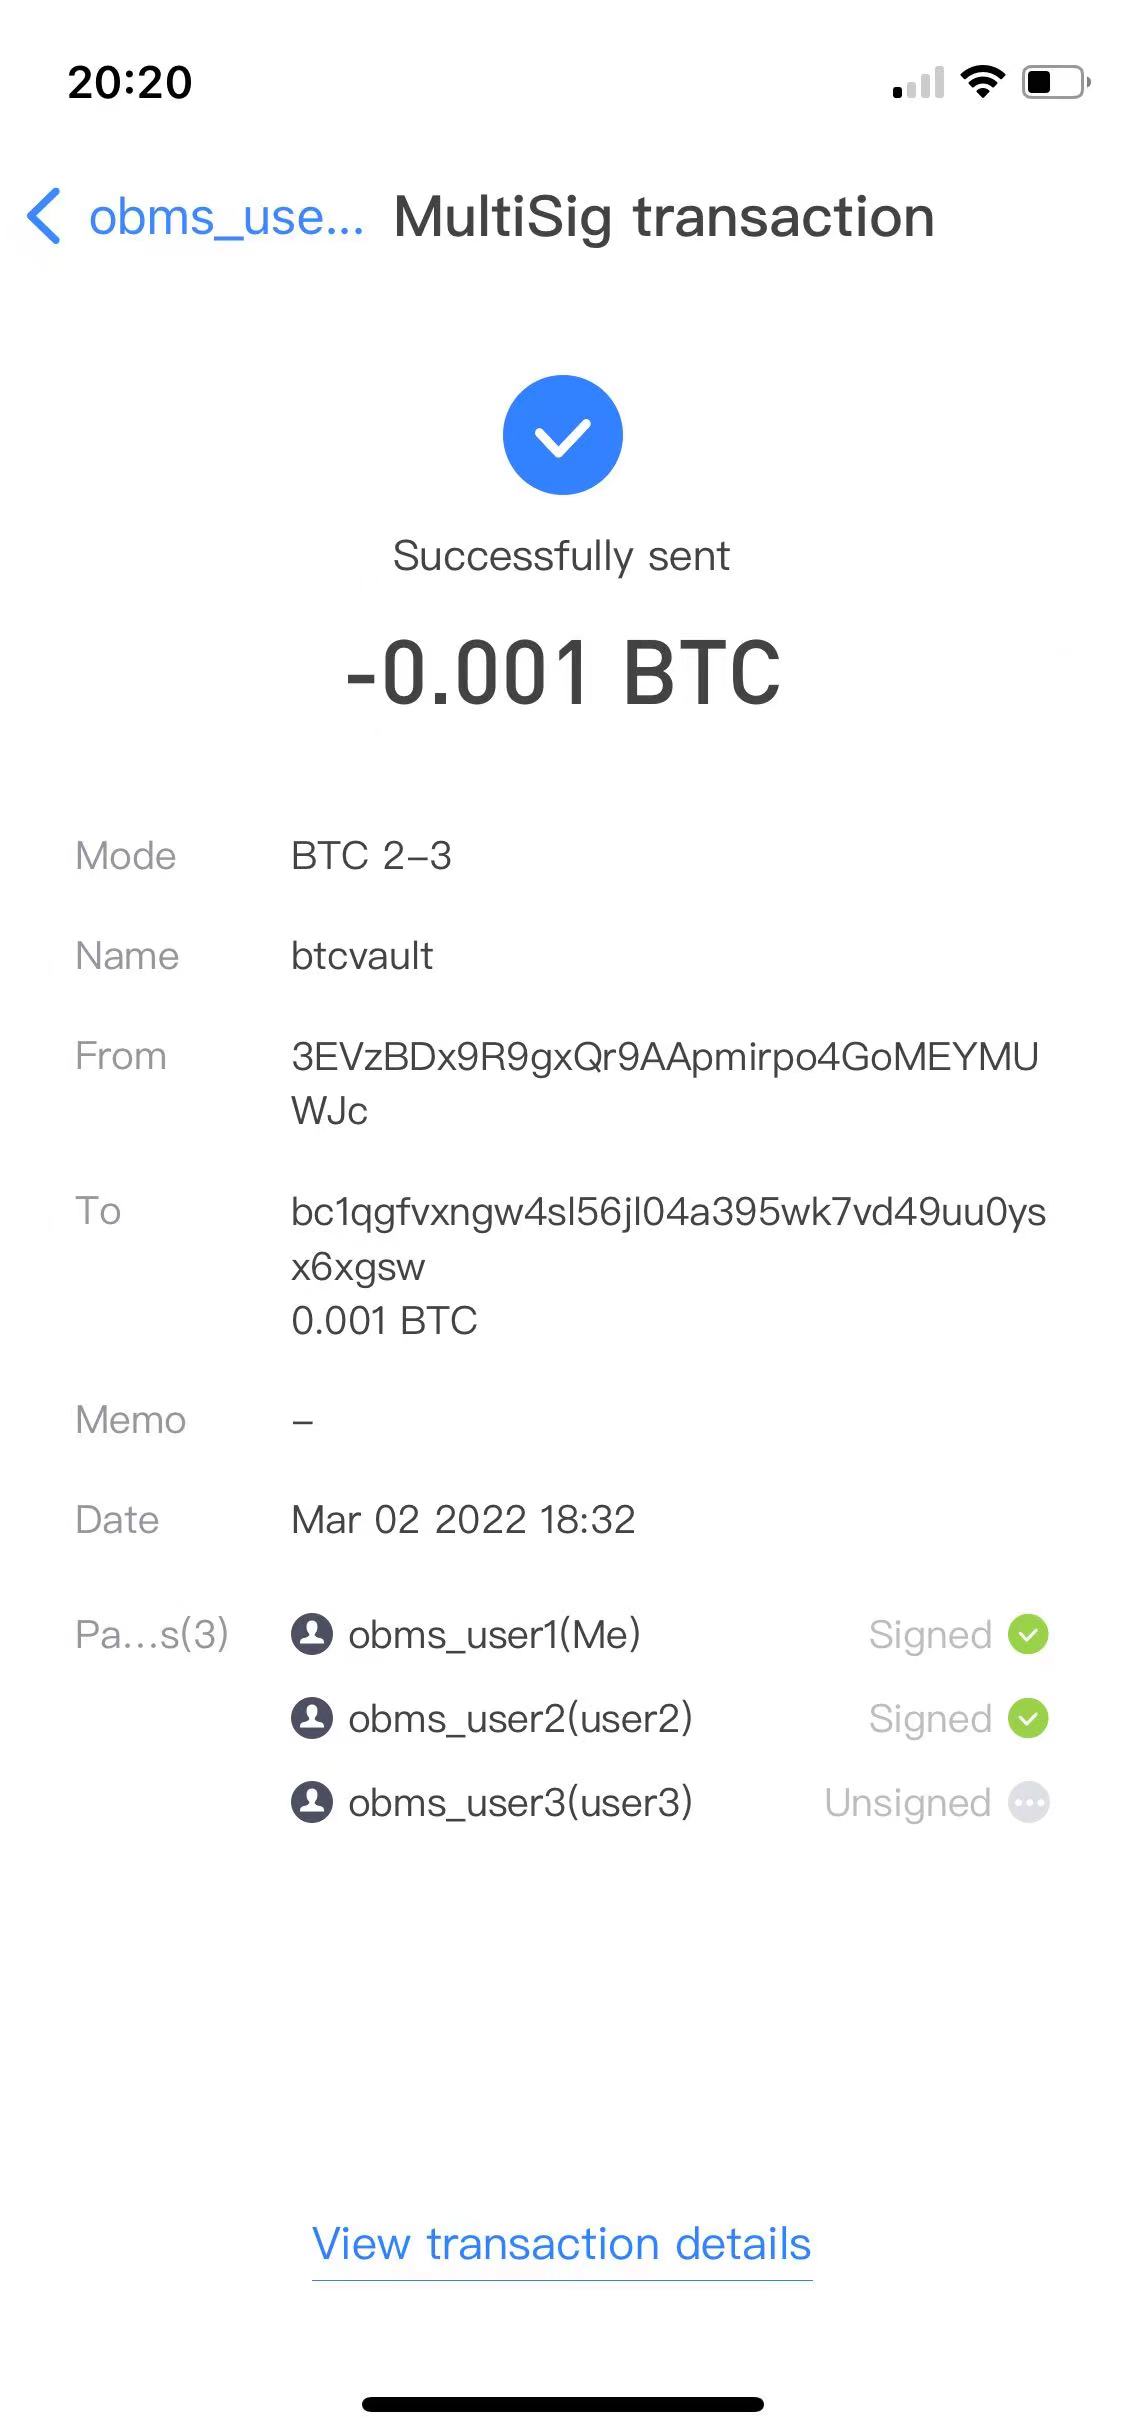
After the signature is completed, the transaction will be automatically broadcast to the network and wait for the confirmation to complete, as shown below:
6. Multisig Cold Wallet
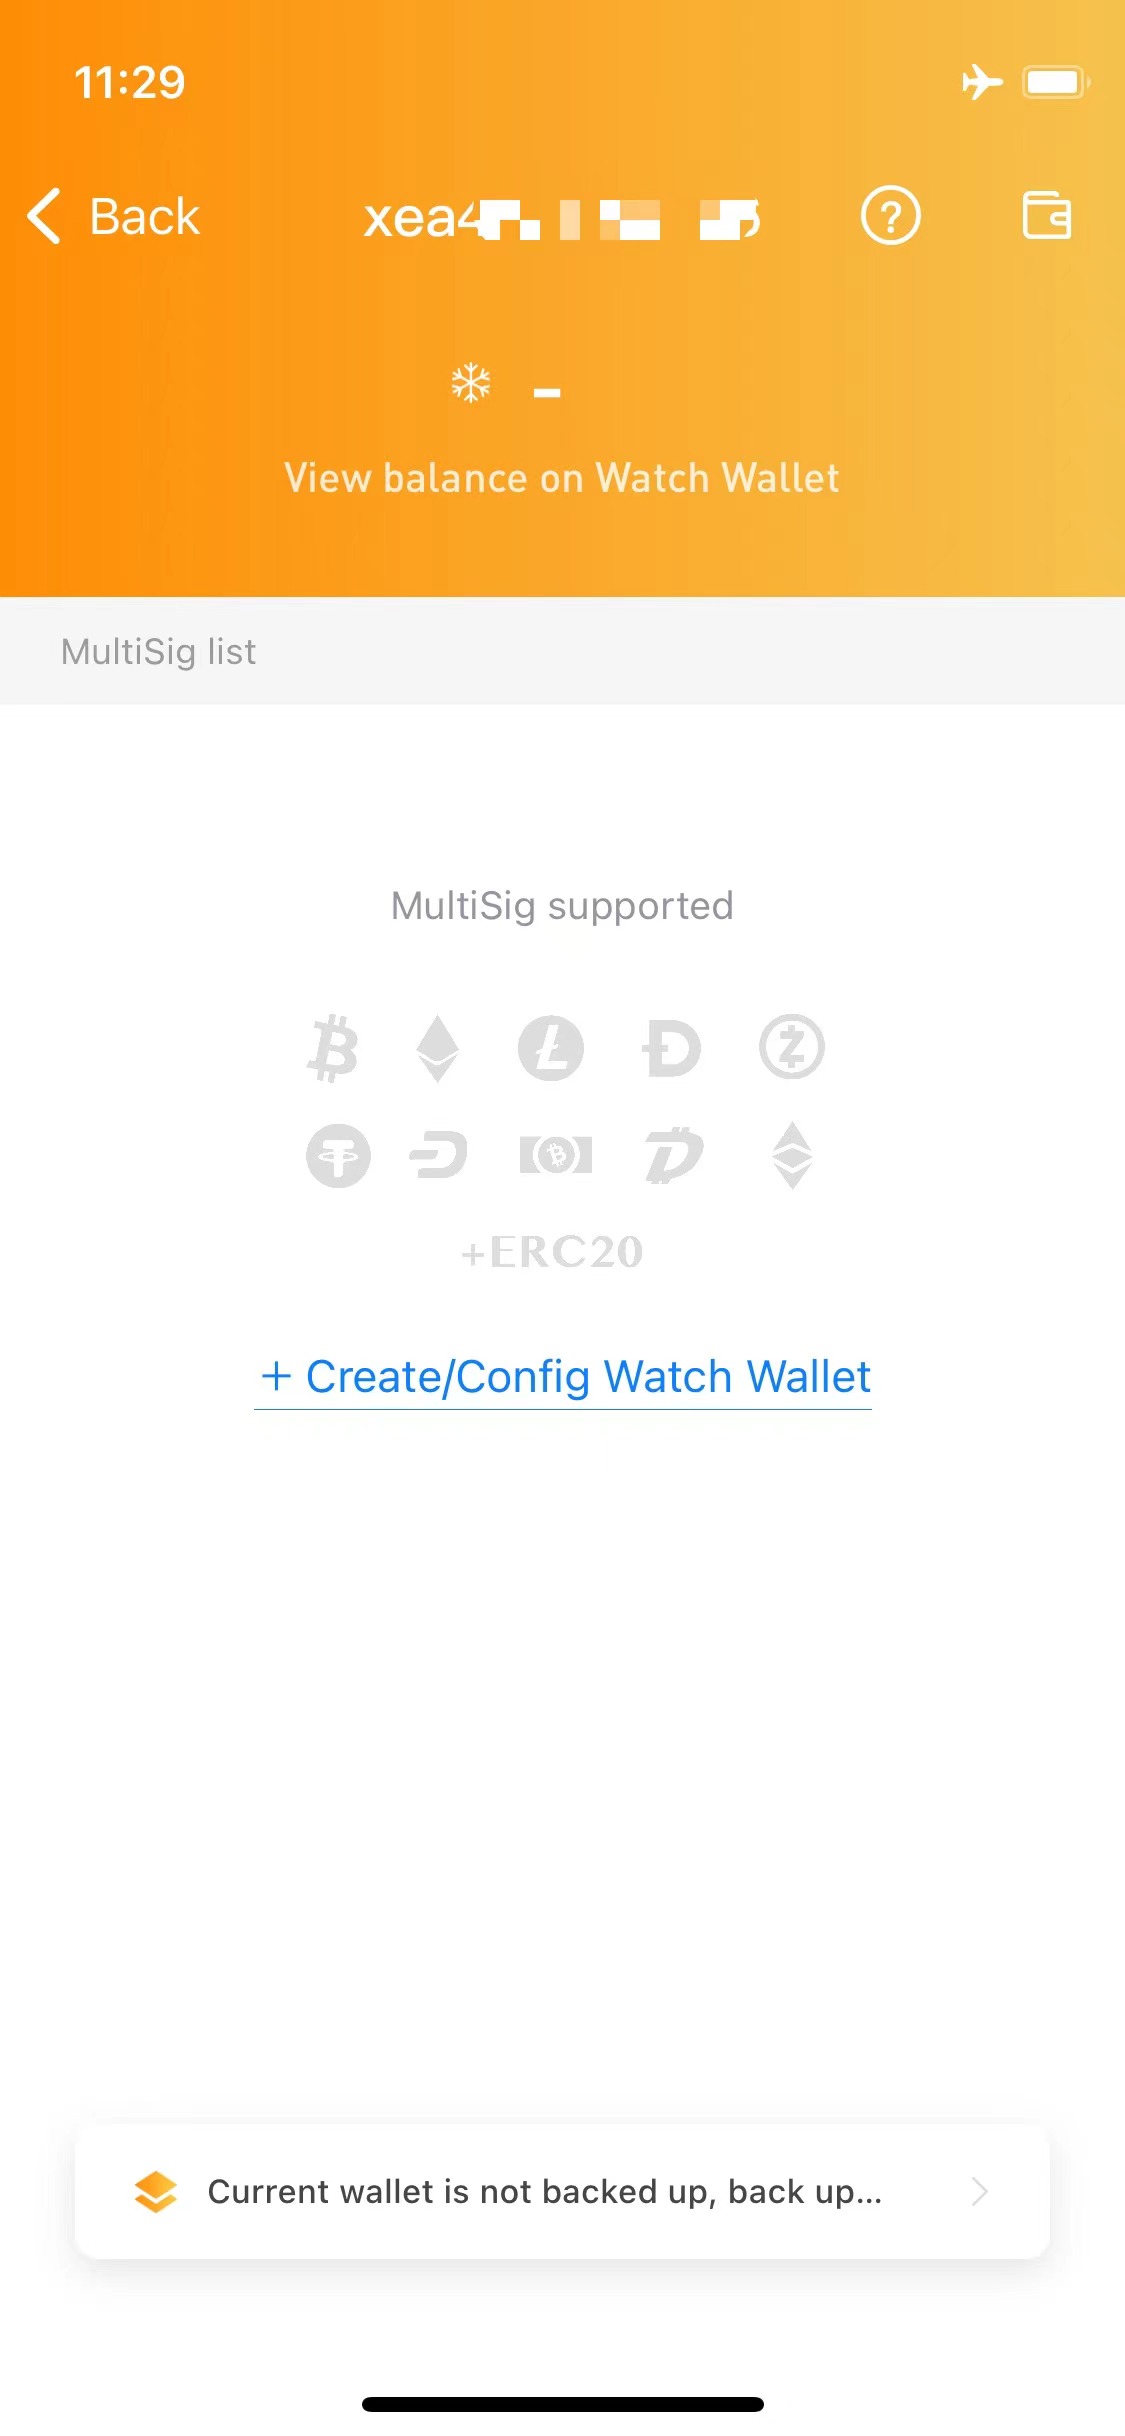
This article explains how to use a MultiSig Cold Wallet. MultiSig Cold Wallets require the use of two mobile phones, both of which have Ownbit wallet software installed. After the installation is complete, one of them is permanently offline and used as a Cold Wallet. The other is connected to the Internet as a Watch Wallet.
How to create a Watch Wallet?
On the MultiSig wallet page on the side of the Cold Wallet, click Create/Config Watch Wallet, as shown below:
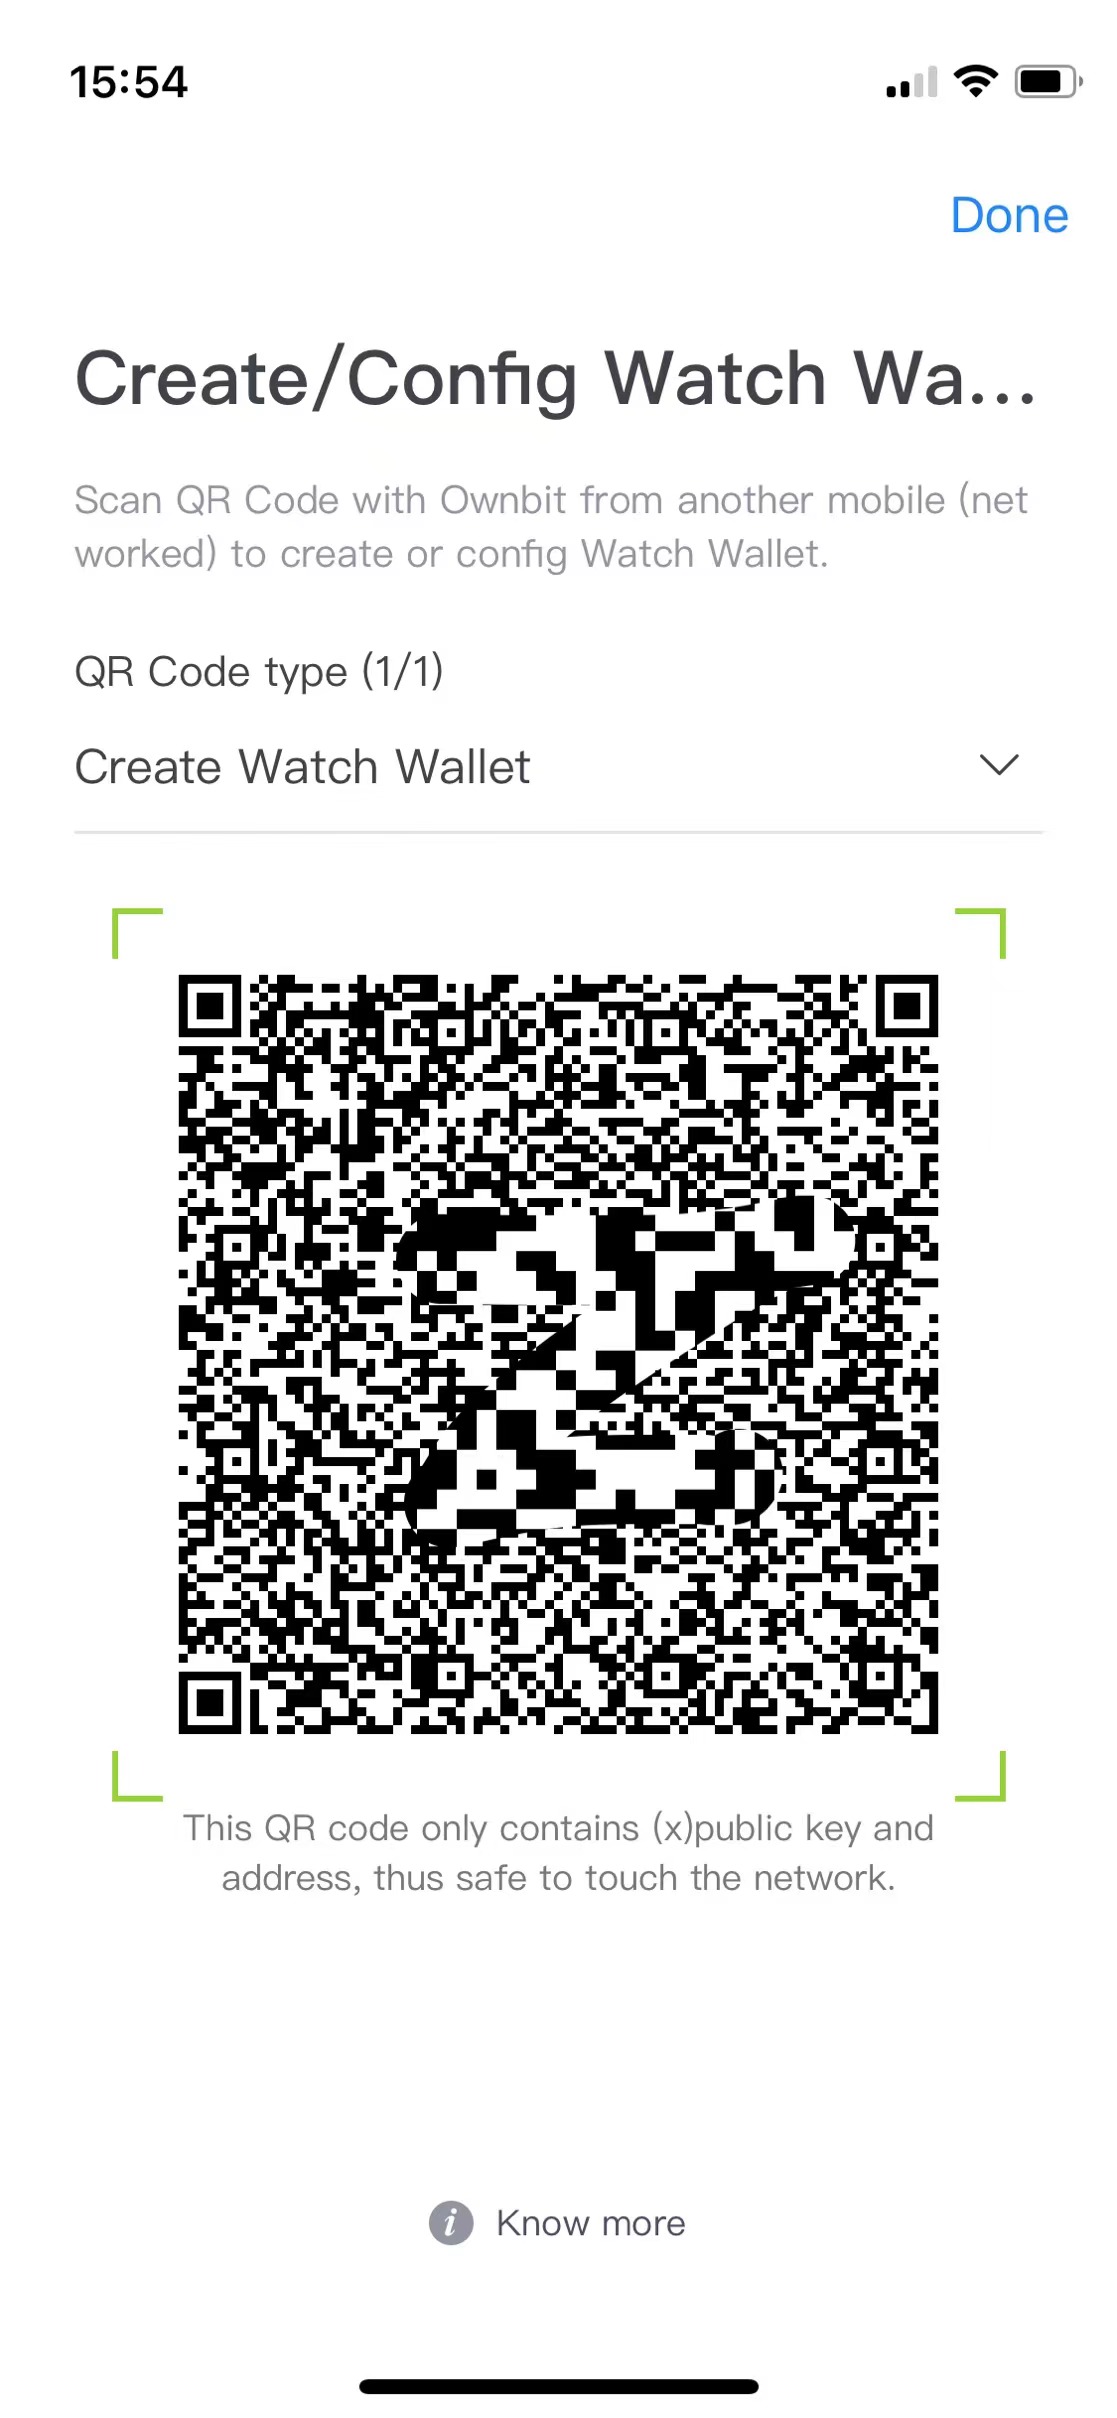
Scan the QR code with Ownbit on the side of the Watch Wallet to create the Watch Wallet. The color of the Watch Wallet is gray, as shown below:
How to send a transaction?
Send in the Watch Wallet, enter the address, amount and other information, click OK, and the QR code to be signed will appear, as shown below:
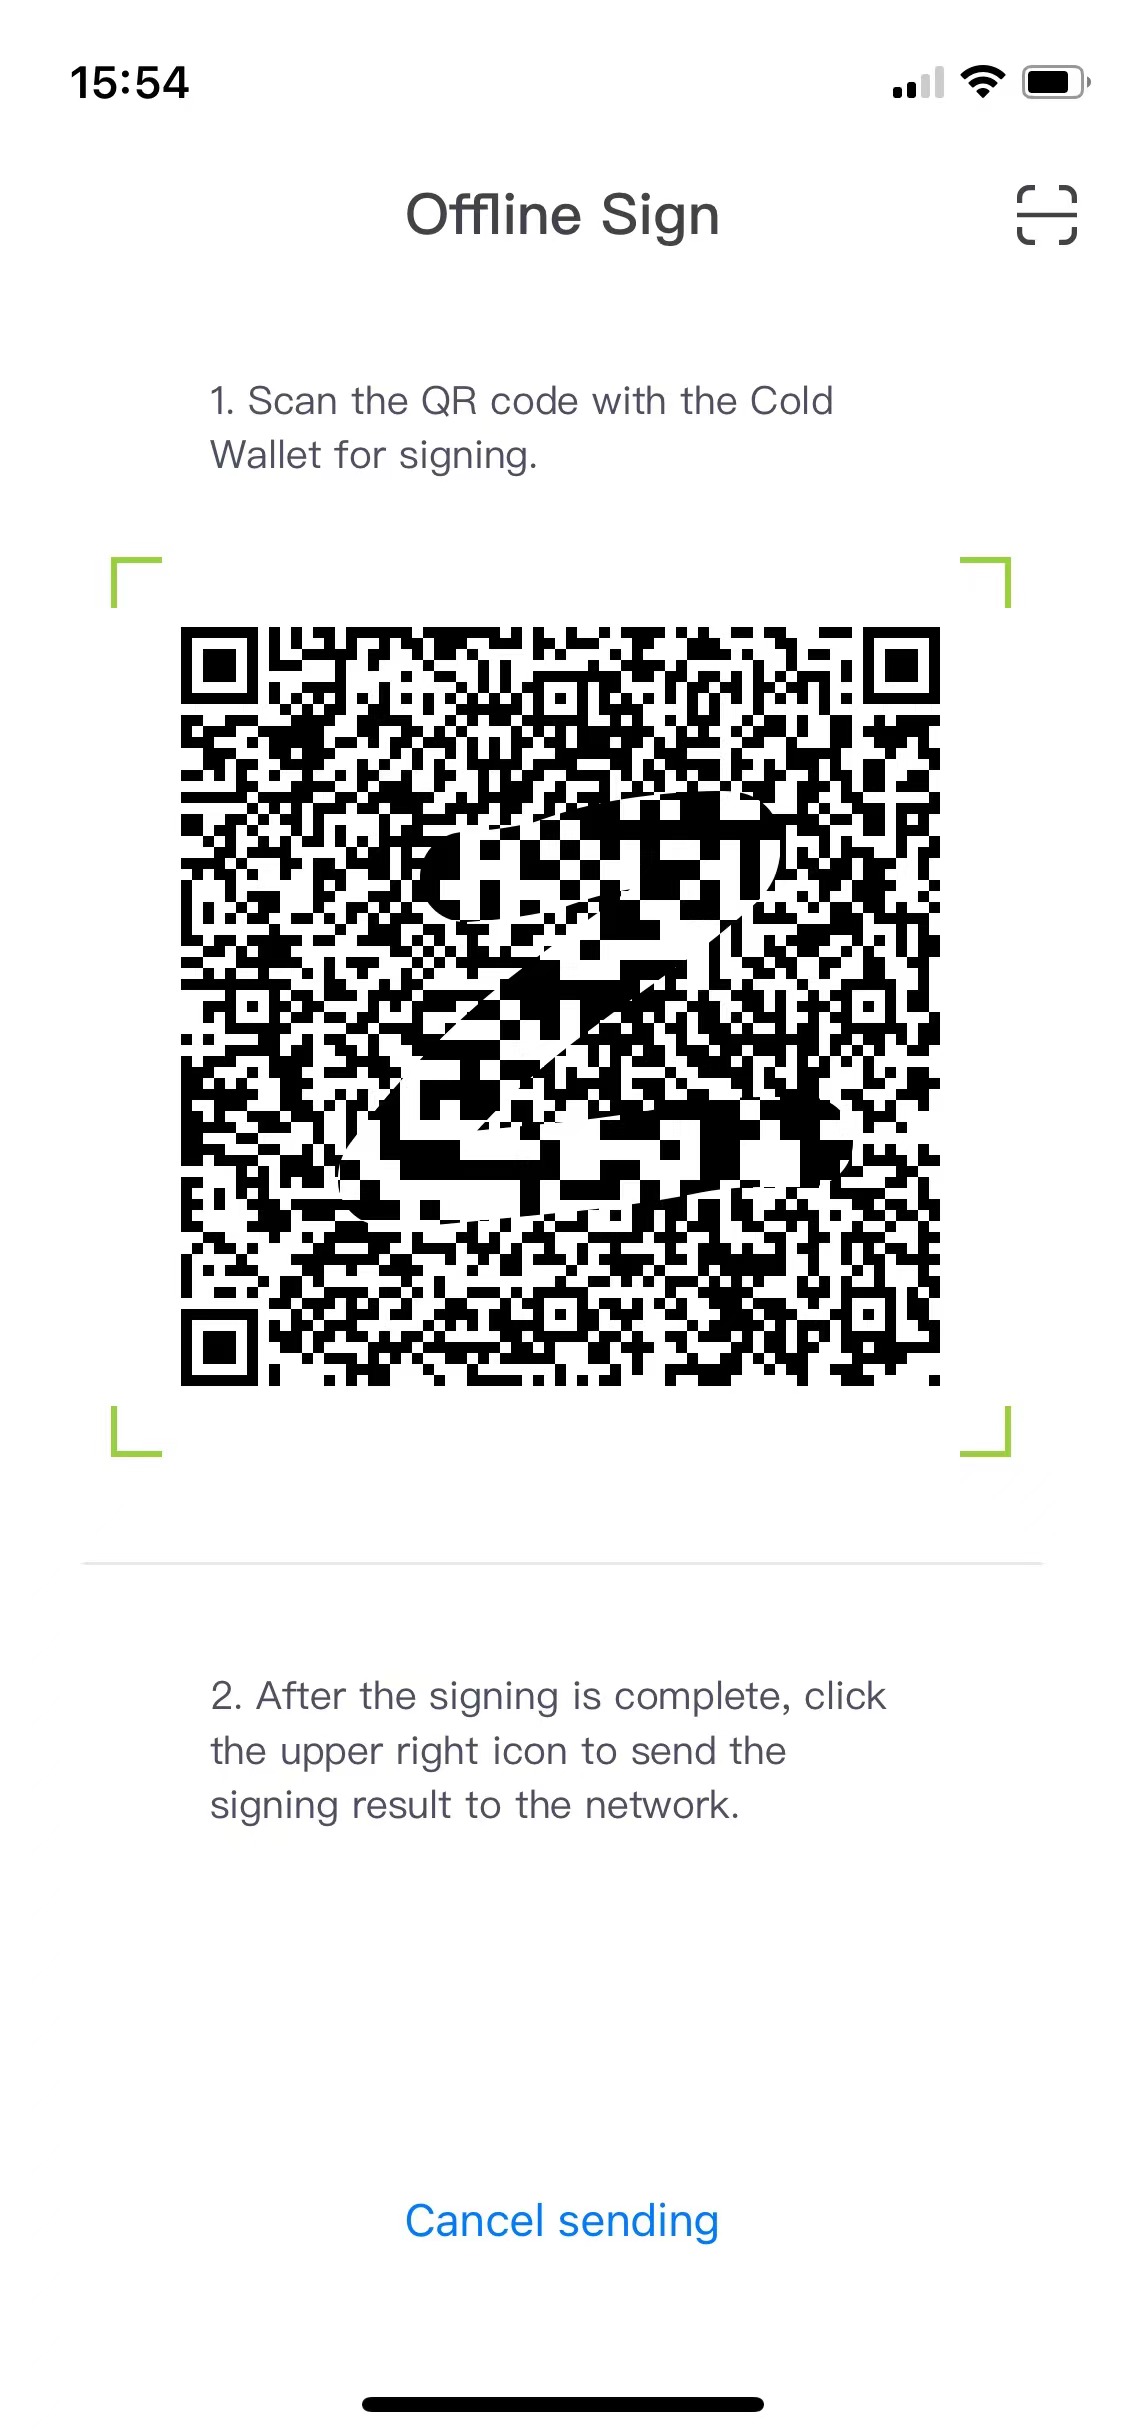
Use the Cold Wallet to scan the QR code, sign it, and get the QR code of the signature. Then use the Watch Wallet to scan the signed QR code and send the transaction to the network. Every time, you need to scan the code twice. One is to scan the QR code in the Watch Wallet to sign. The other is to scan the signature in the Cold Wallet to send it to the network.
7. Self-service recovery of MultiSig assets
The security of MultiSig assets does not depend on the Ownbit server, and users can recover MultiSig assets without the help of the Ownbit server. For the specific method, please refer How to self-recover MultiSig assets.