How to Recover Multisig Assets by Yourself?
The security and availability of Ownbit multisig assets do not rely on the Ownbit server. With the help of the Ownbit Multisig Recovery Tool (which works even in offline environments), you can always recover your multisig assets on your own, anytime and anywhere — even if the Ownbit server is permanently down. This guide takes a 2-of-3 multisig setup as an example, involving three participants: A, B, and C.
1. Recovering BTC Multisig Assets
a. Step one: Use a block explorer to find the available UTXOs for your multisig address. Each blockchain has its own explorer — for BTC, you can use: https://www.blockchain.com/btc/address/3CkvfWhYd6behUYnrA5rMQJoyr6oLGM6Ed. Any transaction that has been received by the address but remains unspent is an available UTXO. Record the transaction hash, the output index (0 for the first output, 1 for the second, and so on), and the amount in satoshis — namely: txHash, index, and satoshi.
b. Step two: Construct a BTC input/output JSON. Example:
        {
            "inputs": [{
                "segwit": "D",
                "txHash": "757ef70941ea9170cc918097630a7aa7e4c644e3f8d73a15ff1e98d321bf5b62",
                "index": 1,
                "satoshis": 13400
            }, {
                "segwit": "D",
                "txHash": "637dfeda367f051d34228badfef09726f0893653fe8baebbe6e150ea68e756f3",
                "index": 2,
                "satoshis": 456400
            }],
            "outputs": [{
                "amount": 10000,
                "address": "bc1q2dzu8fcrr66yq9n8q5u6qhwleslqystahdw923" //receiver address
            }, {
                "address": "bc1q8dl3vmrqmcs4xpyn884upnedlj2t6uewnfdnp034wqfjghpm5ghqupl9v9", //change address
                "amount": 458144
            }]
        }
Multisig addresses starting with bc1 require the parameter segwit = D. For addresses starting with 3, this parameter is not needed. The difference between the sum of inputs and outputs is the miner fee for this transaction.
c. Step three: Prepare the Pubkeys. Pubkeys is an array containing the public keys of all multisig participants. You can find each participant's pubkey in the multisig details page, as shown below:
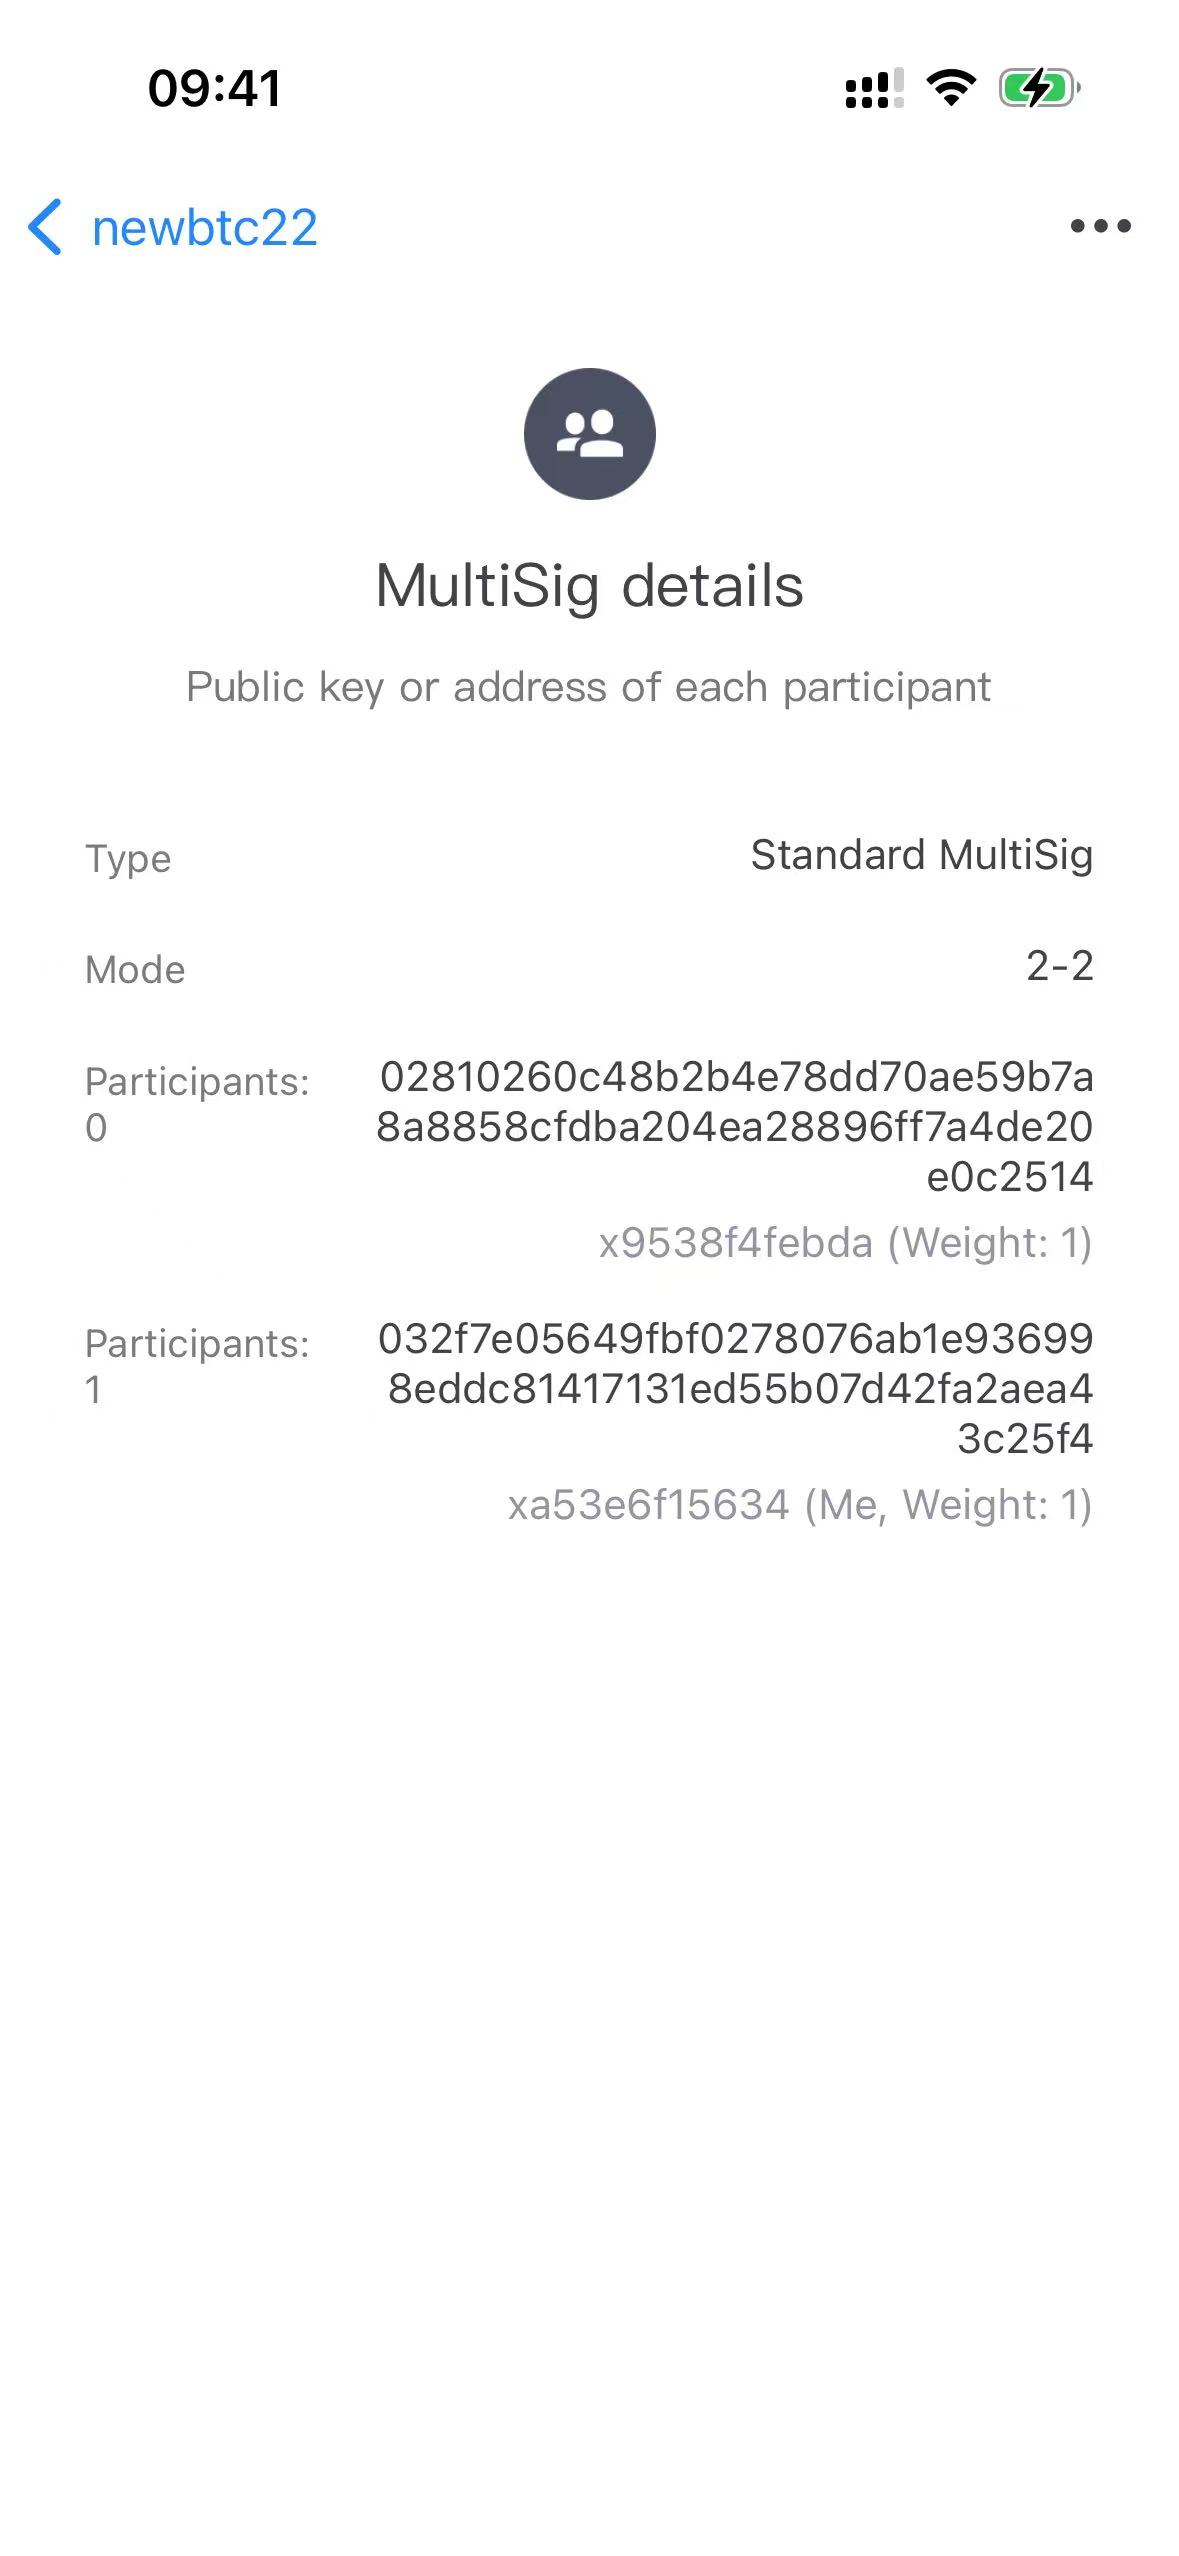
Concatenate all participant pubkeys with colons (:) as separators to get the final Pubkeys string. Example:
02810260c48b2b4e78dd70ae59b7a8a8858cfdba204ea28896ff7a4de20e0c2514:032f7e05649fbf0278076ab1e936998eddc81417131ed55b07d42fa2aea43c25f4
The pubkey can also be derived from a mnemonic phrase, using the following logic:
        Mnemonic
            ↓
        Seed (BIP39)
            ↓
        Master Key (BIP32)
            ↓
        BIP44 Path: m/44'/0'/0'/0
            ↓
        Extended Public Key (xpub)
            ↓
        Child Public Key at Index 0 (pubkey at m/44'/0'/0'/0/0)
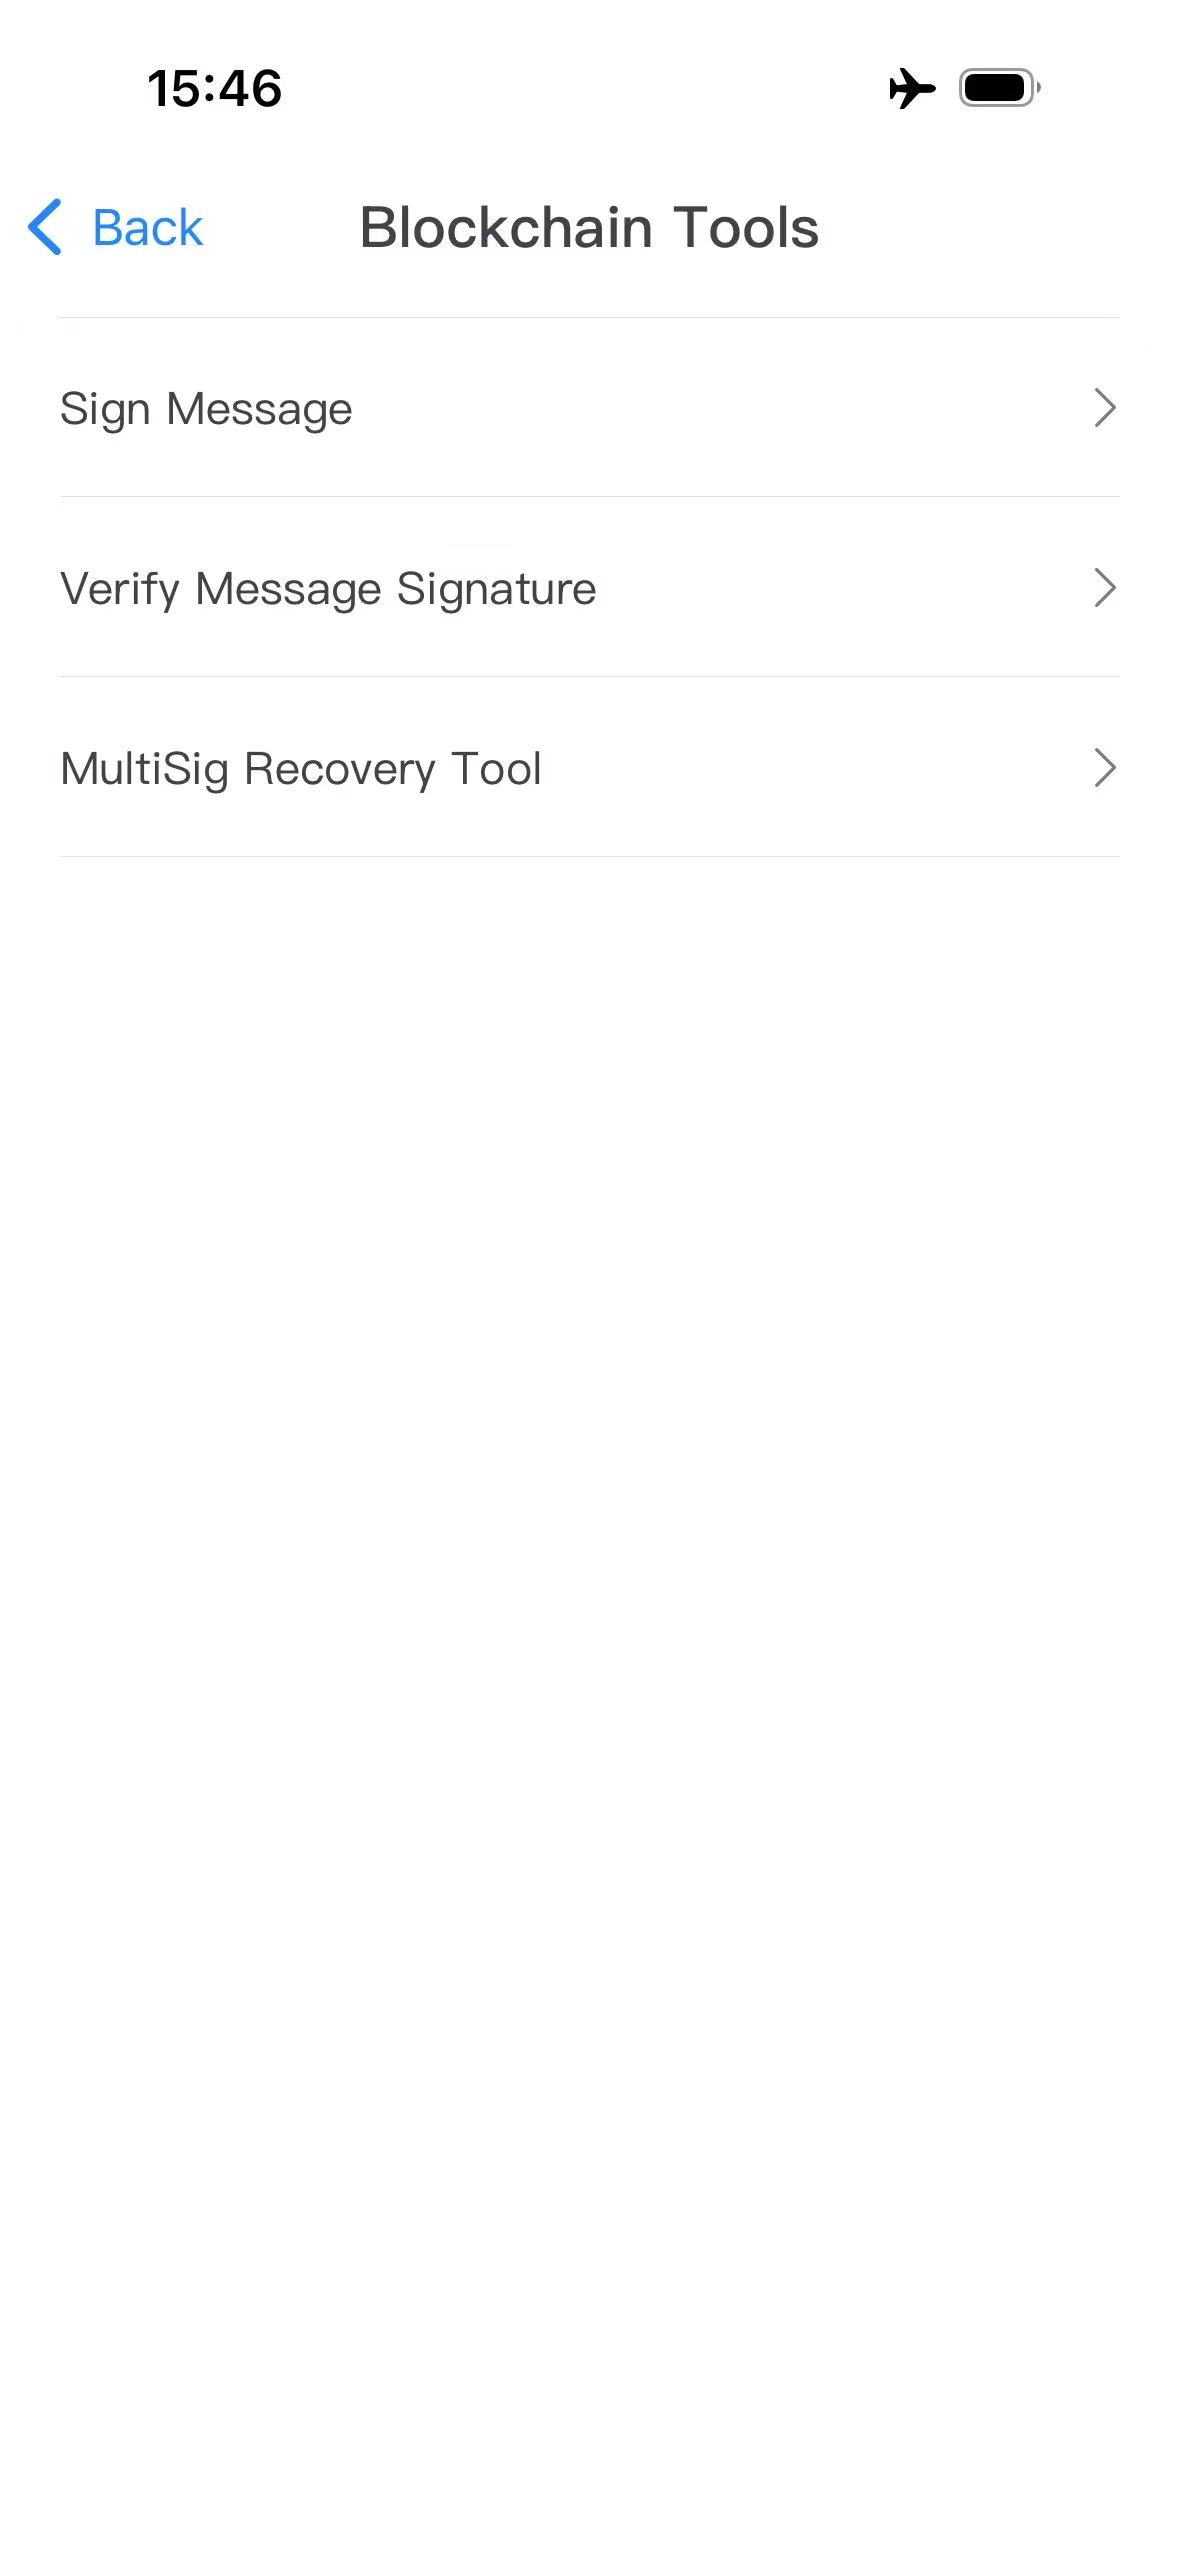
d. Step four: On both User A and User B's phones, open the Multisig Recovery Tool (found at: Home Menu → Blockchain Tools → Multisig Recovery Tool). This tool works even in offline environments, so you can recover your multisig assets even if the Ownbit server is permanently unavailable. As shown below:
Select the coin type: BTC, then enter the BTC multisig tool page, as shown below:
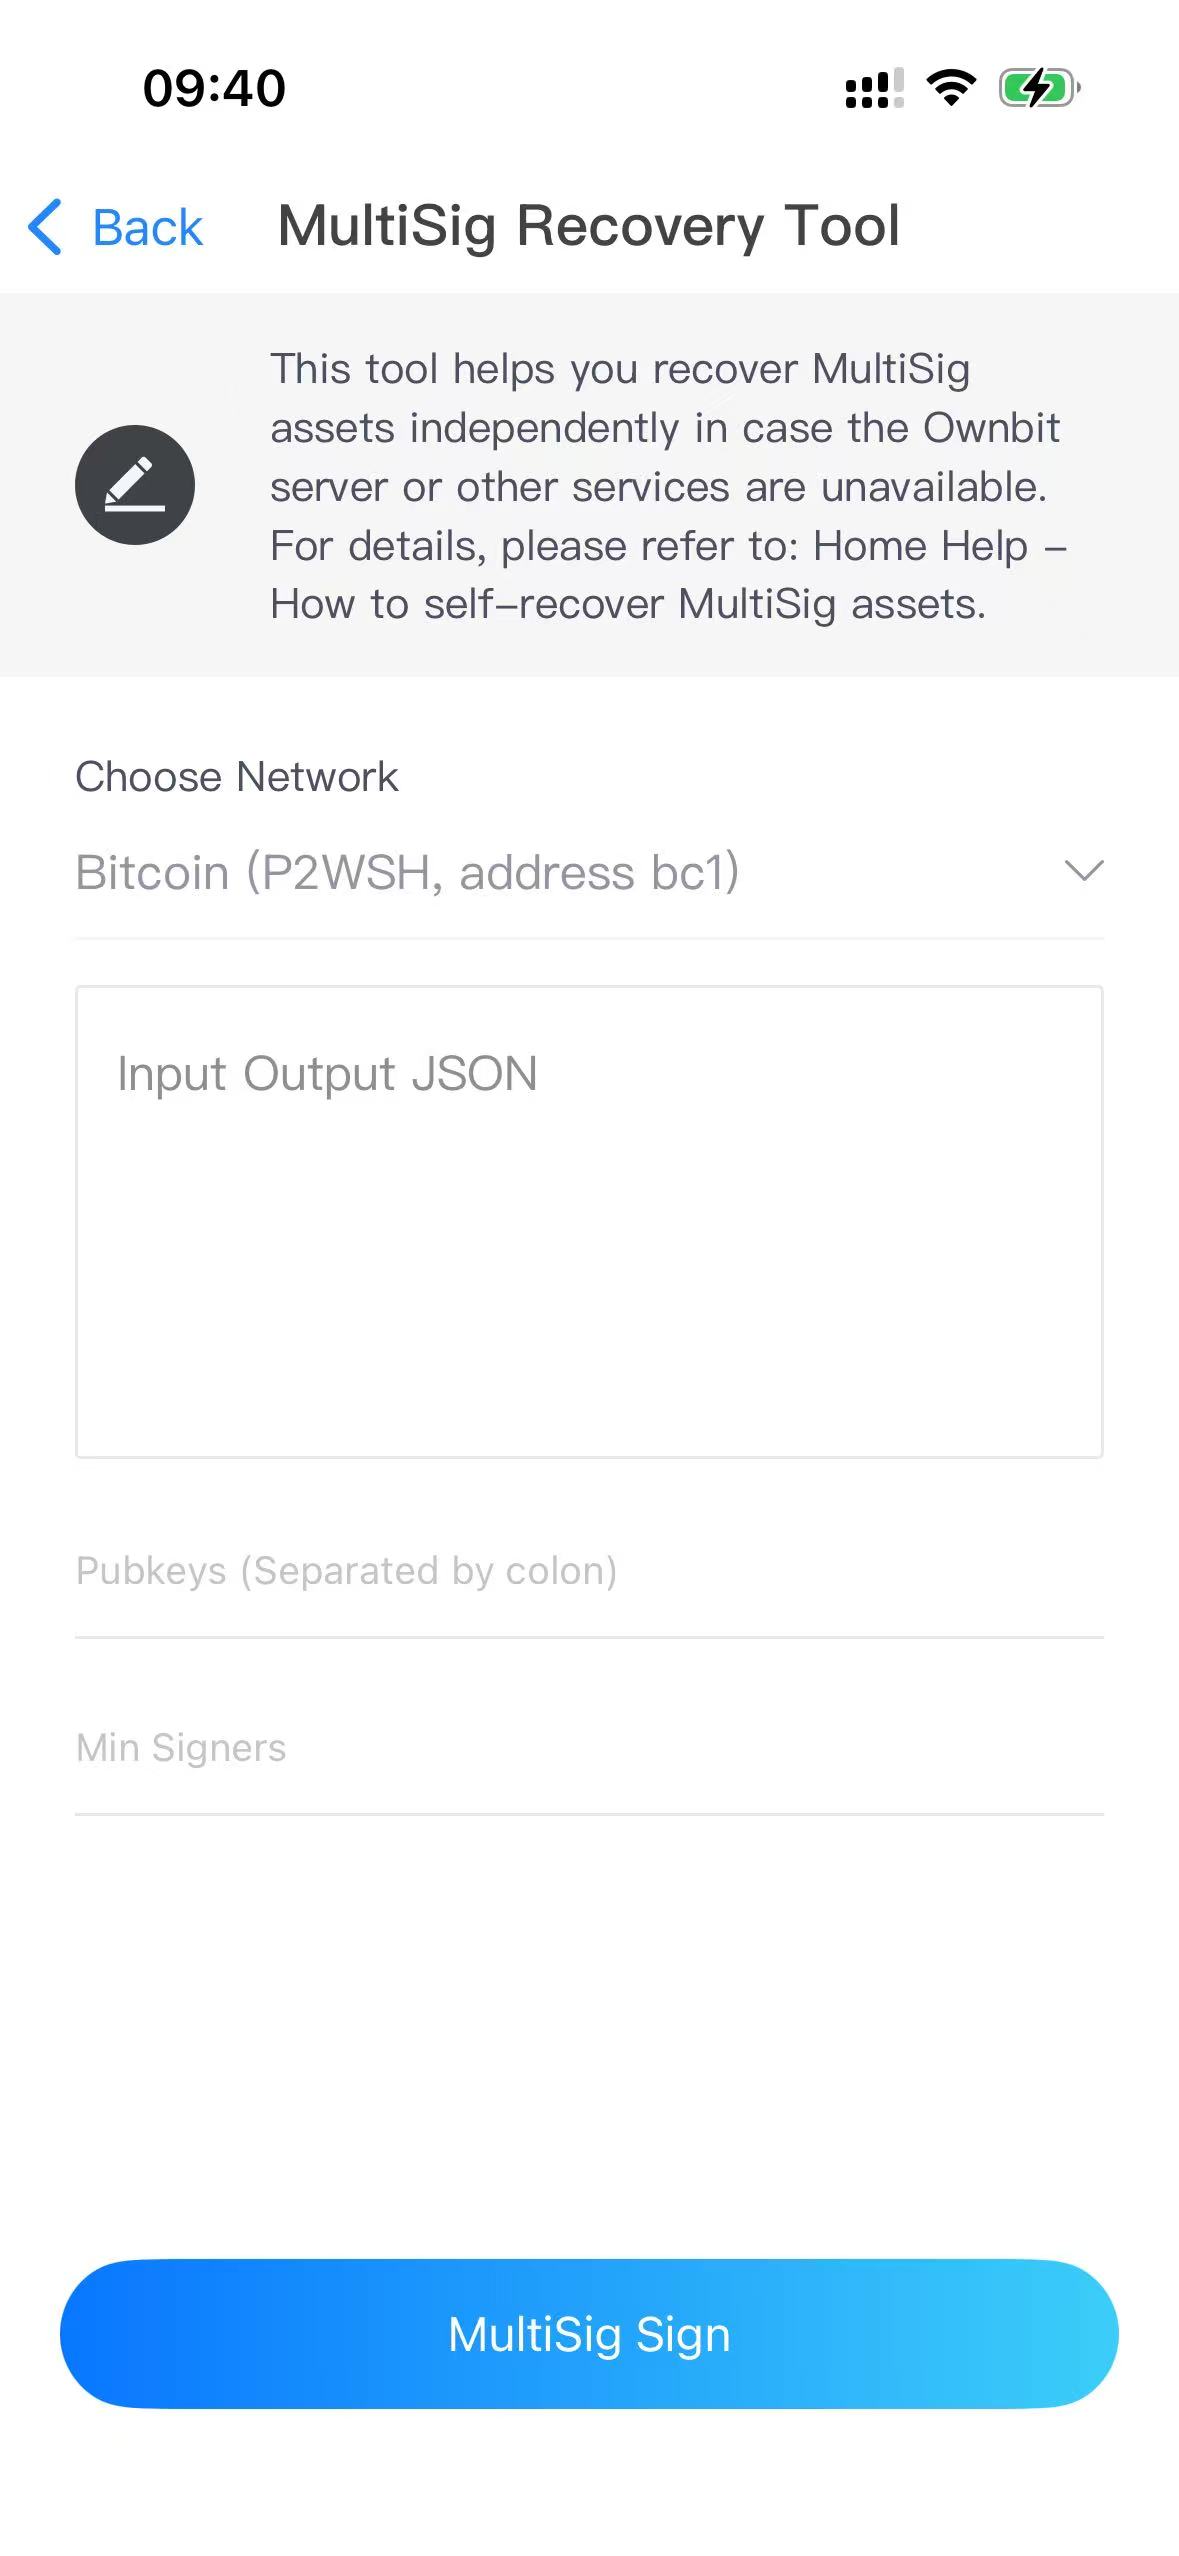
Parameter explanations are as follows:
| Parameter Name | Detailed Explanation |
|---|---|
| Network | Select the network, such as BTC with a bc1 or 3-address, or other chains like LTC, DOGE, etc. |
| Input Output JSON | The Input/Output JSON generated in Step 1 |
| Pubkeys | The Pubkeys generated in Step 3, separated by colons (:) |
| Min Singers | Minimum number of required signatures. For example, in a 2-of-3 multisig, the minimum is 2 |
Explanation of BTC multisig parameters.
e. Step five: Fill in the required fields and click the sign button to generate signatures.
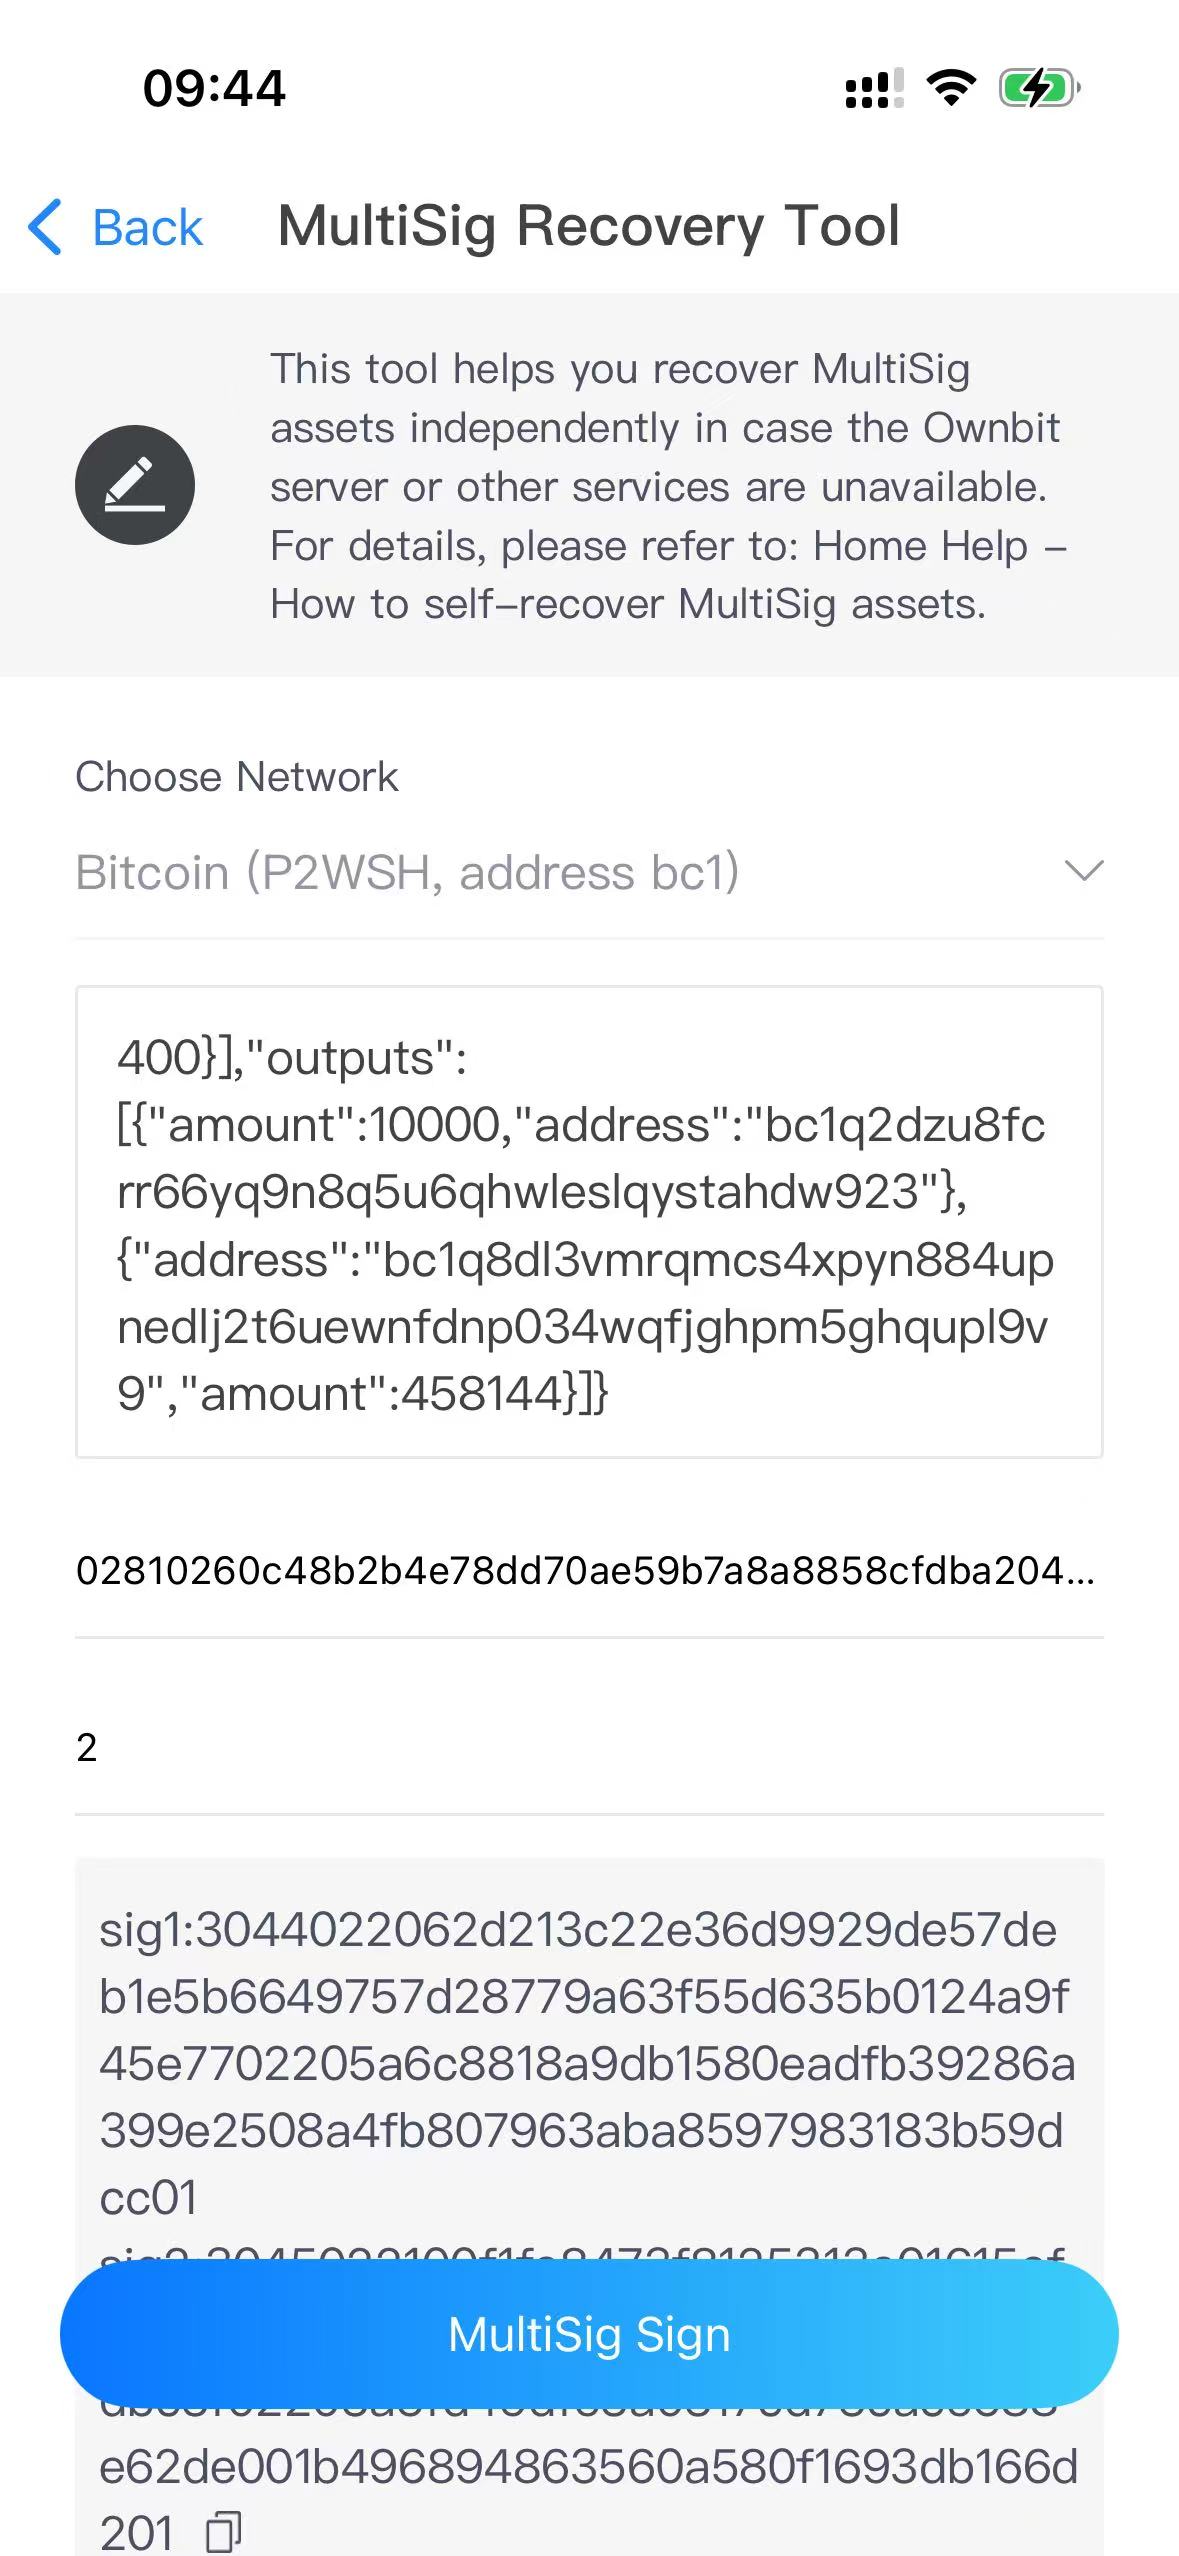
Note: The number of generated signatures corresponds to the number of inputs. For example, 2 inputs will result in 2 signatures.
f. Step six: Now you can assemble the transaction and generate the finalHex.
        const bitcoin = require('bitcoinjs-lib');
        const ecc = require('tiny-secp256k1');
        bitcoin.initEccLib(ecc);

        // Signatures (already obtained from users A + B)
        const sigs = {
          input0: [
            '3044022062d213c22e36d9929de57deb1e5b6649757d28779a63f55d635b0124a9f45e7702205a6c8818a9db1580eadfb39286a399e2508a4fb807963aba8597983183b59dcc01',
            '3044022041fa6e561e5906e03148b540d47f9bcf77d9b3505fcc15b0b0c51843cb359052022069ffd710386f5f2c968ce5e39715b8a0f3a9667f7486ab6cec08a2afd2bc874901'
          ],
          input1: [
            '3045022100f1fe8473f8125313e01615ef0db9b6b76dc5328ad2ace90905ce77948a2dbc3f02203a5fd49dfe3a0317cd73cace688e62de001b496894863560a580f1693db166d201',
            '3045022100ee8dea3f7a8c1333c4a0e8a2e59206cb495bd7ecbbfec7122dea32cb90a7f9210220117a280d11d45c71b90047b5a430e2ec0ab18fe24064c911ac61926fee0eb53601'
          ]
        };

        // Build 2-of-2 multisig script
        const pubkey1 = Buffer.from('02810260c48b2b4e78dd70ae59b7a8a8858cfdba204ea28896ff7a4de20e0c2514', 'hex');
        const pubkey2 = Buffer.from('032f7e05649fbf0278076ab1e936998eddc81417131ed55b07d42fa2aea43c25f4', 'hex');
        const multisig = bitcoin.payments.p2ms({ m: 2, pubkeys: [pubkey1, pubkey2] });
        const p2wsh = bitcoin.payments.p2wsh({ redeem: multisig });

        const tx = new bitcoin.Transaction();

        // Add input 0
        tx.addInput(
          Buffer.from('757ef70941ea9170cc918097630a7aa7e4c644e3f8d73a15ff1e98d321bf5b62', 'hex').reverse(),
          1,
          0xffffffff
        );

        // Add input 1
        tx.addInput(
          Buffer.from('637dfeda367f051d34228badfef09726f0893653fe8baebbe6e150ea68e756f3', 'hex').reverse(),
          2,
          0xffffffff
        );

        // Add output 0
        tx.addOutput(
          bitcoin.address.toOutputScript('bc1q2dzu8fcrr66yq9n8q5u6qhwleslqystahdw923', bitcoin.networks.bitcoin),
          10000
        );

        // Add output 1
        tx.addOutput(
          bitcoin.address.toOutputScript('bc1q8dl3vmrqmcs4xpyn884upnedlj2t6uewnfdnp034wqfjghpm5ghqupl9v9', bitcoin.networks.bitcoin),
          458144
        );

        // Set witness for each input
        [sigs.input0, sigs.input1].forEach((sigList, index) => {
          tx.setWitness(index, [
            Buffer.alloc(0),
            Buffer.from(sigList[0], 'hex'),
            Buffer.from(sigList[1], 'hex'),
            p2wsh.redeem.output
          ]);
        });

        // Output final hex
        const finalHex = tx.toHex();
        console.log('Final Transaction Hex:\n', finalHex);
g. Step seven: Broadcast the finalHex to the network to spend the multisig funds. Example:
        curl -X POST https://mempool.space/api/tx \
          -H "Content-Type: text/plain" \
          -d '<hex>'
Note: UTXO-based coins like LTC, DOGE follow a similar process to BTC, but the input/output JSON format is slightly different. Here's an LTC example:
        {
            "inputs": [{
                "vout": 1,
                "satoshis": 94960,
                "txid": "b830d41437f2f1cb3c5303c6626cc9762979bf88bd9bcfbb5a356150e86ef0ad"
            }],
            "outputs": [{
                "address": "LeDXT3evSeAQyCwa2b4ohjS9YxcV9dx7AC",
                "amount": 10000
            }, {
                "address": "MHosP5QAgWrqLGrEvYDRQVDxDohSoUsZA4",
                "amount": 79920
            }]
        }
UTXO-based coins like LTC use txid and vout instead of BTC’s txHash and index.
2. Recovering ETH/ERC20 Multisig Assets
a. Step one: User A opens the "Multisig Recovery Tool", selects the coin type: ETH, and enters the ETH multisig recovery page, as shown below:
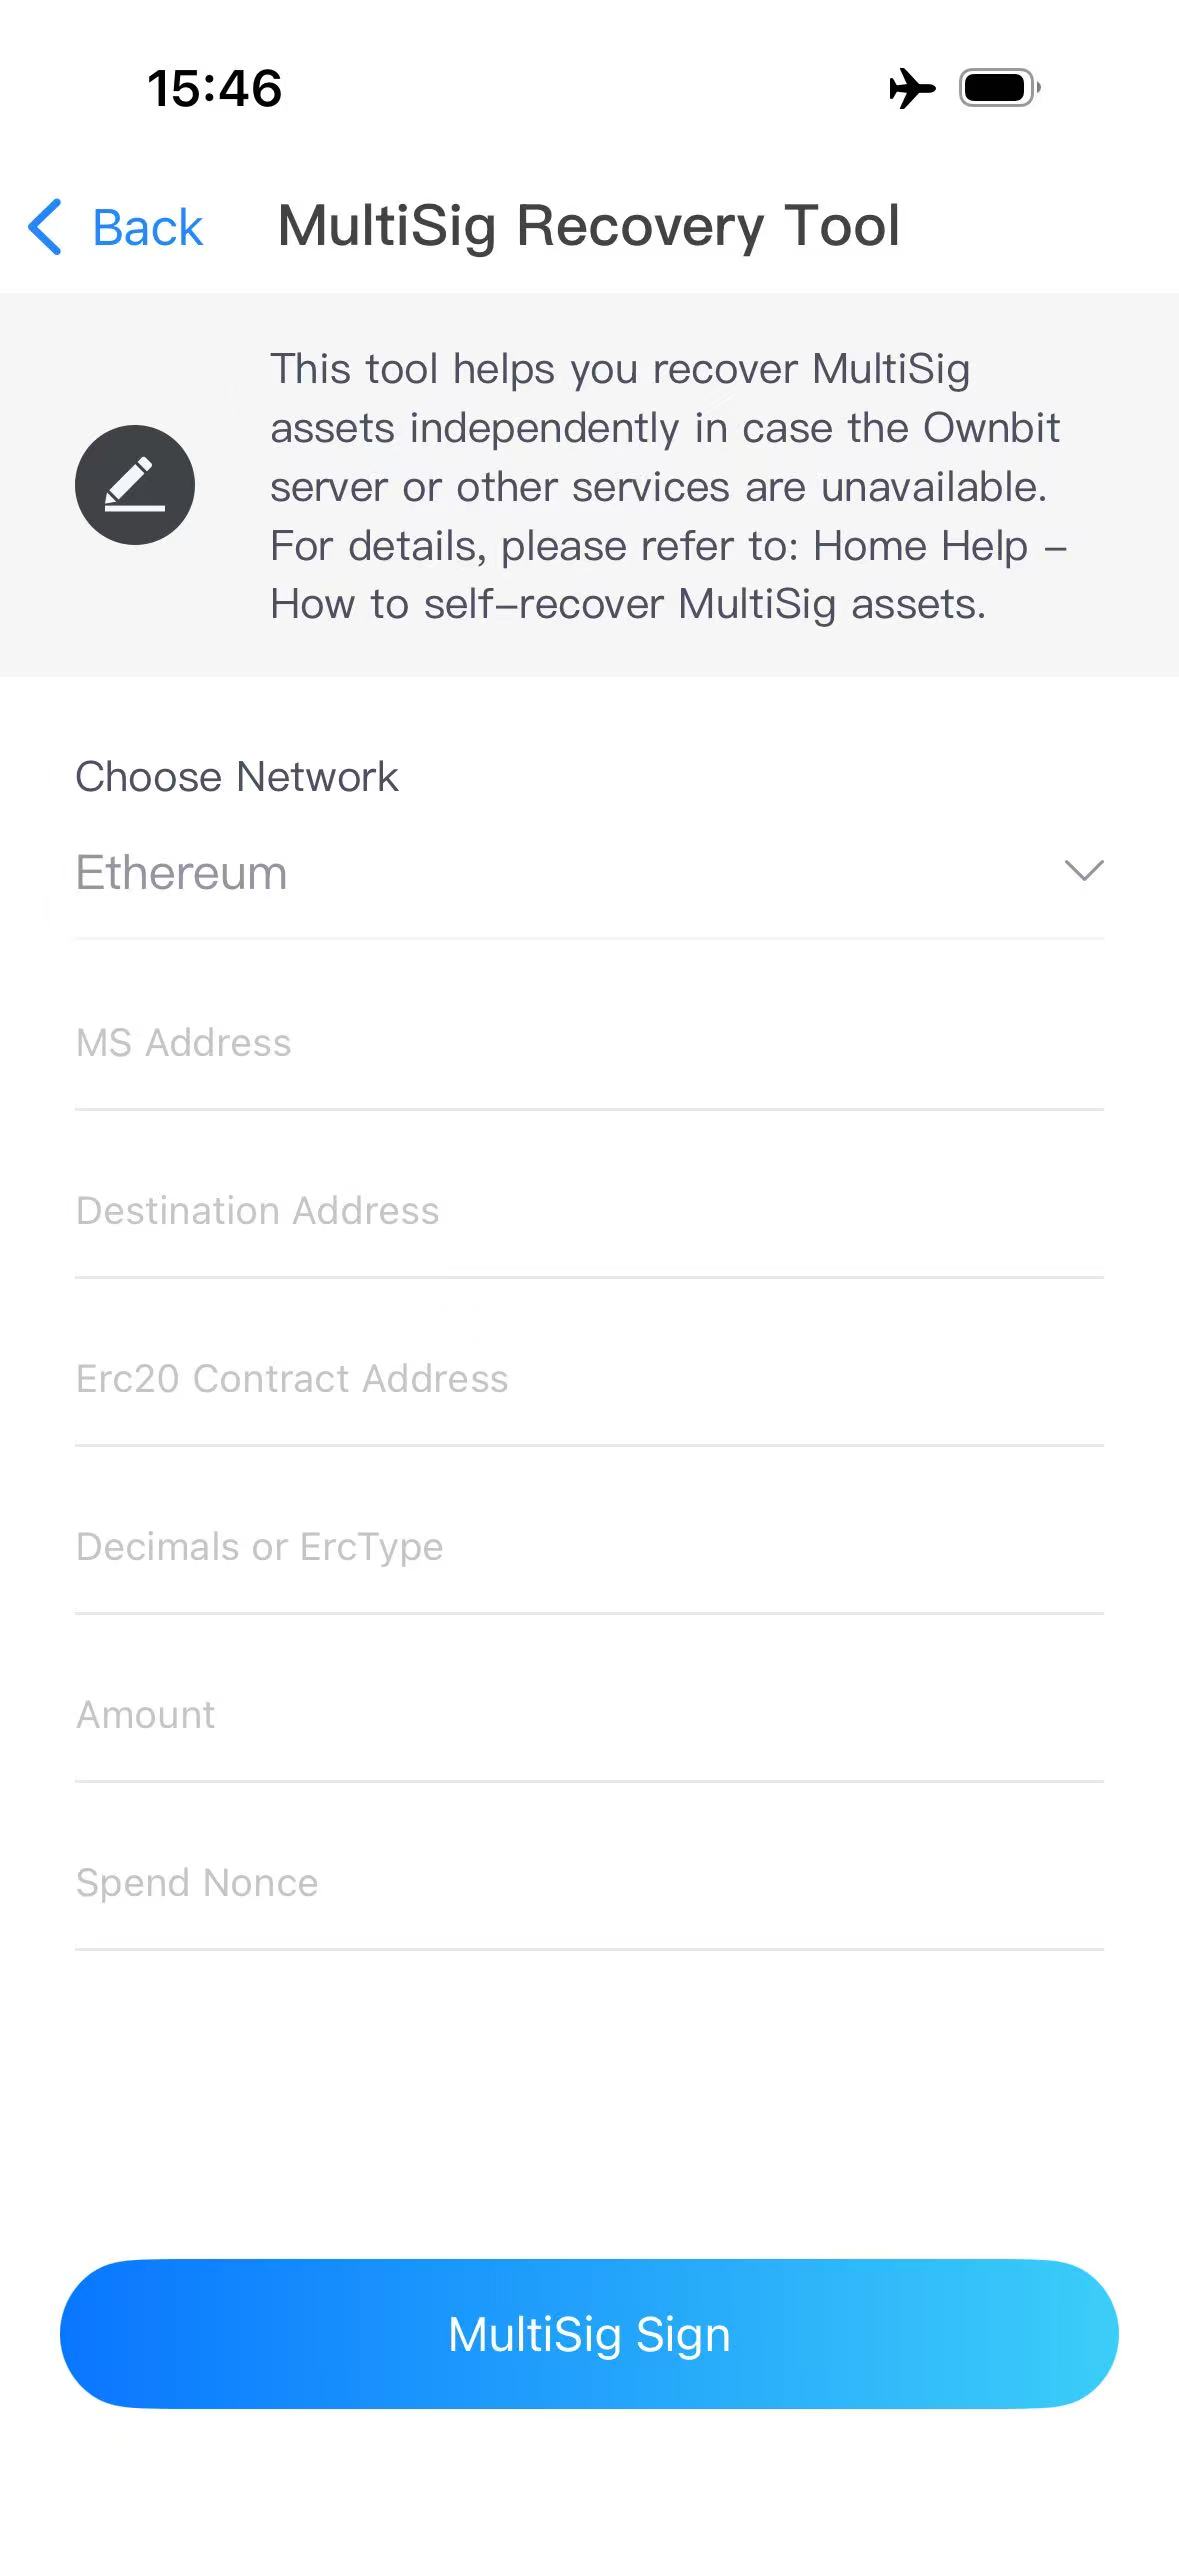
Fill in each field based on the type of asset you want to recover. Details are explained below:
| Parameter Name | Detailed Explanation |
|---|---|
| Network | Select the network your multisig address belongs to: Ethereum, BNB Smart Chain, Base, etc. |
| MS Address | The multisig address from which you want to recover assets |
| Destination | The address you want to send the recovered assets to |
| Erc20 Contract Address | For ETH transfers, enter: 0x0 |
| Decimals or ErcType | For ETH transfers, enter: 18 |
| Amount | Enter the amount to send, for example: 1.2 (meaning 1.2 ETH) |
| Spend Nonce | Enter the current spend nonce of your multisig address. Instructions on how to obtain it are below |
Explanation of ETH transaction parameters.
b. Step two: Obtain the Spend Nonce: The Spend Nonce represents how many times your multisig address has attempted to send transactions (failed transactions are also counted). You can obtain it in two ways: 1. Count the transactions sent from your multisig address using a block explorer. 2. Use an RPC call to retrieve it, as shown below:
% curl -X POST https://mainnet.infura.io/v3/your_api_key \
    -H "Content-Type: application/json" \
    -d '{
           "jsonrpc":"2.0",
           "method":"eth_call",
           "params":[
             {
               "to": "0xD0BF699Fb29810bB58b5F6EDb482227b529Dfc5a",
               "data": "0xc6a2a9f1"
             },
             "latest"
           ],
           "id":1
    }'
    {"jsonrpc":"2.0","id":1,"result":"0x0000000000000000000000000000000000000000000000000000000000000016"}
The result returned is in hexadecimal and needs to be converted to decimal. For example, 0016 becomes: 22.
When sending ERC20 tokens, fill in the parameters as follows:
| Parameter Name | Detailed Explanation |
|---|---|
| Network | Select the appropriate network for your multisig: Ethereum, BNB Smart Chain, Base, etc. |
| MS Address | The multisig address you want to recover assets from |
| Destination | The address where you want to send the assets |
| Erc20 Contract Address | The corresponding ERC20 contract address. For example, USDT: 0xdac17f95...3d831ec7 |
| Decimals or ErcType | Each ERC20 token has its own decimals. For example, USDT has 6. You can find this on etherscan.io |
| Amount | Enter the amount to send, e.g., 1.2 (meaning 1.2 USDT) |
| Spend Nonce | See explanation above |
Explanation of parameters when sending ERC20 tokens.
When sending NFTs (ERC721/ERC1155), fill in the parameters as follows:
| Parameter Name | Detailed Explanation |
|---|---|
| Network | Select the appropriate network for your multisig: Ethereum, BNB Smart Chain, Base, etc. |
| MS Address | The multisig address you want to recover assets from |
| Destination | The address where you want to send the assets |
| Erc20 Contract Address | Use contractAddress_tokenId format, separated by an underscore (_), e.g.: 0xfcad2...009f7b_0x0000...00b9e |
| Decimals or ErcType | Use 1 for ERC721 and 2 for ERC1155 |
| Amount | Enter the quantity to send, e.g., 1 |
| Spend Nonce | See explanation above |
Explanation of parameters when sending ERC721/ERC1155 NFTs.
c. Step three: After filling in the information, click the sign button to generate your signature (r, s, v), as shown below:
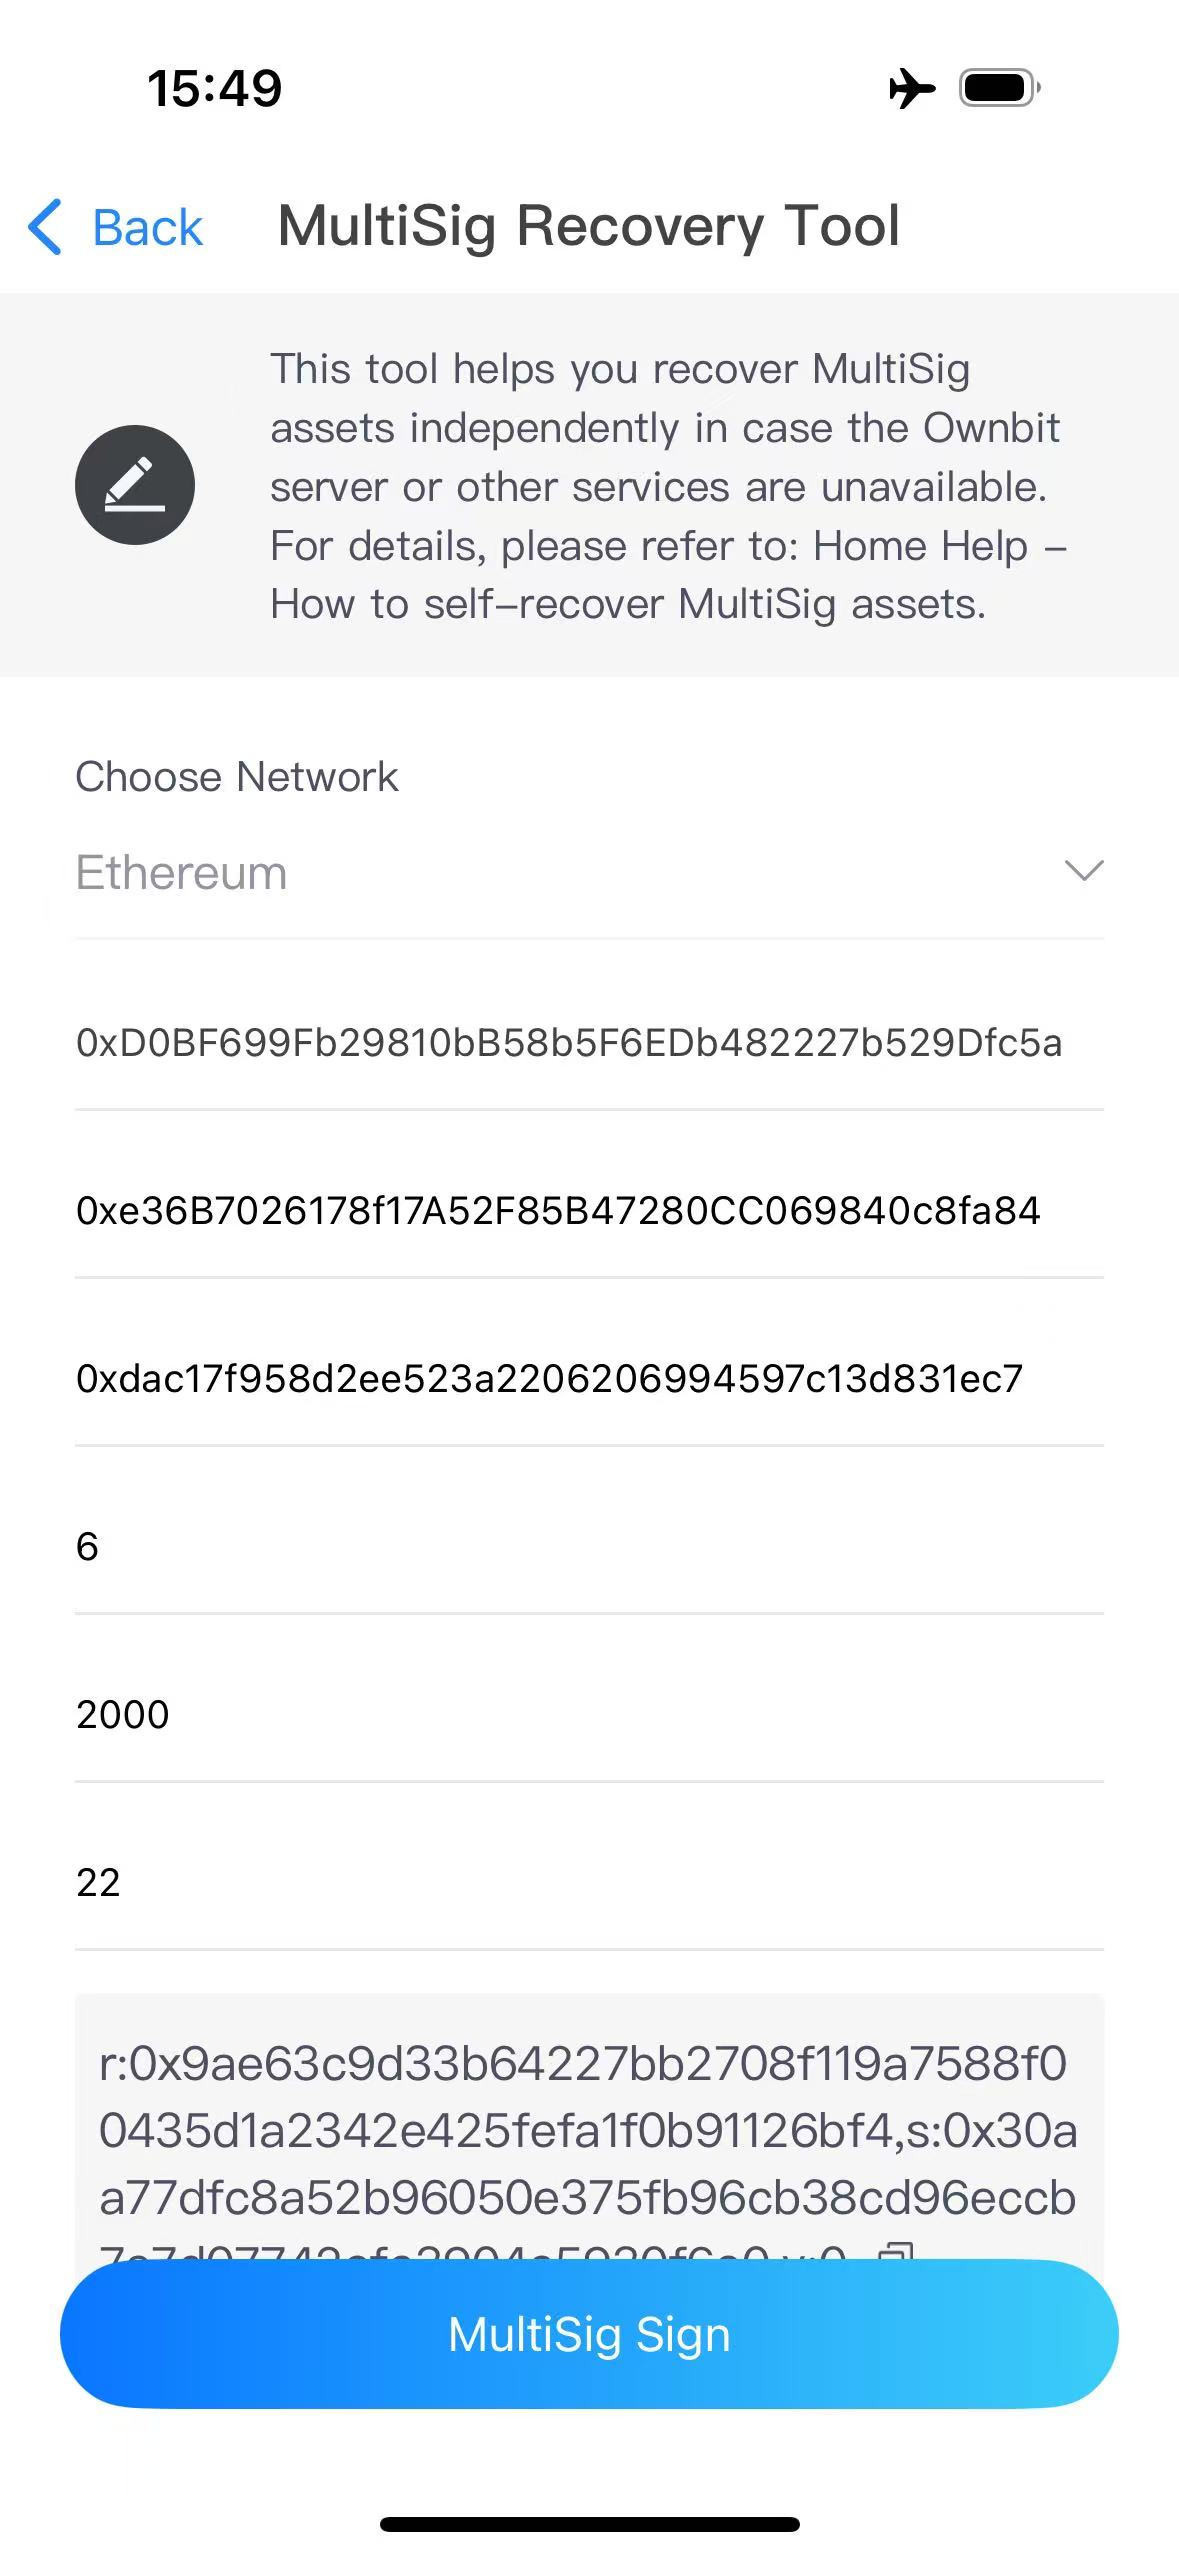
d. Step four: Repeat the same process on User B’s device to generate B’s signature (r, s, v). Make sure that all values entered by B are exactly the same as those entered by A. Now you have two sets of signatures (r, s, v), and you can proceed to call the multisig contract to spend the assets.
Next, we will call the spend method to complete the multisig transaction. The function structure is as follows:
//destination is the receiver address for sending ether,  or an ERC20 contract address for sending ERC20.
//value is the wei to be trasnferred to the destination, when sending ERC20 value should be 0.
//data for transfer ether: 0x
//data for transfer erc20 example: 0xa9059cbb000000000000000000000000ac6342a7efb995d63cc91db49f6023e95873d25000000000000000000000000000000000000000000000000000000000000003e8
//data for transfer erc721 example: 0x42842e0e00000000000000000000000097b65ad59c8c96f2dd786751e6279a1a6d34a4810000000000000000000000006cb33e7179860d24635c66850f1f6a5d4f8eee6d0000000000000000000000000000000000000000000000000000000000042134
//data can contain any data to be executed.

function spend(address destination, uint256 value, uint8[] memory vs, bytes32[] memory rs, bytes32[] memory ss, bytes calldata data) external {
    require(destination != address(this), "Not allow sending to yourself");
    require(_validSignature(destination, value, vs, rs, ss, data), "invalid signatures");
    spendNonce = spendNonce + 1;
    //transfer tokens from this contract to the destination address
    (bool sent,) = destination.call{value: value}(data);
    if (sent) {
        emit Spent(destination, value);
    }
}
e. Step five: Based on the two sets of (r, s, v) you already have, you can construct the calldata required for the spend method. Below is an example of how to do it in code:
        const Web3 = require("web3");
        const web3 = new Web3();

        const abi = [{
          "name": "spend",
          "type": "function",
          "inputs": [
            { "name": "destination", "type": "address" },
            { "name": "value", "type": "uint256" },
            { "name": "vs", "type": "uint8[]" },
            { "name": "rs", "type": "bytes32[]" },
            { "name": "ss", "type": "bytes32[]" },
            { "name": "data", "type": "bytes" }
          ]
        }];

        const contract = new web3.eth.Contract(abi);
        const calldata = contract.methods.spend(
          "0xdac17f958d2ee523a2206206994597c13d831ec7", //destination
          "0", //ether-value
          [1, 1], //vs
          [
            "0xaca5025bd6d2fcd3308aa3589ea7aa419ef67914275ce7be80558584232554f9",
            "0x9028a9e0fee249f874d747c0c082b1b9cdde12505cea47a2e8cc19b567c3fea8" //rs
          ],
          [
            "0x3a12af0ee1354b709b5312db6976150fc7ebc74f6f94404005593290c6322e26",
            "0x310e7534a5a0a7e71566c14462c10cf2022c966a390d0edd144895c0c032d599" //ss
          ],
          "0xa9059cbb000000000000000000000000e36b7026178f17a52f85b47280cc069840c8fa840000000000000000000000000000000000000000000000000000000077359400" //inner-calldata
        ).encodeABI();

        console.log(calldata);
Constructing calldata for ERC20 spend
Constructing calldata for ETH spend is similar. Just replace the ether-value with the appropriate value and set the inner-calldata to 0x0.
f. Step six: After generating the calldata, you can send any ETH transaction with the calldata set as the hexdata of the transaction. Once broadcasted, the multisig spend will take effect.
Note: The recovery process for other EVM networks (such as BSC, BASE) is the same as for ETH.
3. Recovering TRX/TRC20 Multisig Assets
a. Step one: Generate the txJson for the transaction to be sent. Here is an example code snippet:
        const TronWeb = require('tronweb');

        const tronWeb = new TronWeb({
          fullHost: 'https://api.trongrid.io'
        });

        (async () => {
          const from = 'TXeDpnE...';
          const to = 'TQwbMLM...';
          const contract = 'TR7NHqjeKQxGTCi8q8ZY4pL8otSzgjLj6t'; // USDT TRC20
          const amount = 2000000000; // 2000 USDT (6 decimals)
          const feeLimit = 15000000;

          const functionSelector = 'transfer(address,uint256)';
          const parameter = [
            { type: 'address', value: to },
            { type: 'uint256', value: amount }
          ];

          const options = {
            feeLimit,
            callValue: 0,
            shouldPollResponse: false
          };

          const tx = await tronWeb.transactionBuilder.triggerSmartContract(
            contract,
            functionSelector,
            options,
            parameter,
            from
          );

          const txJson = JSON.stringify(tx.transaction);
          console.log(txJson);
        })();
Generating txJson for Sending TRC20 Transactions
        const TronWeb = require('tronweb');

        const tronWeb = new TronWeb({
          fullHost: 'https://api.trongrid.io'
        });

        (async () => {
          const from = 'TXeDpnE...';
          const to = 'TQwbMLM...';
          const amount = 2_000_000; // 2 TRX

          const tx = await tronWeb.transactionBuilder.sendTrx(to, amount, from);

          const txJson = JSON.stringify(tx);
          console.log(txJson);
        })();
Generating txJson for Sending TRX Transactions
Tip: The default expiration time in the generated txJson is relatively short. It's recommended to extend the expiration time slightly to avoid the transaction expiring before it's broadcasted.
b. Step two: On both User A and User B's phones, open the Multisig Recovery Tool – TRX. Enter the txJson and tap the sign button to generate their respective signatures. As shown below:
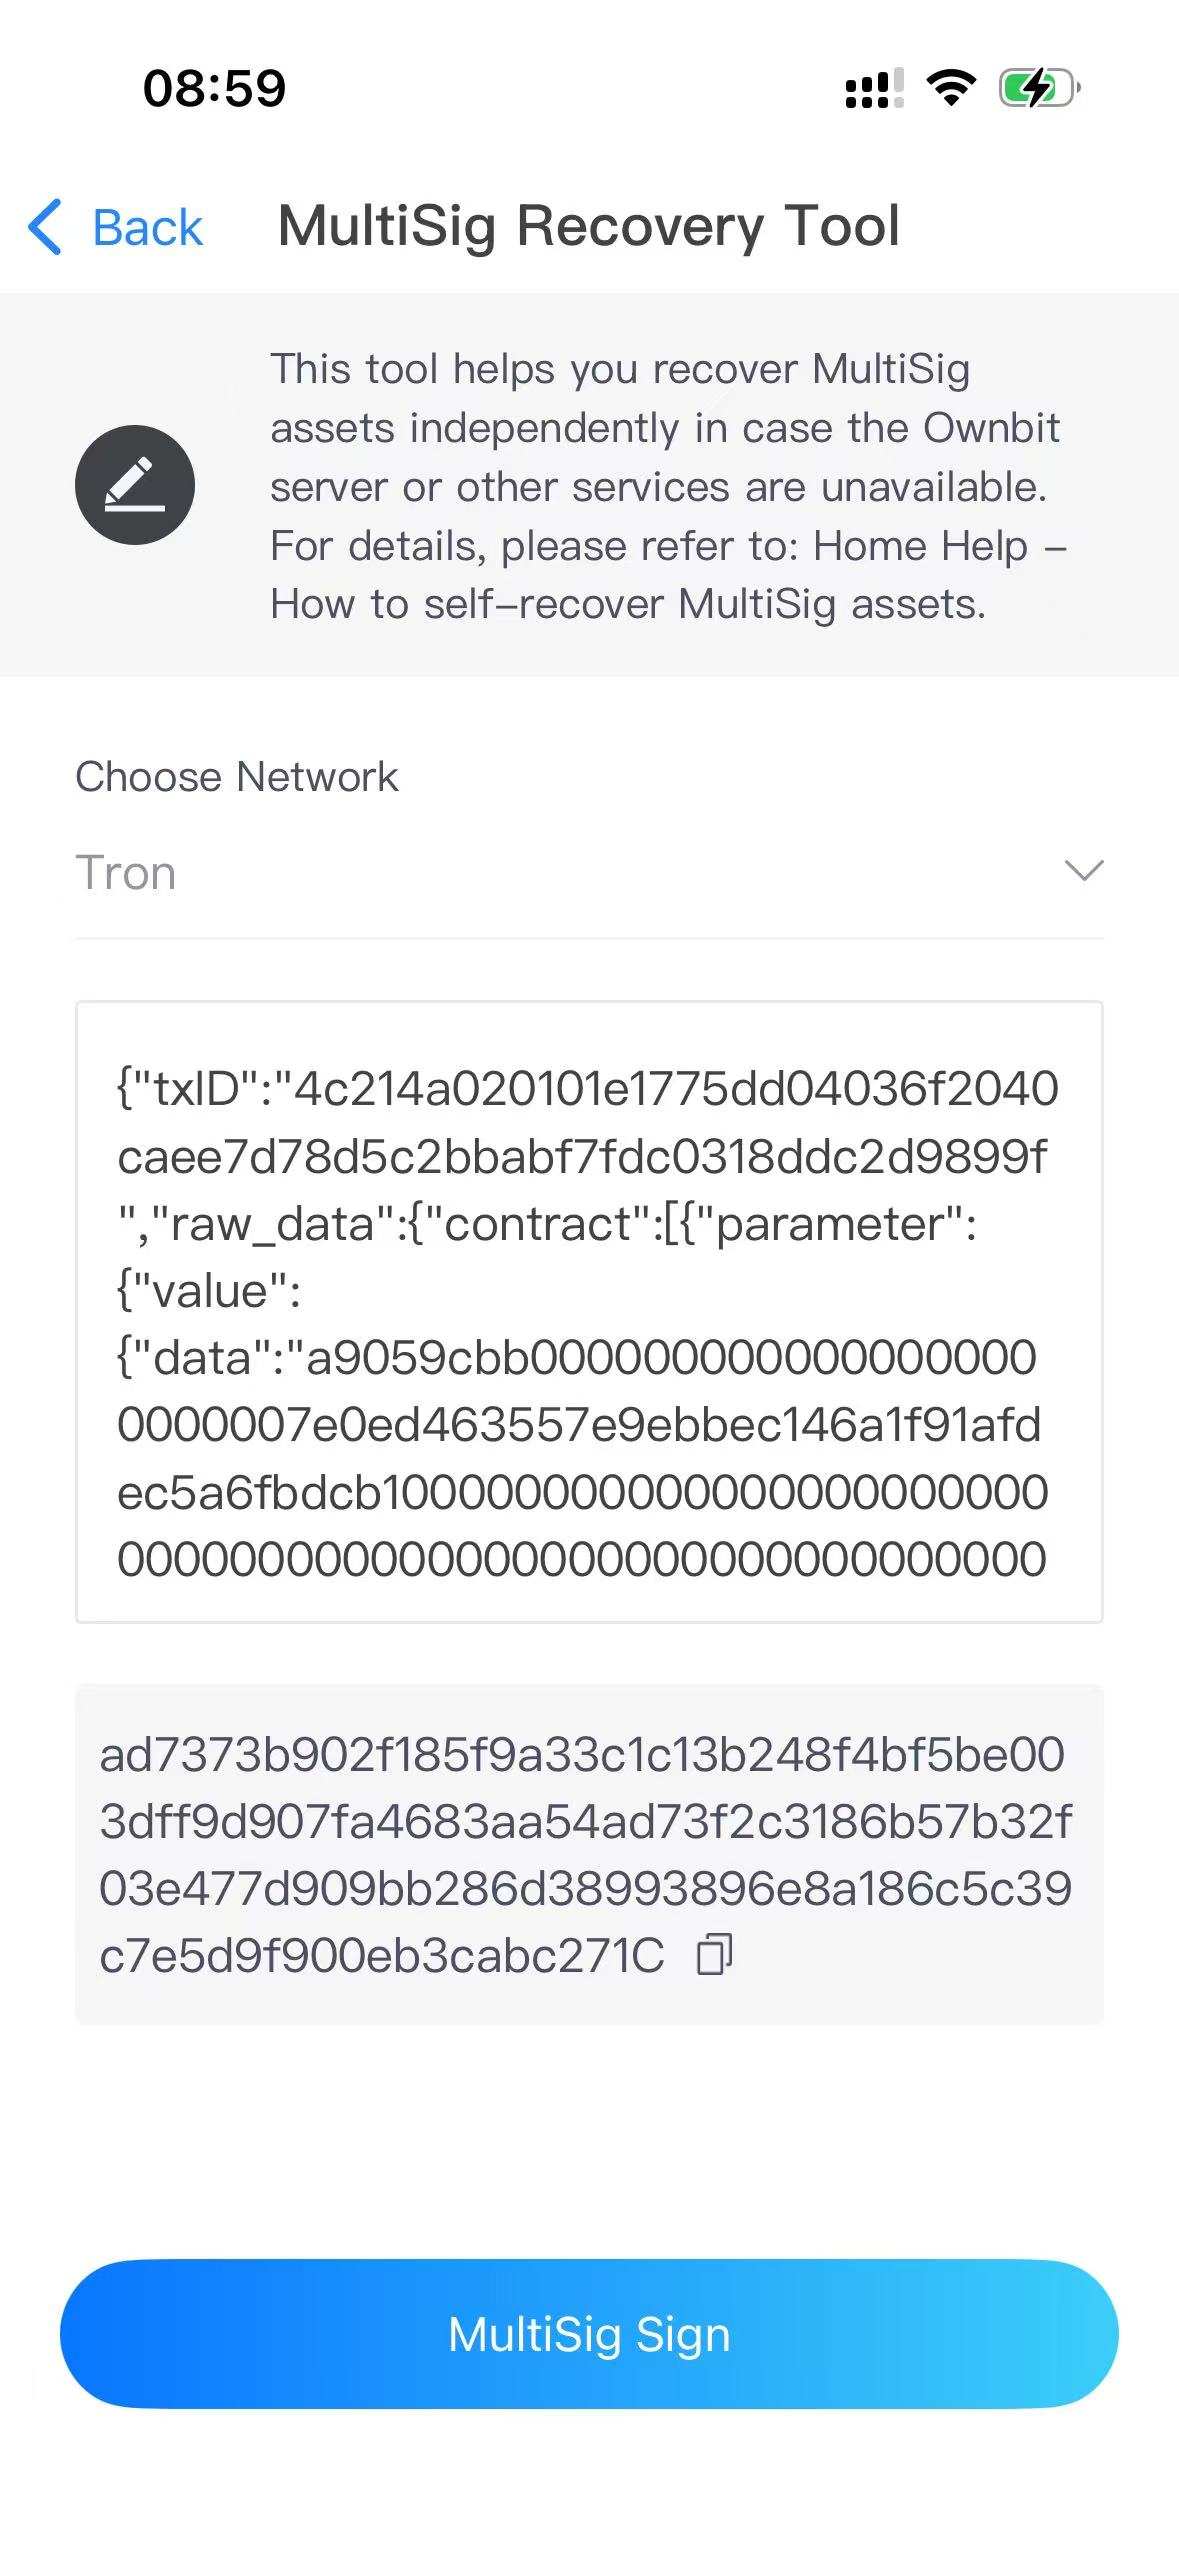
c. Step three: Add the obtained signatures to the signature field of the txJson. This completes the txJson and makes it ready to be broadcasted to the TRON network. Example:
        {
          "txID": "4c214a020101e1775dd04036f2040caee7d78d5c2bbabf7fdc0318ddc2d9899f",
          "raw_data": {
            "contract": [...],
            "ref_block_bytes": "...",
            ...
          },
          "raw_data_hex": "...",
          "visible": false,
          "signature": [
            "ad7373b902f185f9a33c1c13b248f4bf5be003dff9d907fa4683aa54ad73f2c3186b57b32f03e477d909bb286d38993896e8a186c5c39c7e5d9f900eb3cabc271c",
            "cf310bb59e38e7edd00d1e6ab6ac216b3ab80ba6ce2db140456744cce6b7ed610d599330669ca98ddf05e4211d02c54ff0e033cd28f82680ba8d50b9baf03b831b"
          ]
        }
4. Step four: Broadcast the complete txJson to the TRON network to finalize the multisig transaction.
4. Recover SOL/SPL MultiSig assets
a. Generate the SOL address and private key required for signature of each participant through the MultiSig walelt mnemonic (generation path: m/44'/501'/0'/0').
b. In MultiSig Wallet -> MultiSig Page -> Menu "MultiSig details", get the /multisig data/ value (this is the multisig data account to be used in the contract call process.
c. When you have the MultiSig address (multisigPda), multisig data account, and the SOL address and signature private key of each participant, you can call it according to the Ownbit multi-signature source code to spend multi-signature assets. The MultiSig source code address is: https://github.com/bitbill/ownbit-multisig-contracts.
d. A complete call process: first any participant sends a call to create_transaction, and then other participants call approve. When enough people are reached, any party sends a call to execute_transaction.